You are using an out of date browser. It may not display this or other websites correctly.
You should upgrade or use an alternative browser.
You should upgrade or use an alternative browser.
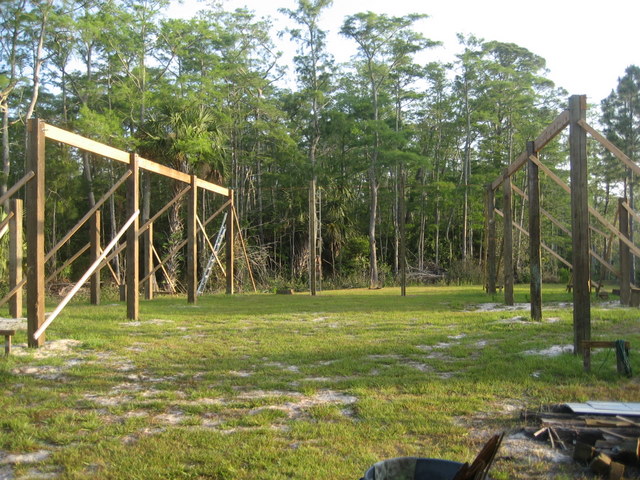
Finally started pole barn - 40x50
- Thread starter cowpen
- Start date
- Views: 83477
More options
Who Replied?
/ Finally started pole barn - 40x50
#21
charlz
Elite Member
Nice! I'd rent a boom truck or something that can suspend them into place. The time and effort savings would be well worth the rental fee. Just have everything and a couple buddies ready to go so you get it done with minimal rental fees.
weldingisfun
Veteran Member
- Joined
- Dec 12, 2006
- Messages
- 1,825
- Location
- West Bell County, Texas
- Tractor
- Mahindra 4500 4WD w/FEL, and Scotts S2048 lawn tractor
Any idea what the trusses weigh? If they can be lifted from one end by one man, I have a suggestion. It has worked for me. But, first try to lift one.
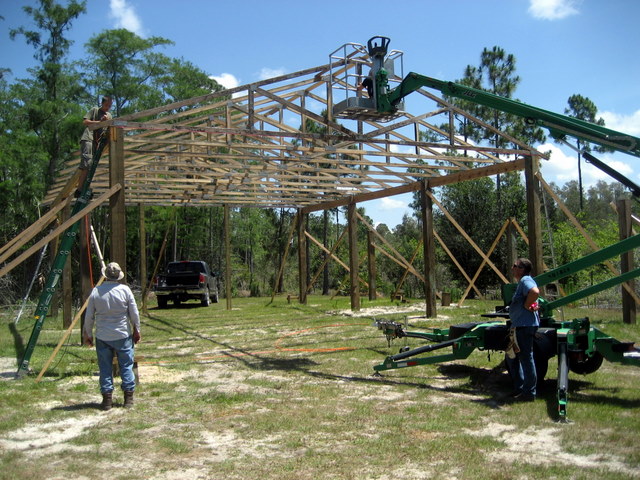
So I decided to rent one of those tow-behind man lifts. They have a 500lb capacity which will be plenty for me and a truss tied off to the side of the cage. It worked perfectly.
My truss-setting crew consisted of myself, my wife, son, daughter, and 81 year old father-in-law! He's built a few barns over the years, so he as excited about the barn as I am.
Here's the first truss going up.
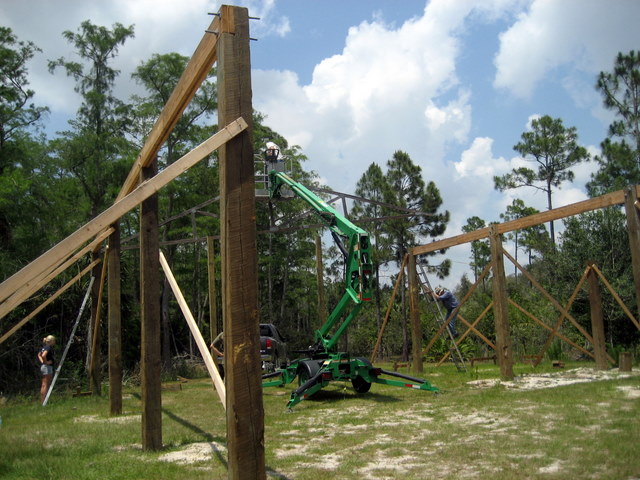
My truss-setting crew consisted of myself, my wife, son, daughter, and 81 year old father-in-law!
He's built a few barns over the years, so he as excited about the barn as I am. Here's the first truss going up.
Once we got the first truss up and braced, the others fell into place quickly. I made a jig to hold the top of the truss on 4 foot centers.
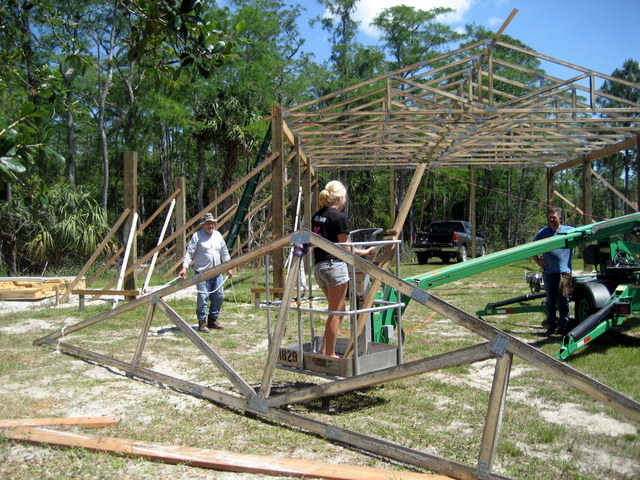
The kids took turns hauling trusses up with the lift while their Papa and I toenailed the tails to the beams. Here's my daughter taking up the last truss while I ran the bucket with the ground controls.
My son toenailing in the last truss. He knows how to swing a hammer pretty well, but the palm nailer's a lot more fun.
I didn't know it until later, but while we were nailing the last truss, my daughter was carving her initials in it.
I asked her, "isn't that kind of like hiking your leg to mark your territory?" She failed to see the humor. '"Uggh! that's Gross! Dad!"
Seriously though, involving the kids in projects like this is always a pleasure for me. It gives them a sense of ownership in the final outcome and brings the family closer in the process. I think I've also succeeded in convincing them to study hard so they can do this for fun rather than make a living at it (not that that's a bad thing).
weldingisfun said:Any idea what the trusses weigh? If they can be lifted from one end by one man, I have a suggestion. It has worked for me. But, first try to lift one.
The trusses are 2x4 hard yellow pine which I thought would be pretty heavy. But after I broke the bundle and lifted one, I found it was surprisingly light. I could lift one myself pretty easily. I probably could have managed without renting the man-lift, but it only cost about $240 for the day and it kinda made the whole ordeal a little more fun.
The next Saturday, my brother in law came over and we set 2x4 purlins over the trusses. The final overhang will be 2' all around, so we hung the 2x4's roughly 2' over the gable ends. The "rough" measurement would bite me later, but I'll get to that in another post.
One of my friends who's a contractor suggested that I place the purlin sections so they end between trusses rather than on top of a truss. Then just scab a 2 foot length of 2x4 to the bottom of both ends to tie them together. The logic is that the junction will be stronger because you're not nailing so close to the endgrain of the 2x4's. I did that, but I'm not sure if I'd do it that way again. The scabs were a pain to nail in, and I'm not convinced it's all that much stronger.
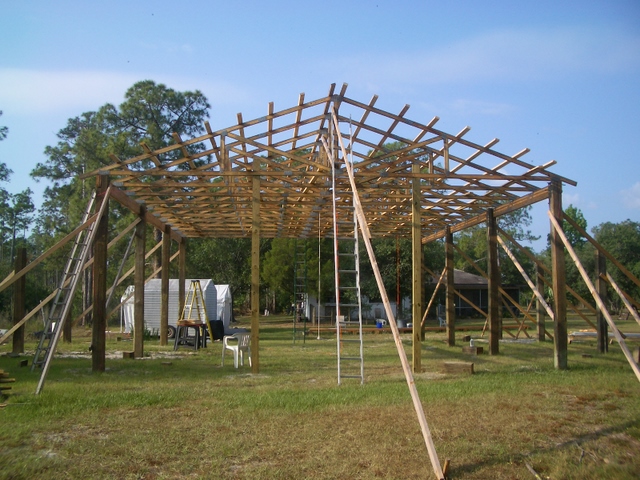
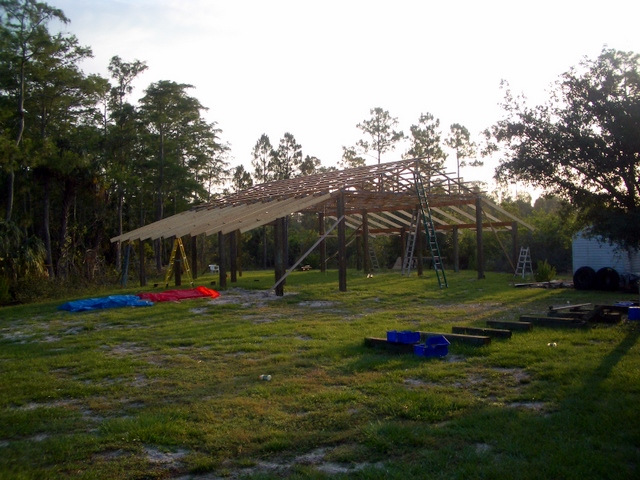
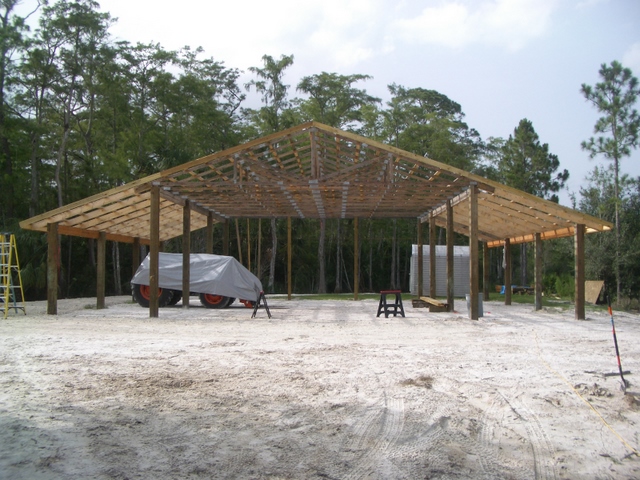
The trussed section of the barn is mostly done here and I'm ready to start setting the beams for the two shed roof sections.
One of my friends who's a contractor suggested that I place the purlin sections so they end between trusses rather than on top of a truss. Then just scab a 2 foot length of 2x4 to the bottom of both ends to tie them together. The logic is that the junction will be stronger because you're not nailing so close to the endgrain of the 2x4's. I did that, but I'm not sure if I'd do it that way again. The scabs were a pain to nail in, and I'm not convinced it's all that much stronger.
The trussed section of the barn is mostly done here and I'm ready to start setting the beams for the two shed roof sections.
Once the trusses were stabilized with purlins, it was time to set the 40' double 2x8 beams for the shed rafters. Unfortunately, my buddy's tractor wasn't available, so I had to figure something else out. What I came up with was this elaborate series of ropes, pulleys, straps, and a makeshift gin pole to hoist the heavy beams up by hand.
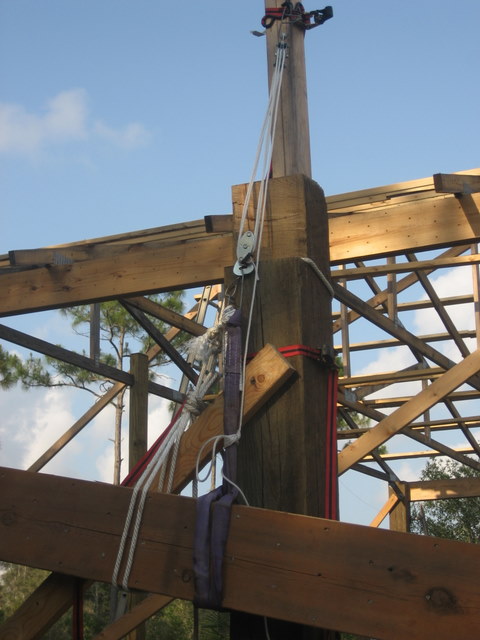
The plan was simple; hoist a little, tie off, snub the ropes up, and hoist again. So, I'm up an 8 foot ladder beside the pole, hauling up on the block and tackle when the rope gives way - very suddenly. This was a completely unexpected development.
Since time tends to stand still during these kind of events, I had time to cuss the rope (and myself) on the way down. I'm sure the backflip off the ladder looked perfectly graceful, but I was certain that this was going to hurt... BAD. I wondered what the ambulance ride would be like? Would I be airlifted? Would anyone besides my mother come to my funeral? I hit the ground flat on my back, braced for the pain. Guess what? It didn't hurt. Don't ask me why, but I was fine. I've had worse falling off a barstool!
Anyways, after giving thanks for great fortune, I proceeded to ditch the mechanical solution and go for the brute strength approach. I lifted the beam shoulder high while my son backed the pickup under it. Then I got in the bed and managed to get it high enough to catch the notch on the pole. Repeat on the other end and the job was done.
I'll be glad when I have my own tractor.
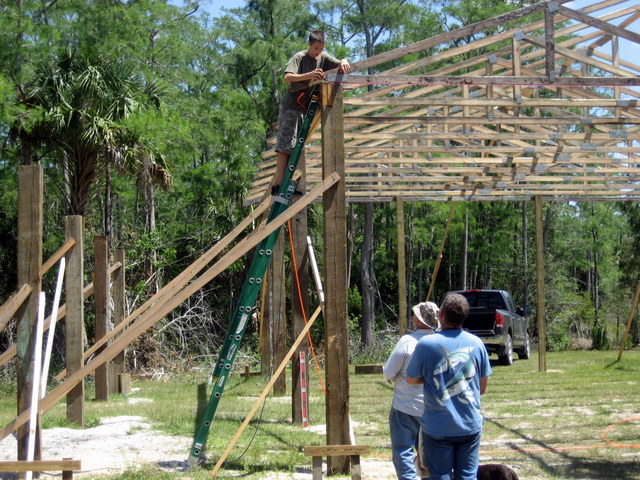
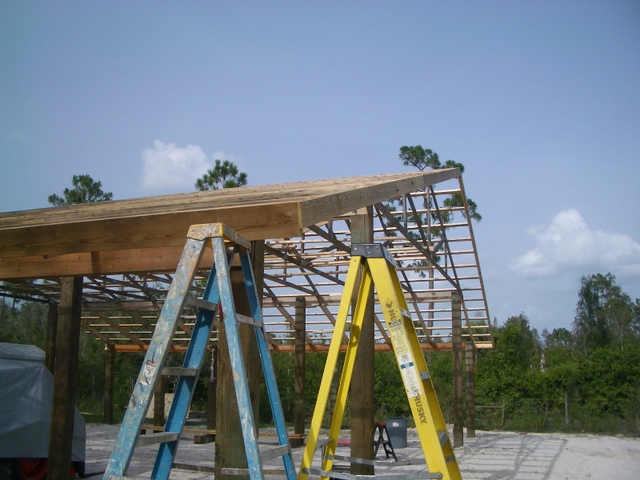
With the shed beams completed on both sides it was time to set the rafters. The 2x8 rafters are basically a continuation of the truss tails. I bought Simpson hangers for this, but failed to realize that the truss tails would be in the way. So, instead I toenailed to the truss beams and nailed through the rafter and into the tails on 2.5" centers. On the outside beams, I made birdsmouth cuts and tied the rafters down with hurricane clips.
I decided that scabbing onto the trusses at the gable ends wouldn't look so hot, and would present other challenges for siding. Instead, I notched out the rafters so that the truss tail fit flush, and then glued and nailed a plywood mending plate on both sides. This shot kinda shows the details.

I decided that scabbing onto the trusses at the gable ends wouldn't look so hot, and would present other challenges for siding. Instead, I notched out the rafters so that the truss tail fit flush, and then glued and nailed a plywood mending plate on both sides. This shot kinda shows the details.
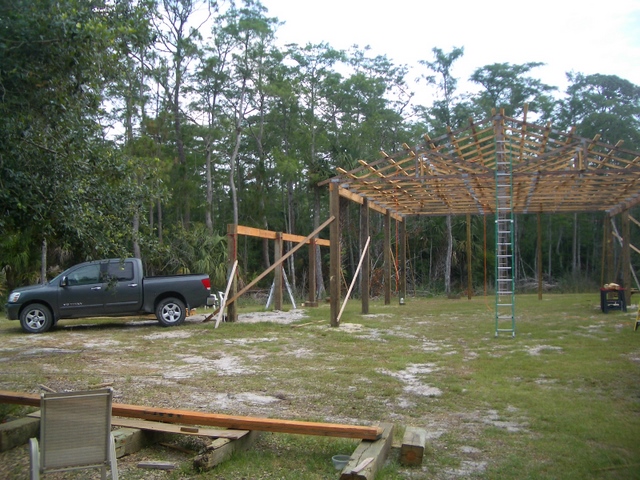
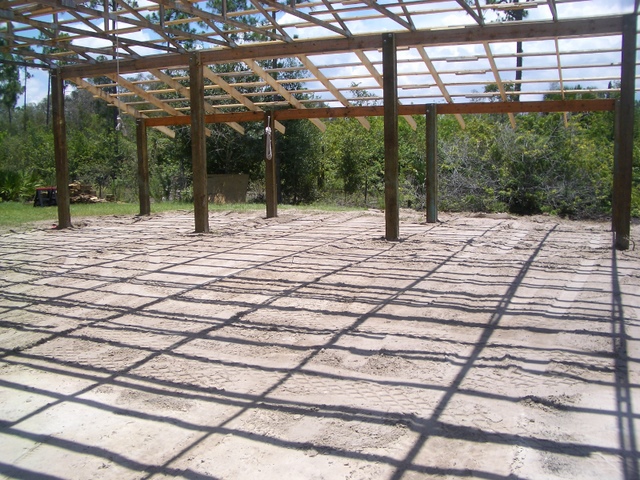
While I was trying to finish the framing, a buddy who's in the grading and trucking business brought out his excavator and dump truck to dig out my pond for more fill. I need to raise the road to the barn a bit, build a new road around the back of the house, and level the inside of the barn for the slab.
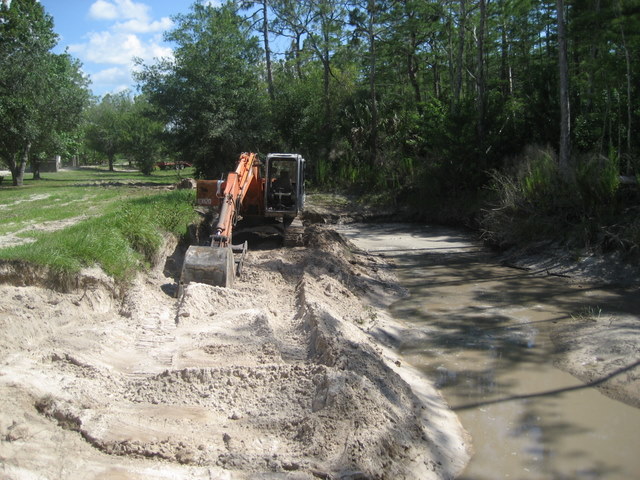
Groundwater levels fluctuate a lot where I live and right now it's about as low as I've seen it. The pond actually overflows for a few weeks almost every summer rainy season. Since the pond was almost dry, he was able to drive the excavator down into it and get really deep. It'll be almost 20' deep when the water's up, so I may be able to keep some fish alive in the future.
The soil is mostly fine sand, with thin layers of blue-grey clay here and there. It's really soft and erodes easily when it's wet, so I had to buy some crushed limestone base rock to top dress some of the problem areas. For the rest, I'll plant some bahiagrass which does a great job firming everything up.
Graded and leveled. The fill from the pond worked great once it dried overnight, and Paul spread the whole thing with his old Ford tractor and box blade. He's been doing grading work with that tractor for a long time and he's truly an artist at his trade.
I've got the purlins finished. Just need to trim everything square, nail up the fly rafters and fascia, and I'm ready for metal! Really looking forward to getting "dried in".
I've got the purlins finished. Just need to trim everything square, nail up the fly rafters and fascia, and I'm ready for metal!
Really looking forward to getting "dried in".I've really been sweating about whether the roof is going to end up square. My wife says I'm obsessing about it, but I just want to avoid any "sawtooth" edge on the metal when I'm done.
So I stretched strings, measured, applied the 3-4-5 rule, re-measured, and discovered that I had been a little sloppy with the overhang of my purlins on the gable ends. I had planned for a full 2' overhang, but I was a couple inches short on several of them. The biggest reason for the mistake was a lack of homework on my part. I didn't realize until too late that fly rafters hang under the ends of the purlins. I thought they got nailed into the end-grain of the purlins.
So I ended up trimming all the purlins to match the shortest one. Then I hung my fly rafters and nailed up the fascia all around. I used 1x8 PT on the eaves and 1x6 PT on the gables for fascia. I'm leaving the soffits open, so the transition between the two isn't really all that noticeable.
So I stretched strings, measured, applied the 3-4-5 rule, re-measured, and discovered that I had been a little sloppy with the overhang of my purlins on the gable ends.
I had planned for a full 2' overhang, but I was a couple inches short on several of them. The biggest reason for the mistake was a lack of homework on my part. I didn't realize until too late that fly rafters hang under the ends of the purlins. I thought they got nailed into the end-grain of the purlins.So I ended up trimming all the purlins to match the shortest one. Then I hung my fly rafters and nailed up the fascia all around. I used 1x8 PT on the eaves and 1x6 PT on the gables for fascia. I'm leaving the soffits open, so the transition between the two isn't really all that noticeable.
bones1
Platinum Member
- Joined
- May 31, 2006
- Messages
- 793
- Tractor
- Farmtrac 300 dtc
God job Cowpen. You do nice work and will have a nice building when finished.
EddieWalker
Epic Contributor
Great project. I really enjoy your solutions to installing the trusses and hanging the heavier pieces. There's always a way and with some planing and creativity, you got it done!!!!
I'm wondering about your trusses. I read that you toenailed them on, but didn't see anything else to lock them into place. Is that all you did to hold them there?
Straping would be the best, but blocking has been around forever and is fairly effective. Probably not for Florida, but it's still allot better then just toenailing.
Did I miss something?
Eddie
Bones - thanks! We're having a lot of fun with the project and I'm learning a lot in the process.
Eddie - I'm glad to know you've been watching my progress. I always look forward to reading your perspective on the various projects posted on TBN.
Re: tieing the trusses down... you're right - that's definitely a must-do here in hurricane alley! I just toenailed to hold everything in place as we set trusses and purlins. Later, I went back with Simpson H4 hurricane ties on each truss except the gable ends. The bolts through the posts & beams were in the way on those, so I used straps instead. I think I must have gone through 10# of nails just on the ties! The palm nailer worked great for this task. I'll try and post some pics.
Metal for the roof got delivered last week. I found a really nice and honest guy - Tommy - who builds pole barns locally. I hired him to order my metal and help install it. He uses an outfit in Moore Haven (about 60 mi. away) that rolls out their own sheets. I chose a 36" multi-rib 26ga. ag panel in white. I decided to go with single long sheets that cover all the way from the peak to the eave, so I needed 30 sheets at 28' 6" to cover the barn. The cost was about $3100 total including ridge cap, closures, screws, & delivery. The white color was more expensive, but will hopefully make for a cooler barn compared to the plain galvalume. We'll see...
Tommy brought his 90HP Kubota over on delivery day to unload the metal. He said that these were the longest sheets he's ever worked with and he was concerned about the bundle kinking when he lifted with the forks. Fortunately, with me lifting on one end of the stack and the delivery guy lifting on the other we managed to set them off the trailer without damage. I was amazed at how much the stack weighed. Judging from the front tires on the Kubota while he was lifting, we must have been close to capacity on the loader.
Here's the barn - ready for metal. Tommy will bring a couple of guys in the morning. He said we should be able to knock it out in a day.
Note the shed's now behind the barn. Attached chains to the runners and slid it over with Paul's old Ford grading tractor - after emptying it out of course. It'll be hidden from view once the siding's up which is a bonus according to my wife.
em14
Platinum Member
"I needed 30 sheets at 28' 6" to cover the barn" ... I'm curious as to why you choose to use such long pcs of metal roofing … I would think they would be harder to install. You are going to have a great barn!
Leo
Leo
EddieWalker
Epic Contributor
em14 said:"I needed 30 sheets at 28' 6" to cover the barn" ... I'm curious as to why you choose to use such long pcs of metal roofing I would think they would be harder to install. You are going to have a great barn!
Leo
My wife and I installed the roof panels on our home and shop. She was on the trusses and I carred them to the wall and slowly slid them up, over the purlins, to her. She would help pull and positin them while I climbed up a ladder and held them in place. Then she would get a few screws into them and I would go get another piece.
The long one in the picture that she is standing on is 33 feet long. I picked it up by myself. It was awkward, but I just took it slow and we didn't have any problems. It was longer because it actualy goes past the peak in the middle of the building to a short peak off to the side on the second story.
Eddie
