wroughtn_harv
Super Member
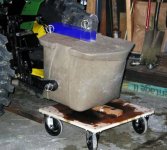
Awhile back a bud with a medium sized Kubota wanted to find a way to use his front end loader to move the trailers around the place. He didn't want to cut a hole in the bucket for a ball so he hit me up for ideas.
At the time I didn't have any, doesn't happen often, but then it did.
But after perusing ya'lls post I thunk up one that might be a seed for ya'll to plant and muse over and make work.
I have a cardinal rule about one thing. It's receiver hitches. You never ever let one get away. And they're everywhere if you're looking.
My thing is twenty five bucks for a whole assembly less insert.
My truck has four of them permanently mounted. One front, one back in the usual place, and one on each corner of the bed about four inches down from the top of the bed.
I've got pipe knotchers, vices, manual benders, one off specialty tools etc all mounted on inserts for these hitches. And I've got about four of the receivers mounted to different places in the shop.
This combination is absolutely deadly for a handy kind of person. You can have a vise anchored to a truck or tractor in the middle of nowhere for you to whup up on some poor innocent piece of steel etc.
Let's add one more use for this often tossed piece of valuable junk.
When I was brainstorming with bud I noticed a couple of things about the small tractor buckets. They're not made that strong. Of course they don't have to be and any weight you add to them takes away from their payload.
Put your imagination in gear and follow me.
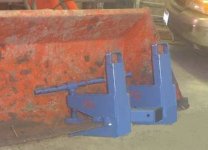
You take a receiver hitch assembly and modify it so that it's attached at each end of your bucket. The beauty of the receiver hitch assembly is it's almost impossible to twist the square tubing frame if the plate it's attached to if firmly attached itself.
You can have the receiver piece itself in the middle or off to one side or another. If you have access to enough material then maybe three spaced across the top of your bucket would be perfect.
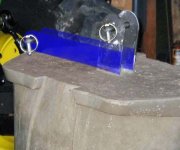
Let's say you want to move some trailers around the place. You make an insert where it comes out of the receiver and angles down and then along the floor of your bucket and stopping say a foot or so in front of the blade. With your ball on this you can see it plenty fine and and your control is great because moving your front wheels a little moves the trailer tongue a lot.
You decide you want to have a boom to pick up things. So you make a boom. Two legs come back to your bucket so that they sit with the back of the bucket and the bottom of the bucket supporting them. These are your supports for your beam. The beam is inserted into the receiver assemply and pinned. The only thing you'd have to be real careful with would be tilting your bucket down where the pressure would be against just the beam away from your supports.
If you wanted to put a hay spear in your front loader it could be make the same way. A frame made in a triangle with the bottom resting on the floor of the bucket near the leading edge of the bucket. The main spear attached to the insert and two smaller locater spears coming our of the triangular frame near the floor of the bucket.
Both of these attachments would attached by one five eighths pin to the front loader.
Don't go out buy a twenty foot stick of two and half inch square tubing and figure you don't need the receiver hitch assemblies.
That don't work. If you buy quarter inch wall tubing as you need your two inch inserts won't work. There's a seam to deal with. Receiver assemblies are machined out for about six inches back. So buying a three foot piece or receiver material from your trailer supplier doesn't mean you've got six six inch pieces to use at your heart's content. You've got one piece and some great stuff to work with.
If you go with less than quarter inch wall material you'll have too sloppy a fit and it won't be worth throwing rocks with or at.
I hope I've planted a seed.
I know.
I have too fertile a mind.
That's okay.
It beats playing in the street for entertainment.
<A target="_blank" HREF=http://photos.yahoo.com/bc/wroughtnharv/lst?.dir=/Iris&.src=ph&.order=&.view=t&.done=http%3a//photos.yahoo.com/>Iris, my tractor</A>
At the time I didn't have any, doesn't happen often, but then it did.
But after perusing ya'lls post I thunk up one that might be a seed for ya'll to plant and muse over and make work.
I have a cardinal rule about one thing. It's receiver hitches. You never ever let one get away. And they're everywhere if you're looking.
My thing is twenty five bucks for a whole assembly less insert.
My truck has four of them permanently mounted. One front, one back in the usual place, and one on each corner of the bed about four inches down from the top of the bed.
I've got pipe knotchers, vices, manual benders, one off specialty tools etc all mounted on inserts for these hitches. And I've got about four of the receivers mounted to different places in the shop.
This combination is absolutely deadly for a handy kind of person. You can have a vise anchored to a truck or tractor in the middle of nowhere for you to whup up on some poor innocent piece of steel etc.
Let's add one more use for this often tossed piece of valuable junk.
When I was brainstorming with bud I noticed a couple of things about the small tractor buckets. They're not made that strong. Of course they don't have to be and any weight you add to them takes away from their payload.
Put your imagination in gear and follow me.
You take a receiver hitch assembly and modify it so that it's attached at each end of your bucket. The beauty of the receiver hitch assembly is it's almost impossible to twist the square tubing frame if the plate it's attached to if firmly attached itself.
You can have the receiver piece itself in the middle or off to one side or another. If you have access to enough material then maybe three spaced across the top of your bucket would be perfect.
Let's say you want to move some trailers around the place. You make an insert where it comes out of the receiver and angles down and then along the floor of your bucket and stopping say a foot or so in front of the blade. With your ball on this you can see it plenty fine and and your control is great because moving your front wheels a little moves the trailer tongue a lot.
You decide you want to have a boom to pick up things. So you make a boom. Two legs come back to your bucket so that they sit with the back of the bucket and the bottom of the bucket supporting them. These are your supports for your beam. The beam is inserted into the receiver assemply and pinned. The only thing you'd have to be real careful with would be tilting your bucket down where the pressure would be against just the beam away from your supports.
If you wanted to put a hay spear in your front loader it could be make the same way. A frame made in a triangle with the bottom resting on the floor of the bucket near the leading edge of the bucket. The main spear attached to the insert and two smaller locater spears coming our of the triangular frame near the floor of the bucket.
Both of these attachments would attached by one five eighths pin to the front loader.
Don't go out buy a twenty foot stick of two and half inch square tubing and figure you don't need the receiver hitch assemblies.
That don't work. If you buy quarter inch wall tubing as you need your two inch inserts won't work. There's a seam to deal with. Receiver assemblies are machined out for about six inches back. So buying a three foot piece or receiver material from your trailer supplier doesn't mean you've got six six inch pieces to use at your heart's content. You've got one piece and some great stuff to work with.
If you go with less than quarter inch wall material you'll have too sloppy a fit and it won't be worth throwing rocks with or at.
I hope I've planted a seed.
I know.
I have too fertile a mind.
That's okay.
It beats playing in the street for entertainment.
<A target="_blank" HREF=http://photos.yahoo.com/bc/wroughtnharv/lst?.dir=/Iris&.src=ph&.order=&.view=t&.done=http%3a//photos.yahoo.com/>Iris, my tractor</A>