ametcalf
Silver Member
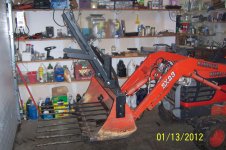
Well, I finished my grapple and we are using it a lot as we clean up fence rows and a wooded area. We are also moving old piles of rotted wood chips and piles of composting leaves.
I originally built a wooden grapple with the idea of taking it to a welding shop and have them make a duplicate out of steel.
When I took it to the welder I could tell that we were on two different pages on what the cost should probably be. That was mostly my fault as they are a very good shop and very reasonably priced. The big kicker though was that I couldn't be in the shop when they were working on it due to their insurance. I remembered that TBN member teg had commented on my wooden grapple that the design was simple enough that I should weld it myself. I also had a prong break on my brush fork that I had to cut off and change. When cutting off the tooth I decided my welds may not look good but they are tough enough to hold what the grapple would be clamping. Another consideration that it is not a life and death situation, if a weld fails the grapple falls off and drops a bunch of brush. No big deal.
Thanks to this terrific website and all those who post I forged ahead with my plan.
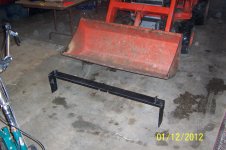
I bought a bunch of angle iron that cost right at $100. I combined that with a little bit of old steel that I had lying around and started building. The first thing I built was the base that would bolt on to the loader bucket.
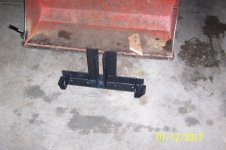
I then built the grapple base that would hold the grapple and would attach to the base plate. I made the uprights that hold the hydraulic cylinder higher than I needed to with holes spaced every 2 inches so that I have some flexibility if I want to change any angles or anything.
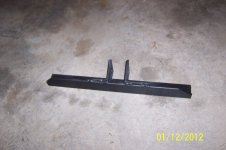
I then built the crosspiece that would connect the two arms and hold the end of the hydraulic cylinder.
I then made the arms and the two teeth. I made the arms longer than I needed because I am still deciding how to shape the end of the arms for using the grapple when I have the brush forks on. The first teeth come down on the end of the bucket for when the brush forks are not on.
I then made a plate to protect the hydraulics out of some sheet metal that I had in the barn. I was going to use half inch plywood for this but I saw the sheet metal and decided to try it.
I then primed and painted everything.
I then put everything together using C clamps to attach the crosspiece to the arms. I did this so that I could make final adjustments to it before welding it. I then took it out to try it out. I got so carried away that I bent the C clamps. The measurements seemed right so I went ahead and welded the crosspiece in place.
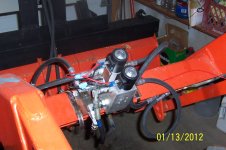
I got all of the hydraulics from Surplus Center and was very happy with their service and the products. I wired the switch that I bought from Advance Auto for the diverter valve to the wire that goes to the headlights. I put a 10 amp inline fuse on this wire. I was going to wire directly to the battery but then realized that if I left the switch in the grapple position when the tractor was off the valve would still be drawing electricity and would run the battery down. By wiring into the light circuit before the switch there is no draw when the tractor is off. My switch setup isn't as fancy as most but it was cheap and it works well.
I was trying to figure out how to mount the diverter valve and saw on this site that someone used large hose clamps so I made up a couple of brackets out of 3 1/2 inch angle iron that I attached to the loader cross piece.
I thought I might need a restrictor to slow down the grapple action but wanted to try the system before going to that work. I am glad I did because I can control the speed by how much I move the tilt function of the joy stick. Another thought I had was that I wondered if I needed some kind of relief valve so that the grapple wouldn't break anything when it clamped down. That is not a worry because the one inch cylinder has enough power to clasp and hold but not so much power that it will break any of the rest of the setup. That brings up another point. The 2 teeth are not welded to the arms. They are just mounted with 1/2 inch grade 8 bolts tighten with a couple of 24 inch breaker bars. I wanted another point for the system to give without breaking anything. So far they haven't shifted so I don't foresee ever welding them.
We have really enjoyed using the grapple in the woods. One caution, the hired man learned was that by using the brush forks and the grapple you can quickly put a heavy enough load on the front so that if you raise the bucket when the tractor isn't level you can change the center of gravity as demonstrated on my post titled Skid Plate inspection in the attachments forum.
Thanks again to all those that share their expertise on this website. I'm not as ignorant as I used to be and if you keep posting I will be smarter tomorrow than I am today.
I originally built a wooden grapple with the idea of taking it to a welding shop and have them make a duplicate out of steel.
When I took it to the welder I could tell that we were on two different pages on what the cost should probably be. That was mostly my fault as they are a very good shop and very reasonably priced. The big kicker though was that I couldn't be in the shop when they were working on it due to their insurance. I remembered that TBN member teg had commented on my wooden grapple that the design was simple enough that I should weld it myself. I also had a prong break on my brush fork that I had to cut off and change. When cutting off the tooth I decided my welds may not look good but they are tough enough to hold what the grapple would be clamping. Another consideration that it is not a life and death situation, if a weld fails the grapple falls off and drops a bunch of brush. No big deal.
Thanks to this terrific website and all those who post I forged ahead with my plan.
I bought a bunch of angle iron that cost right at $100. I combined that with a little bit of old steel that I had lying around and started building. The first thing I built was the base that would bolt on to the loader bucket.
I then built the grapple base that would hold the grapple and would attach to the base plate. I made the uprights that hold the hydraulic cylinder higher than I needed to with holes spaced every 2 inches so that I have some flexibility if I want to change any angles or anything.
I then built the crosspiece that would connect the two arms and hold the end of the hydraulic cylinder.
I then made the arms and the two teeth. I made the arms longer than I needed because I am still deciding how to shape the end of the arms for using the grapple when I have the brush forks on. The first teeth come down on the end of the bucket for when the brush forks are not on.
I then made a plate to protect the hydraulics out of some sheet metal that I had in the barn. I was going to use half inch plywood for this but I saw the sheet metal and decided to try it.
I then primed and painted everything.
I then put everything together using C clamps to attach the crosspiece to the arms. I did this so that I could make final adjustments to it before welding it. I then took it out to try it out. I got so carried away that I bent the C clamps. The measurements seemed right so I went ahead and welded the crosspiece in place.
I got all of the hydraulics from Surplus Center and was very happy with their service and the products. I wired the switch that I bought from Advance Auto for the diverter valve to the wire that goes to the headlights. I put a 10 amp inline fuse on this wire. I was going to wire directly to the battery but then realized that if I left the switch in the grapple position when the tractor was off the valve would still be drawing electricity and would run the battery down. By wiring into the light circuit before the switch there is no draw when the tractor is off. My switch setup isn't as fancy as most but it was cheap and it works well.
I was trying to figure out how to mount the diverter valve and saw on this site that someone used large hose clamps so I made up a couple of brackets out of 3 1/2 inch angle iron that I attached to the loader cross piece.
I thought I might need a restrictor to slow down the grapple action but wanted to try the system before going to that work. I am glad I did because I can control the speed by how much I move the tilt function of the joy stick. Another thought I had was that I wondered if I needed some kind of relief valve so that the grapple wouldn't break anything when it clamped down. That is not a worry because the one inch cylinder has enough power to clasp and hold but not so much power that it will break any of the rest of the setup. That brings up another point. The 2 teeth are not welded to the arms. They are just mounted with 1/2 inch grade 8 bolts tighten with a couple of 24 inch breaker bars. I wanted another point for the system to give without breaking anything. So far they haven't shifted so I don't foresee ever welding them.
We have really enjoyed using the grapple in the woods. One caution, the hired man learned was that by using the brush forks and the grapple you can quickly put a heavy enough load on the front so that if you raise the bucket when the tractor isn't level you can change the center of gravity as demonstrated on my post titled Skid Plate inspection in the attachments forum.
Thanks again to all those that share their expertise on this website. I'm not as ignorant as I used to be and if you keep posting I will be smarter tomorrow than I am today.
Attachments
-
 Base brace.JPG589.1 KB · Views: 642
 -
 Grapple base.JPG447.8 KB · Views: 477
 -
 Cross piece.JPG412.8 KB · Views: 376
 -
 Side arms.JPG426.8 KB · Views: 369
 -
 Teeth.JPG433.8 KB · Views: 375
 -
 Ready to paint.JPG342.9 KB · Views: 446
 -
 Diverter switch.JPG490.4 KB · Views: 569
 -
 Diverter valve.JPG615.1 KB · Views: 797
 -
 Jaws open.JPG683.4 KB · Views: 1,274
 -
 Cylinder protection.JPG474 KB · Views: 806
 -
 IMAG0009.jpg1,007.6 KB · Views: 1,269

