
lincolnvt
Silver Member
Hey guys:
Well it has been several months of work and learning but I have officially completed my hydraulic set up in preparation for my grapple (No Chris I haven't purchased it yet... ) Special thanks to Kenny as always for his help and support. Also, thanks to Michael Ames for fabricating the connection b/w my joystick and the Otto handle switch.
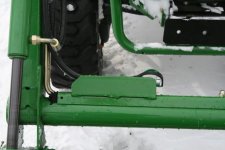
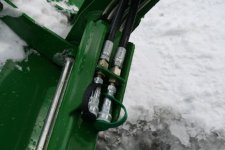
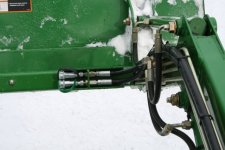
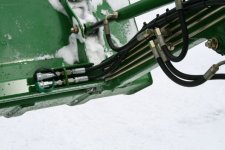
This morning I took my 2520 up to the neighbors shop and we fabricated the bulkhead. I had sketched it out on a simple drafting program I own. We used 1/4 in steel stock and it is two inches high. The two holes for the bulkhead fitting were drilled after making a caliper measurement on the actual fittings. It was a tight fit b/c we only had about 2 1/2 inches of width to work with. I buffed the paint off the hydraulic line cover on the tractor in preparation for welding. The two sides of the bulkhead are welded on the sides of the cover not the top so we could have the full 2 1/2 inches for the fittings. Once the welding was completed the corners were rounded and buffed, everything was primed and painted JD Green. In preparation for putting the cover back on I was my buddy was looking at the hard lines and noticed some significant wear a the corners on the two ends. Evidently the cover is rubbing the hard lines and wearing through - that would be bad. So, I cut some nylon protective hose cover and wrapped the hard line before putting the cover back in place. You guys may want to check this out on your tractors. It would obviously take a long time to wear through but I was surprised by the damage already done (120hrs in). Once the cover with the painted bulkhead was back in place it was time to tighten fittings. I had already connected the bulkhead fitting to the NPT of the hose end. Put that through the steel plate and locked it down with the nut. Then, we connected the 1/4 Pioneer QC to the O ring end of the fitting and connected that assembly to the JIC end of the bulkhead fitting. Pushed the button on the joystick to change over the diverter and gave it pressure - everything held perfectly. I know this is long winded I am just excited how things worked out and wanted to give as much info as possible to help others. Any questions just let me know.
Cheers, Brad
Well it has been several months of work and learning but I have officially completed my hydraulic set up in preparation for my grapple (No Chris I haven't purchased it yet... ) Special thanks to Kenny as always for his help and support. Also, thanks to Michael Ames for fabricating the connection b/w my joystick and the Otto handle switch.
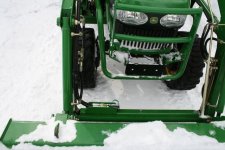
This morning I took my 2520 up to the neighbors shop and we fabricated the bulkhead. I had sketched it out on a simple drafting program I own. We used 1/4 in steel stock and it is two inches high. The two holes for the bulkhead fitting were drilled after making a caliper measurement on the actual fittings. It was a tight fit b/c we only had about 2 1/2 inches of width to work with. I buffed the paint off the hydraulic line cover on the tractor in preparation for welding. The two sides of the bulkhead are welded on the sides of the cover not the top so we could have the full 2 1/2 inches for the fittings. Once the welding was completed the corners were rounded and buffed, everything was primed and painted JD Green. In preparation for putting the cover back on I was my buddy was looking at the hard lines and noticed some significant wear a the corners on the two ends. Evidently the cover is rubbing the hard lines and wearing through - that would be bad. So, I cut some nylon protective hose cover and wrapped the hard line before putting the cover back in place. You guys may want to check this out on your tractors. It would obviously take a long time to wear through but I was surprised by the damage already done (120hrs in). Once the cover with the painted bulkhead was back in place it was time to tighten fittings. I had already connected the bulkhead fitting to the NPT of the hose end. Put that through the steel plate and locked it down with the nut. Then, we connected the 1/4 Pioneer QC to the O ring end of the fitting and connected that assembly to the JIC end of the bulkhead fitting. Pushed the button on the joystick to change over the diverter and gave it pressure - everything held perfectly. I know this is long winded I am just excited how things worked out and wanted to give as much info as possible to help others. Any questions just let me know.
Cheers, Brad
Attachments
-
 IMG_0298.jpg41.6 KB · Views: 630
 -
 IMG_0299.jpg39.2 KB · Views: 535
 -
 IMG_0300.jpg40.1 KB · Views: 491
 -
 IMG_0301.jpg45.3 KB · Views: 412
 -
 IMG_0302.jpg45 KB · Views: 390
 -
 IMG_0303.jpg49.8 KB · Views: 390
 -
 IMG_0305.jpg49.8 KB · Views: 366
 -
 IMG_0306.jpg56.2 KB · Views: 368
 -
 IMG_0307.jpg49 KB · Views: 494