Built a steel sunshade

   / Built a steel sunshade #1  

Sublifer

Gold Member
Joined
Mar 22, 2011
Messages
310
Tractor
LS 4047
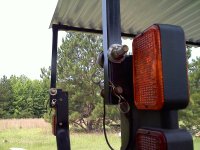
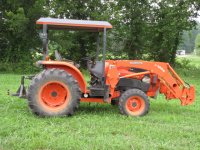
Over the last 4 weeks or so I've spent nearly every bit of spare time I had building my sunshade. 4 weeks worth of evenings and weekends later I've got it finished. I value the experience of putting it together, particularly from a beginner welder point of view, but if I'd known how long it would take, I'd not do it again unless I was being paid very well :laughing:

I'm very happy with the finished product, don't get me wrong, what bothers me is that I saved $100-200 and maybe not even that, but spent so much of my free time working on it. I did want something with a bit of fall protection to it. I don't think any of the flat top shades available offer much protection from falling objects and that is why I won't regret building it.

So here are the pictures, beginning to end with a few words where needed. Due to the amount of pics it is going to take several posts.

The first here are the beginning of the frame.

IMG_0753.JPGIMG_0763.JPGIMG_0764.JPGIMG_0765.JPGIMG_0766.JPG
 
Last edited:
   / Built a steel sunshade
  • Thread Starter
#2  
Note to self, "Insert all" makes the post too tall.

These next ones are the where I added the bracing to attach to the ROPS and then the first pieces of sheet metal going on.

IMG_0776.JPGIMG_0777.JPGIMG_0778.JPGIMG_0779.JPGIMG_0780.JPGIMG_0781.JPGIMG_0782.JPGIMG_0783.JPG
 
   / Built a steel sunshade
  • Thread Starter
#3  
Here the last piece of sheet are going on. The angles weren't perfect so I had a fun time welding to fill in the gaps. This was one of the most time consuming parts. Better cuts would have made it easier but the frame wasn't welded perfect either so after a weld it would often shrink an angle due to the contracting weld metal and screw up measurements and angles. Possible fix for that might have been to tack weld everything together before completing all the welds. Not sure though as I am a welding noob... fill me in if you know. Ok, the pics:

IMG_0785.JPGIMG_0786.JPGIMG_0787.JPGIMG_0788.JPGIMG_0791.JPGIMG_0792.JPG
 
   / Built a steel sunshade
  • Thread Starter
#4  
These pics are where I am cleaning up and grinding down welds and then the first coat of primer. I loved the rustoleum sandable ultimate automotive primer or whatever they called it.

IMG_0793.JPGIMG_0794.JPGIMG_0795.JPGIMG_0796.JPGIMG_0797.JPG
 
   / Built a steel sunshade
  • Thread Starter
#5  
I tried filling pinholes and grind marks with a sandable "filler" primer paint. Don't ever waste your money on it. It might could fill a micron or so sized imperfection but after several coats it wouldn't do anything for me. So a little more research into the subject and I found spot and glazing putty. So here are some pictures with the glazing followed by sanding, priming, sanding. Those pieces below in the first pic are the brackets to hold it to the ROPS.

IMG_0798.JPGIMG_0799.JPGIMG_0800.JPGIMG_0801.JPGIMG_0802.JPGIMG_0803.JPG
 
   / Built a steel sunshade
  • Thread Starter
#6  
Here I am getting the color on it and then putting clear coat over the top.
By the way, I put the enamel on the underside right after priming it. Its just gray with black on the supports. Nothing fancy but I did have to go back over some parts after because of the glazing compound, extra primer and bit of blue overspray. I have to say, I am not very impressed with the Rustoleum enamels. It doesn't spray very well and it gets torn up way too easy, even after 24 hrs curing time. The clear coat was even worse. I used the crystal coat enamel and while it might be okay for small parts, the overspray leaves a fine white dust on EVERYTHING so unless you wash your project after every single spray the clear coat is not going to look very nice. Next time I have a project to paint, after I put the primer on I'll take it to my friend who has a few spray guns and does a very good job on the cars he has painted.

IMG_0804.JPGIMG_0807.JPGIMG_0808.JPGIMG_0809.JPGIMG_0810.JPGIMG_0811.JPGIMG_0812.JPGIMG_0816.JPG
 
   / Built a steel sunshade
  • Thread Starter
#7  
Time for insulation. Both to help keep the heat from the metal radiating down and also to keep the engine noise from bouncing back. I had some good ideas on attaching it but doing the big main pieces as single solid pieces turned out to be a real hassle, mostly because of trying to slide it into place between the supports. Next time I'd use more supports and do it in 2 or 3 pieces. I'm proud of the engineering I put into the brackets. Fully adjustable with wood shoes to keep it from putting holes in the insulation. The wood is spanish cedar so it ought to hold up to the elements pretty well and if not can be easily replaced. I ran into several problems here though. First, this is where I had the biggest problem with the enamel, every step of the way it got messed up so I ended up just spraying some clear coat over it at the end. The one good thing about the clear is it dries in about 3 minutes. I also broke a tap in one of the ends and I couldn't get it out so I welded it in and redrilled and tapped. I should have tried harder to avoid where the tap was because that tool steel made it difficult to drill and even harder to tap. I stripped two more of those cheap Cobalt brand taps and the threads still weren't deep enough so I ended up filing the threads down on the screw and then used visegrips to screw it in :confused2:

IMG_0820.JPGIMG_0821.JPGIMG_0822.JPGIMG_0823.JPGIMG_0825.JPG
 
   / Built a steel sunshade
  • Thread Starter
#8  
So we took the shade up to our property but I had to wait on help to put it on because it ended up weighing around 200-250 pounds. While I waited I thought I'd go ahead and wash the tractor. Here are some pictures of my LS R4047. It may never be this clean again.

IMG_0827.JPGIMG_0828.JPGIMG_0829.JPGIMG_0830.JPGIMG_0831.JPGIMG_0832.JPGIMG_0833.JPG
 
   / Built a steel sunshade #9  
Time for insulation. Both to help keep the heat from the metal radiating down and also to keep the engine noise from bouncing back. I had some good ideas on attaching it but doing the big main pieces as single solid pieces turned out to be a real hassle, mostly because of trying to slide it into place between the supports. Next time I'd use more supports and do it in 2 or 3 pieces. I'm proud of the engineering I put into the brackets. Fully adjustable with wood shoes to keep it from putting holes in the insulation. The wood is spanish cedar so it ought to hold up to the elements pretty well and if not can be easily replaced. I ran into several problems here though. First, this is where I had the biggest problem with the enamel, every step of the way it got messed up so I ended up just spraying some clear coat over it at the end. The one good thing about the clear is it dries in about 3 minutes. I also broke a tap in one of the ends and I couldn't get it out so I welded it in and redrilled and tapped. I should have tried harder to avoid where the tap was because that tool steel made it difficult to drill and even harder to tap. I stripped two more of those cheap Cobalt brand taps and the threads still weren't deep enough so I ended up filing the threads down on the screw and then used visegrips to screw it in :confused2:

View attachment 215298View attachment 215299View attachment 215300View attachment 215301View attachment 215302


Looks really good.. I like it alot and dont cut yourself short it takes alot to learn this stuff. Looks like you did a FINE job.. Those taps suck I know. I have tried the same thing. What I do now is drill the hole thru the metal and weld a nut over the hole and then the bolt screws into the nut thru the hole and does the same thing! Way easier than tapping steel... Great Job...

AndyG
 
   / Built a steel sunshade
  • Thread Starter
#10  
So I finally got the shade on it. Not without more trouble though. While waiting I tried to make sure I had all the nuts, bolts, and washers ready. It turns out that I forgot a bag of bolts for the ROPS attachment. In the process I used one of the wrong nuts and stripped some of the threaded rod. Well, after a lot of digging we were able to find some in my brother in laws truck box and he thought it'd be worth trying to put it on over the stripped part of the rod. Well, no luck there, the nut got stuck and then wouldn't come back off with the impact wrench. My BIL went to get a cutter to take some of the rod off as it was long enough to spare some and I used a ratchet to try to get the nut off as we were going to need it. Bad luck strikes again, while trying to take it off I broke the threaded rod right past the edge of how much we needed. The shade is on and the brackets will hold it on, but the one bracket is going to need me to cut it shorter so I can weld a usable piece of threaded rod back on it. Have to cut it shorter or the welds would be right where I need to tighten down the bolts. Well, thats for another day. At least it is on there now.

IMG_0834.JPGIMG_0835.JPGIMG_0836.JPGIMG_0837.JPGIMG_0838.JPGIMG_0839.JPG
 
   / Built a steel sunshade
  • Thread Starter
#11  
Looks really good.. I like it alot and dont cut yourself short it takes alot to learn this stuff. Looks like you did a FINE job.. Those taps suck I know. I have tried the same thing. What I do now is drill the hole thru the metal and weld a nut over the hole and then the bolt screws into the nut thru the hole and does the same thing! Way easier than tapping steel... Great Job...

AndyG

Thanks Andy. Thats a good idea but these brackets wouldn't have had the clearance in the center hole for a nut welded on. It could have saved me making two of the three taps on each of those bars though. I'll have to try that on my next project.

John
 
   / Built a steel sunshade
  • Thread Starter
#12  
Wanted to ask, if anyone else built their own sunshade, would you post a pic of it and share your own thoughts on why you did it like you did and how you like yours vs mine.
 
   / Built a steel sunshade #13  
I built one over the weekend, very simple, very cheap, very functional , light weight, easy to take off and on. I simply bought a stalk of 16ga 1 inch steel square tubeing:$20/one sheet of PVC corogated paneling:$20/box of self drilling screws:$6. Simply cut the tube to my measured lenghts(basicly 4ft sq frame.) welded them together, made 2 legs to bolt to the rop brackets using my existing bolts and pins just placed them betewwn the brackets marked and drilled holes, welded those to the frame,painted the frame black, sheeted it with the panel and bolted it on. DONE. Works great, its light enough to handle alone, less than 20lbs, rigid, doent rattle, and best of all CHEAP!:thumbsup:
 

Attachments

  • 20110603111145.jpg
    20110603111145.jpg
    584 KB · Views: 526
  • 20110603111115.jpg
    20110603111115.jpg
    795.1 KB · Views: 426
  • 20110603111211.jpg
    20110603111211.jpg
    609.2 KB · Views: 387
  • 20110603111256.jpg
    20110603111256.jpg
    396.9 KB · Views: 335
   / Built a steel sunshade #14  
One more plus to my top is the fact it does not radiate heat or sound. The white PVC is thin enogh to reflect back the sun and allows sound to pass around it pretty well too. It may not look as fancy but it sure beats being microwaved by the sun!
 
   / Built a steel sunshade #15  
One more plus to my top is the fact it does not radiate heat or sound. The white PVC is thin enogh to reflect back the sun and allows sound to pass around it pretty well too. It may not look as fancy but it sure beats being microwaved by the sun!

The lack of sound bouncing back may also be due to its wavy surface.
 
   / Built a steel sunshade
  • Thread Starter
#16  
One more plus to my top is the fact it does not radiate heat or sound. The white PVC is thin enogh to reflect back the sun and allows sound to pass around it pretty well too. It may not look as fancy but it sure beats being microwaved by the sun!

Thanks for the pics Fastdraw! I was tempted to do something similar but I have a lot of trees on mine and my BIL's property so I wanted something that would survive if I ran into a branch or twenty by accident. LOL I also thought it'd be nice to have something that might save me some hurt if a branch fell on it. What you've got would be perfect for open fields and removable is nice. I tried to make mine so it would fold back with the ROPS but I'm afraid to try it with how heavy it is... it'd either come down too hard and too far or I'd never get it back up.

Oh, BTW, I have it insulated so it's pretty cool under mine and I don't get much engine noise either.
 
   / Built a steel sunshade #17  
Here is the one I made, for the same reasons as Sublifer. It is noise and well need to insulate it. Sublifer did you glue the insulation in?
Lee
 

Attachments

  • 1a.jpg
    1a.jpg
    301.8 KB · Views: 437
   / Built a steel sunshade #18  
I plan to build one on my R4010 LS. I too am in the trees. Lots of low branches that vary in height depending on the season or how wet they are. Whatever I do will have to be strong. I have holes knocked in the fiberglass roof on my old Cub Cadet. We've already had our day of sun for this summer, so rain is part of the considerations. The CC's roof had a gutter all the way around it and two tiny drain holes at the back corners. When it rained, the gutter filled up and then the water bounced out in a huge gush, soaking me. My new roof will have no gutters. I plan to have sweeps going to the loader mounts and design it so branches ride smoothly up over the lid.
 
   / Built a steel sunshade
  • Thread Starter
#19  
Looks nice LeeJohn! I thought about doing front posts on mine and may add them still. As fir the insulation, I didn't glue it in cuz I wanted it to be removable and replacable. I used permanent tabs on the lower edges and a screwed in fixture at the top that I think I had a pic of up there. It was a pain getting the sheets in and if I ever do replace them then I'll cut smaller pieces and and add more tabs and what not if I need to.

ShortGame, the sweeps sounds like a good idea. I try to stick to establshed trails on my property so I figured the beveled front on mine would be sufficient. Time will tell...
 
   / Built a steel sunshade #20  
sublifer, I would suggest one thing.... I didn't read this in any of your earlier posts but if I were you, I would be cutting off the ends of those studs that are pointed straight down at your head!! I know the chances of something happening and you getting injured by them are slim but they just look dangerous to me! That is, unless you plan on wearing a helmet lol!!

Otherwise, you did a fantastic job! You want to make me one and paint it green??:p
 

Tractor & Equipment Auctions

2000 CATERPILLAR 988F WHEEL LOADER (A60429)
2000 CATERPILLAR...
CAT 289D3 (A58214)
CAT 289D3 (A58214)
Year: 2012 Make: GMC Model: Acadia Vehicle Type: Multipurpose Vehicle (MPV) Mileage: 188,471 Plate: (A59231)
Year: 2012 Make...
240156 (A56859)
240156 (A56859)
ALLMAND NIGHT-LIGHT PRO 4 BULB LIGHT PLANT (A52706)
ALLMAND...
2000 Sterling L9513 Winch Truck (A56438)
2000 Sterling...
 
Top