Building 55' Bridge Across Creek - Utility Poles

   / Building 55' Bridge Across Creek - Utility Poles #41  
Butyl flashing tape is an excellent way to protect the tops of any type joists.
It does need to be wide enough to allow water to be shed well over both sides of the joist tops.
I once re decked a 40+ year old dock that had metal flashing.
The joists were in such great condition that I, from that day on, always flashed my joists.
There was no sign of any rot under the metal flashing, but then there was great circulation.
 
   / Building 55' Bridge Across Creek - Utility Poles
  • Thread Starter
#42  
S..l..o..w.....g..o..i..n..g. :)

Had some family obligations yesterday so I didn't get anything done. Today I got all the deck boards on, and some screwed down. Tomorrow I will try to get the rest screwed down and the ends ripped straight. After careful consideration, I decided to take the boards as-is, and just rip them down once they are in place. I wanted to be certain I had everything square, and I was just not sure enough of myself to rely on everything I had done to be close enough. Surprisingly, everything laid down nice.

I was concerned I may have to shim a few places but those 2" thick boards made up for any small inconsistencies in the poles. I was also worried that I may get too much bounce in the middle of the two spans after laying 3000lbs of decking on it, but surprisingly it barely moved at all. I feel like I probably could have gotten away with 1.5" boards but these will dry out some now that they are out in the sun. I did not leave any space between the boards as the wood was pretty green, I assume they will shrink some over time and create some gaps.

I had to use the small cart to get the deck boards back there so I was only able to take 10-12 at a time. With a 1/2 mile round trip, it kept things to a crawl.

The task for next weekend is going to be figuring out my ramp for the far side. Its 32" to the top of the deck boards so I am thinking the ramp will need to be at least 12' long to make for a gradual climb. Here are a few pictures from today.
 

Attachments

  • 20210704_132522.jpg
    20210704_132522.jpg
    3.4 MB · Views: 490
  • 20210704_172316.jpg
    20210704_172316.jpg
    3.5 MB · Views: 485
  • 20210704_150346.jpg
    20210704_150346.jpg
    3 MB · Views: 496
Last edited:
   / Building 55' Bridge Across Creek - Utility Poles #43  
Looks good! I kinda like the look of the boards uneven. I believe I would not cut them at all.
 
   / Building 55' Bridge Across Creek - Utility Poles
  • Thread Starter
#45  
Looks a little too rustic in person....lol. Maybe I will compromise and run the chainsaw down the sides without a guide. It will still have that rustic look but a "tad" straighter.
 
   / Building 55' Bridge Across Creek - Utility Poles #46  
Those appear to be salt treated poles, not creosote. I don't think they even make creosote anymore. I know you can't get them around here. They have been outlawed for years.

I'm curious how you ripped the poles? What did you use?
Creosote poles are still used in a lot of areas particularly wet or swampy areas, the creosote poles will long out last CCA treated in wet areas, there are areas of Louisiana that only use creosote poles.
 
   / Building 55' Bridge Across Creek - Utility Poles #47  
I haven't seen one here in SC in years.
 
   / Building 55' Bridge Across Creek - Utility Poles #48  
Here in Florida we only use them on Hi lines in wet areas that are not easily accessible, if it's not we use CCA and in most cases where accessability is not an issue we have gone to Ductile Iron.
 
   / Building 55' Bridge Across Creek - Utility Poles #49  
That bridge will outlast you and anyone you know. Leave the ends as is. They will be the first to rot.
Nicely done Sir.
 
   / Building 55' Bridge Across Creek - Utility Poles
  • Thread Starter
#50  
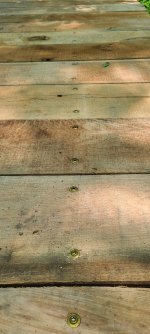
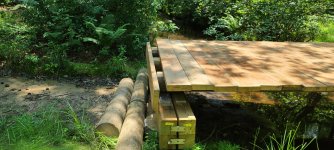
Another slow day as it felt like it was about 105* outside. I managed to get one entire box of 6" lag/screws (qty. 300) in the deck and that was about all I had in me. I did learn rather quickly, that your standard impact gun IS NOT the tool to put those in :)
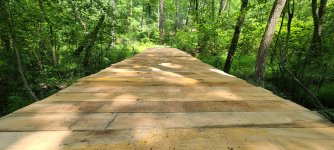
. I had to break out the 1/2" impact driver to make it work. I put one in with the regular impact, and while it worked, it took forever and would probably result in going through 19 batteries. I did not pre-drill the holes, but those screws drew in themselves well. I have still not made a decision about cutting or not cutting the board ends yet, so they are still ragged.

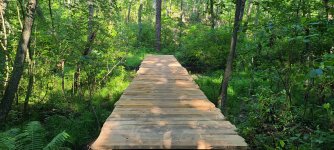
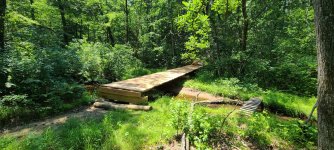
Got some measurements, walked off the ramp area, and it looks like I can go about 12' before it gets too tight with the first tree. Hopefully that will be long enough for a smooth incline. I will work on that and getting the rest of the screws in next weekend.

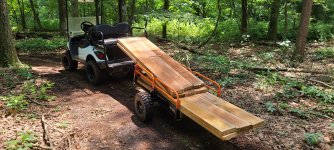
I have (4) smaller 10" or 12" utility poles and I will cut (3) of them to length for the ramp. I should be able to get them back there myself once they are cut down to size. I will probably cut the horizontal poles back a little further and use the outside two supports to hold the ramp stringers.

Here are a couple pics until next weekend.
 

Attachments

  • 20210705_135057.jpg
    20210705_135057.jpg
    2 MB · Views: 278
  • 20210705_133603.jpg
    20210705_133603.jpg
    2.8 MB · Views: 282
  • 20210705_133624.jpg
    20210705_133624.jpg
    3.9 MB · Views: 282
Last edited:
 
Top