Melsman
New member
- Joined
- Dec 15, 2020
- Messages
- 3
- Tractor
- Branson 2810
Hello All,
I'm new to this forum and recently bought a used Branson 2810 with a BL10 FEL and about 875 hours on it. I've appreciated the information I've found here, so I thought I might contribute as well.
I noticed that the three point hitch (TPH) would hiccup (or bounce) when raised to the up position. Sometimes it would bump worse than other times; and I could often get it to stop by lowering the TPH a bit, but not always. After doing some research, I came across this thread: 3-pt bouncing/bleeding which answered many of my questions. The TPH was definitely bouncing/hiccupping (when loaded) and, when I tightened the slow return valve and shut the engine off, the TPH would slowly lower to the ground (about 1/2" per second). According to the thread, these were symptoms of failed TPH piston rings. So, I ordered the parts from Dillon at Dave's Tractor in Red Bluff, CA., and prepared to dive into the repair. Note that since the service manual is crap for this tractor, I didn't know what parts were needed for this repair. I relied on Dillon to send me the correct parts.
The rings arrived in a week and I started to dismantle the tractor seat and plates and the TPH hydraulic power cylinder. The link above has some photos to help with the rather straight forward process of disassembly, but here are some additional notes:
1. They say it's about an hour project. I did not find this to be true; more like three hours from start to finish.
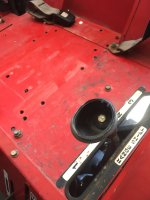
2. Figuring out how to get the knobs off the levers (without destroying them) took a bit of time. I used a claw hammer and block of wood to gently pry the knobs off. The 3-range shifter knob is different in that it has a 10mm bolt under the cap on the knob. (See photo)
3. The previous owner had used this tractor mostly to groom a horse arena, so I had to take off the floor plates as well as the seat plates in order to pressure wash the 1" accumulation of dirt before I dared open the hydraulic chamber.
4. Pulling the banjo bolt for the hydraulic fluid supply and the 6 bolts on the hydraulic cylinder head was straight forward. Be sure not to lose the copper seal rings on the banjo bolt. Also, there are two 0-rings on the face of that cylinder head that need to be checked and replaced if necessary. (I had suitable replacements in my Harbor Freight metric O-ring kit.) There's also a large O-ring that seals the cylinder head into the cylinder. Be sure to check that O-ring as well.
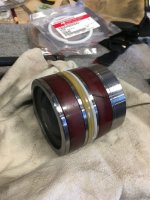
5. Pumping the lift arms didn't move the piston out for me, but letting the arms lower all the way to the ground (or close to it) pushed the piston far enough out that I was able to gently grab the lip with a pair of needle-nose pliers and pull the piston out.
I found that the rings were in decent shape,
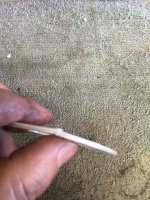
which made me doubt my diagnosis slightly. However, I did notice a slight spur on the little white "backup ring", but I didn't think that was bad enough to cause a problem. (See photo)
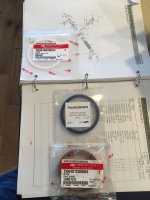
Dillon at Dave's tractor had sent me three rings: one TNA4020999A9 "New Style One Piece U-Packing Seal", one TB36400000A4 Backup ring, and one TNA401C000A4 wear ring. (See photo)
However, when I examined the piston, I realized that the new "one piece" ring replaced the old piston ring and backup ring group, so the backup ring IS NOT USED with the new one piece seal ring. Also, Dillon only sent me one wear ring; the piston has two. So, since my wear rings were in good shape, I reused one of my old wear rings with the new wear ring. In short, the CORRECT parts for this repair are: one TNA4020999A9 New Style One Piece U-Packing Seal, and two TNA401C000A4 wear rings.
Note that I am NOT blaming Dillon at Dave's Tractor for this mix up. As crappy as the manuals are for this tractor, I'm sure he was guessing as best he could.
Here are some additional notes on installing the rings:
1. The wear rings and backup ring are slit rings so removing them was simple. The packing ring (seal) not so much. There are videos online where a person is using two screw drivers to remove and then reinstall the ring. I felt like that would scratch the piston up, so I used small plastic pry bars to do the job.
2. The piston seal ring has a raised lip that should be installed toward the top of the piston.
3. Before reinstalling the piston, use a jack stand to raise and hold the TPH arms in a slightly up position (to allow the piston to seat further into the cylinder).
4. Reinstallation involved wiping the cylinder walls with a clean cloth (just to make sure there was no debris), lubricating the new rings with a small amount of hydraulic fluid, guiding the piston into the cylinder, and then tapping it into the cylinder with a wooden dowel and rubber mallet. It went home with only 3-4 gentle taps.
5. Before reinstalling the cylinder head, you may want to disassemble the slow return valve and check to make sure its O-rings are in good shape as well.
6. When installing the cylinder head, be sure the two small O-rings are in place and the large sealing O-ring is slightly lubricated before assembly.
7. Clean the copper seal rings on the banjo bolt before reconnecting the hydraulic line.
Since I already had the tractor apart, I decided to check the Relief Valve and Safety Valve just to make sure they were clear and in good order. Note that each of these has sealing O-rings that need to be checked for wear. (Both were good, BTW.)
Before I started buttoning everything back up, I started the tractor and ran the hydraulics through a few cycles. Everything responded normally and, most importantly, there were no leaks.
After reinstalling the seat and floor plates and making sure everything was buttoned up properly, I reattached the Gannon box (box scraper) and raised and lowered it multiple times... no more hiccups! I guess the slight spur on the backup ring was enough to break he seal of the piton and cause leak-by. Maybe that's why Branson went to a single ring system.
So, there you have it; a successful repair. Hopefully, this information will help someone diving into this for the first time.
Melsman
I'm new to this forum and recently bought a used Branson 2810 with a BL10 FEL and about 875 hours on it. I've appreciated the information I've found here, so I thought I might contribute as well.
I noticed that the three point hitch (TPH) would hiccup (or bounce) when raised to the up position. Sometimes it would bump worse than other times; and I could often get it to stop by lowering the TPH a bit, but not always. After doing some research, I came across this thread: 3-pt bouncing/bleeding which answered many of my questions. The TPH was definitely bouncing/hiccupping (when loaded) and, when I tightened the slow return valve and shut the engine off, the TPH would slowly lower to the ground (about 1/2" per second). According to the thread, these were symptoms of failed TPH piston rings. So, I ordered the parts from Dillon at Dave's Tractor in Red Bluff, CA., and prepared to dive into the repair. Note that since the service manual is crap for this tractor, I didn't know what parts were needed for this repair. I relied on Dillon to send me the correct parts.
The rings arrived in a week and I started to dismantle the tractor seat and plates and the TPH hydraulic power cylinder. The link above has some photos to help with the rather straight forward process of disassembly, but here are some additional notes:
1. They say it's about an hour project. I did not find this to be true; more like three hours from start to finish.
2. Figuring out how to get the knobs off the levers (without destroying them) took a bit of time. I used a claw hammer and block of wood to gently pry the knobs off. The 3-range shifter knob is different in that it has a 10mm bolt under the cap on the knob. (See photo)

3. The previous owner had used this tractor mostly to groom a horse arena, so I had to take off the floor plates as well as the seat plates in order to pressure wash the 1" accumulation of dirt before I dared open the hydraulic chamber.
4. Pulling the banjo bolt for the hydraulic fluid supply and the 6 bolts on the hydraulic cylinder head was straight forward. Be sure not to lose the copper seal rings on the banjo bolt. Also, there are two 0-rings on the face of that cylinder head that need to be checked and replaced if necessary. (I had suitable replacements in my Harbor Freight metric O-ring kit.) There's also a large O-ring that seals the cylinder head into the cylinder. Be sure to check that O-ring as well.
5. Pumping the lift arms didn't move the piston out for me, but letting the arms lower all the way to the ground (or close to it) pushed the piston far enough out that I was able to gently grab the lip with a pair of needle-nose pliers and pull the piston out.
I found that the rings were in decent shape,

which made me doubt my diagnosis slightly. However, I did notice a slight spur on the little white "backup ring", but I didn't think that was bad enough to cause a problem. (See photo)

Dillon at Dave's tractor had sent me three rings: one TNA4020999A9 "New Style One Piece U-Packing Seal", one TB36400000A4 Backup ring, and one TNA401C000A4 wear ring. (See photo)

However, when I examined the piston, I realized that the new "one piece" ring replaced the old piston ring and backup ring group, so the backup ring IS NOT USED with the new one piece seal ring. Also, Dillon only sent me one wear ring; the piston has two. So, since my wear rings were in good shape, I reused one of my old wear rings with the new wear ring. In short, the CORRECT parts for this repair are: one TNA4020999A9 New Style One Piece U-Packing Seal, and two TNA401C000A4 wear rings.

Note that I am NOT blaming Dillon at Dave's Tractor for this mix up. As crappy as the manuals are for this tractor, I'm sure he was guessing as best he could.
Here are some additional notes on installing the rings:
1. The wear rings and backup ring are slit rings so removing them was simple. The packing ring (seal) not so much. There are videos online where a person is using two screw drivers to remove and then reinstall the ring. I felt like that would scratch the piston up, so I used small plastic pry bars to do the job.
2. The piston seal ring has a raised lip that should be installed toward the top of the piston.
3. Before reinstalling the piston, use a jack stand to raise and hold the TPH arms in a slightly up position (to allow the piston to seat further into the cylinder).
4. Reinstallation involved wiping the cylinder walls with a clean cloth (just to make sure there was no debris), lubricating the new rings with a small amount of hydraulic fluid, guiding the piston into the cylinder, and then tapping it into the cylinder with a wooden dowel and rubber mallet. It went home with only 3-4 gentle taps.
5. Before reinstalling the cylinder head, you may want to disassemble the slow return valve and check to make sure its O-rings are in good shape as well.
6. When installing the cylinder head, be sure the two small O-rings are in place and the large sealing O-ring is slightly lubricated before assembly.
7. Clean the copper seal rings on the banjo bolt before reconnecting the hydraulic line.
Since I already had the tractor apart, I decided to check the Relief Valve and Safety Valve just to make sure they were clear and in good order. Note that each of these has sealing O-rings that need to be checked for wear. (Both were good, BTW.)
Before I started buttoning everything back up, I started the tractor and ran the hydraulics through a few cycles. Everything responded normally and, most importantly, there were no leaks.
After reinstalling the seat and floor plates and making sure everything was buttoned up properly, I reattached the Gannon box (box scraper) and raised and lowered it multiple times... no more hiccups! I guess the slight spur on the backup ring was enough to break he seal of the piton and cause leak-by. Maybe that's why Branson went to a single ring system.
So, there you have it; a successful repair. Hopefully, this information will help someone diving into this for the first time.
Melsman
