Flail Mower Berti TA200 ditch flail

   / Berti TA200 ditch flail #1  

3Lfarms

Platinum Member
Joined
Apr 11, 2017
Messages
904
Location
Roy, UT
Tractor
LS XU6168CPS and Farmall F-20
I did it! I won the silent auction a local city was having on some of their old equipment. The auction had one really bad picture...so bad I barely knew what I was looking at. Did not even know the size or model number. There was just the one picture from the side, and the description "Bertie mower". They even misspelled Berti. Lol
Anyway, I got the call yesterday and I went and picked it up today.
I found out the size and model number by looking at the ID plate. It was built in 2001. They said it worked fine last year when it was last used.
Plans are to clean and lube it and see if it works. When we picked it up with a loader, the hammers looked alright. The one change they made was to add a big piece of rubber on the front to help keep the tractor clean. Apparently the city had to pay some claims for broken windows and I think the bean counters forced its sale.
Here is the pic after setting it in the rental trailer.
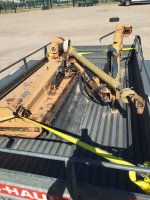
IMG_1380.JPG


Out the door cost....$500.
 
   / Berti TA200 ditch flail #2  
I want to welcome you as the newest resident member of the Flail Mower Nations.
My friend you have a forever mower there, you need a new PTO shaft guard, new belts, change the 90 wt. oil,
order a new manual and spares from a Berti dealer and you will be fine.
You can buy all the parts from a Berti dealer for it. Make sure you purchase Kevlar V belts for replacements when you begin your repairs on it too.
OH and by the way your mower will operate vertically. They did not know that apparently. Most likely the operator was using it vertically and was not mowing away from a residence IF that is what happened which I am pretty sure is what happened AKA operator error. The first thing you need to do is buy a replacement manual and then get rid of that (*&%$%^&*(*&^% rubber flap!!!!!!!!
I hate it when people work on flail mowers that know nothing about them fixing imaginary problems- that rubber flap is an insult to Rube Goldberg!!!!!!


Chain it down before someone steals it on you!!!!!!!!!!!!!!!!!!!!!!!!!!!!!!!!!!!!!!!!!!!!!!!!!!!!!!!!!!!!!!!!!!!!!!!!!
 
   / Berti TA200 ditch flail
  • Thread Starter
#3  
Thanks! I figured if I ended up with this one, I'd have to put some time and money into it to get it up to snuff. I just hope the bearings are OK and I don't have to replace them. Wouldn't be the end of the world if I did though.
I was planning on cutting off the rubber flap and mounts. I don't think they understood that a flail shouldn't be used to mow gravel and to keep the roller on the ground.
Any tips on where to get a PTO shaft guard long enough? The ones at my local Tractor Supply are too short.
 
   / Berti TA200 ditch flail #4  
YES. cut the rubber flap and steel work off it!!!! I would cut the welds with a small grinder that way you can weaken the welds and then bend it off and then clean the surface up with the grinder and paint it as it needs paint.

They almost ruined a high quality European made boom mower and now you have it and it will last you a lifetime as long as you take care of it. if you trade up to a bigger mule you will have now problems using it either.

Give me a few minutes to find the Berti dealer closest to you and I will post it here.

The first name that came up as a Berti dealer that I found was Stotz equipment but
Berti is not listed in their equipment lines.

I would call the Edney folks first in any case to save time as the PTO shaft is a eurocardan PTO shaft


Edney Distributing Company Incorporated
8485 215TH Street West
Lakeville, Minnesota 55044
844-757-2850

Please call the Edney folks first as you can obtain an original manual from as well.
Make sure you have all the information from the flail mowers identification plate
in front of you when you call them.
The Edney folks would have the parts you need. That PTO shaft has seen better
days. Its a shame they never stored it indoors.
 
Last edited:
   / Berti TA200 ditch flail #5  
I have attached a current Berti brochure for you here.

You can also send emails to the Berti company in Italy and they will help you.


View attachment 513968
 
   / Berti TA200 ditch flail
  • Thread Starter
#6  
I have been playing with it today, and aside from a small leak in one of the hoses, it seems to work fine. Hammers all say Berti and are all intact and have a decent edge. Roller turns fine.
I took the rubber flap off and will cut off the mounts with the plasma cutter and grind them down flush.
One problem I have to fix first is the top link hole is a slot, but it is badly worn on one side. The slot on the other side is sized for a Cat 1 top pin, but the lowers are Cat 2. I don't understand why the top slot was undersized. I think I, going to have to weld in a patch on the worn out side and recut the slot. My question is, does it really need to be a slot, or can I just drill a Cat 2 pin hole so it doesn't side and wear out again?
 
   / Berti TA200 ditch flail #7  
One problem I have to fix first is the top link hole is a slot, but it is badly worn on one side. The slot on the other side is sized for a Cat 1 top pin, but the lowers are Cat 2.

Isnt that hole intended for a stepped bolt, combined cat 1/ cat 2 ?

With a cat 1 toplink you push the cat2 part against the toplink ball and put a lynch pin in the first hole. With a cat 2 toplink you push the toplink pin through till it hits the plate with the smaller diameter hole, and put the lynch pin in the 2nd hole of the stepped bolt.
 
   / Berti TA200 ditch flail
  • Thread Starter
#8  
Isnt that hole intended for a stepped bolt, combined cat 1/ cat 2 ?

With a cat 1 toplink you push the cat2 part against the toplink ball and put a lynch pin in the first hole. With a cat 2 toplink you push the toplink pin through till it hits the plate with the smaller diameter hole, and put the lynch pin in the 2nd hole of the stepped bolt.

I just don't understand why one would want to use a Cat1 top link on a heavy cat2 implement. I'm going to rework it into a slot for a standard Cat 2 pin. It's not like I'm going to sell this thing.

I did get more work done on it today. I changed the oil in the gearbox, lubed up the PTO shaft and checked the belts...which seem to be new goodyears.
I did a quick operational check and it spins up with no noise and very little vibration. So I think it's going to work just fine. Just have to get the leaky hose replaced.

I think it's going to get a paint job to match my tractor tomorrow..
 
   / Berti TA200 ditch flail #9  
The top link mount is damaged from improper use of the mower that is why it looks funny.
The slot which is the top link was damaged over time by the use of the mower being rocked
back and forth rather than simply letting it follow the ground contour.

It would be simpler to fabricate a heavy top link weldment using the same thickness of steel as
you need that structural strength to support the mower when raised.
 
   / Berti TA200 ditch flail #10  
The top link mount is damaged from improper use of the mower that is why it looks funny.
The slot which is the top link was damaged over time by the use of the mower being rocked
back and forth rather than simply letting it follow the ground contour.

It would be simpler to fabricate a heavy top link weldment using the same thickness of steel as
you need that structural strength to support the mower when raised.


The other thing is that your going to have to cut both weldments off and then cut steel from the same thickness of sheet steel to make new weldments for it. If you look closely you will see the steel blank that is welded to both ears of the top link. this was done for several reasons.

1. eliminate frame stress when the flail mower is used as a trimming mower to cut back hedges and over growth along a road or vineyard.

2. prevent the top link from tearing the welds when the mower is at a very high negative angle when mowing a ditch bank.

3. the entire weldment left ear, right ear, top weldment connecting both ears is made into one piece of steel due to the way it was welded together to maintain its rigid frame to counter the stress from the mower being moved sideways and also mowing a ditch at a steep angle as well as mowing vertically with it.

4. the left and right weldments are also welded on the inside also to maintain the hitch in one rigid piece.

If you have vibration you need to find it and correct it otherwise your going to have more work. You can purchase new eurocardan spider bearings and parts to replace the old ones and that is where I would start first as that mower was abused and the universal joints are automatically suspect as you should have Zero Vibration and I mean Zero Vibration no matter what whether the mower is directly behind the mule or off to the side or when the flail mower is used vertically.

I would order replacement bearings when you order the PTO shaft shield and the larger round shield for the gearbox as its whipped as well.

I am not trying to spend your money, and you have work to do to correct the abuse that beautiful machine was put through as they really abused and miss used it and it only makes more work for you sadly. When the repairs are done you will have a beautiful mower again.


Tractor & Equipment Auctions

(9) 2 PLUG VALVES (A52472)
(9) 2 PLUG VALVES...
Dell PowerEdge T630 and PowerEdge R520 Rack Servers (A50325)
Dell PowerEdge...
NEW HOLLAND 706 30 INCH 3PT DIRT SCOOP (A52748)
NEW HOLLAND 706 30...
2015 FREIGHTLINER CASCADIA TANDEM AXLE SLEEPER TRUCK (A52577)
2015 FREIGHTLINER...
2007 INTERNATIONAL 7400 DT466 SFA 4X4X CHASSIS TRK (A51406)
2007 INTERNATIONAL...
2010 Ford Edge SE SUV (A51694)
2010 Ford Edge SE...
 
Top