Bad sheetrock prep for paint

/ Bad sheetrock prep for paint #1  

JRobyn

Elite Member
Joined
Dec 4, 2003
Messages
2,797
Location
Middle TN
Tractor
Kubota L4330HST
Any expert sheetrock finishers/painters on here? I've got a project that has stalled because I'm not sure what's the best way to proceed and could use some expert advice.

Missus decided to strip the wallpaper in the little bathroom and paint it. I don't know how the walls were originally prepped for the wallpaper, but evidently it was poorly. It looks like the wall was sheetrocked, mudded, then primed with a coat of latex and then papered. Probably not sized. The paper was extremely "stuck". Paper tiger was required, plus multiple applications of DIF. Even so some sheetrock paper was damaged and parts of the latex prime coat peeled, leaving lifted edges.

I have used a water soluble white-glue-like product before to prep damaged sheetrock paper, so maybe that will help with that, but I really don't know what will work to address the peeling edges of the latex. If I try to sand off the remaining latex, I'm sure that MUCH more paper damage will result.

The desired end-point is a smooth enough surface so that it can be final finished with regular latex paint.

- Jay
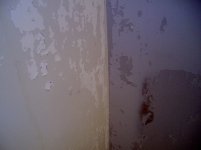
SANY1192 (1024x766).jpg
 
/ Bad sheetrock prep for paint #2  
I am not an expert but have hung hundreds of sheets of drywall and taped and mudded many of them. You don't say how large the room is or mention what fixtures there are or how many electrical outlets are in place. Is the ceiling drywall or suspended? First floor, or basement? I recently redid a 1950 vintage bathroom that had terribly poor walls and ceilings, they were in such poor shape I removed the vanity and stool and drywalled over the existing walls and ceiling using 3/8" drywall and box extenders for the electrical outlets. Most bathrooms are small enough that very few joints need to be taped and mudded. The reason I asked if the bathroom you have is on the first floor or in the basement is that no matter how hard you try to repair existing drywall and paint, any moisure will cause more issues down the road. A second alternative is to install decorative paneling over the existing walls. Not sure if these suggestions help, though.
 
/ Bad sheetrock prep for paint #3  
Or, just demo and re-do, with backer board if moisture is a real issue.
 
/ Bad sheetrock prep for paint #4  
Or, just demo and re-do, with backer board if moisture is a real issue.

Stick895, problem with demolition and redo is that some older homes have REALLY thick walls...the bath I recently redid had 3/8" drywall covered with a layer of plaster, with ANOTHER skim coat of plaster atop that layer. The horizontal ceiling to wall corners had reinforced WIRE MESH so the plaster would have something to stick to and whoever installed the mesh wanted to use as many nails as possible to install it. It was so much easier to just add another layer of drywall.
 
/ Bad sheetrock prep for paint #5  
Been there done that. Existing bathrooms are hard to replace drywall so I would scrape as much as possible and then skimcoat as needed. I like using setting type compound that you mix because it seems to set harder in thin layers. I also use a screen sander with the shop vac to minimize the mess.
 
/ Bad sheetrock prep for paint #6  
That wall looks pretty rough. not ready for paint. I'd would get the new remodel drywall thats 3/8 and screw on walls. If worse comes to worse, you can always tear down old and put new stuff that is mold and moisture resistant for the bathroom.
 
/ Bad sheetrock prep for paint #7  
I did a bathroom long ago that had the ol' sheetrock and 2-coat plaster with wire mesh in the corners. I didn't want to do the ceiling, just the four walls.

The outside wall had blown cellulose insulation, and seeing that I wasn't knocking it out of place and to avoid re-stuffing it I hastily threw up some 6 mil plastic, stapling it thru' cut-up squares of cereal box. 6 mos later and tired of taking baths vs showers (oh, I do procrastinate) I green-walled over the intact plastic and called it a 'vapor barrier'.

But, what about the mesh around the ceiling's perimeter?? A curved-ended chisel in an 'burp gun' (pneumatic chipping hammer, ~$15 for the set at HFT) went thru' it like butter just walking it along, and not adding much dust to what busting all that plaster had generated anyway. (!) With mesh still in place beneath where plaster had crumbled an inch or so out from the very corners I had no trouble taping & mudding as usual. (thin coats there, allow for shrinkage) btw: when I finished that one the GF move in. :dance1:

A pal didn't wipe down the dust too well from a recent bath redo and primer bubbled where it didn't stick. Wifey wanted her colors, not work to do, so they topped over that without fixing the spots first. I was reminded that even the best sealers (KillZ orig for me) can't guarantee to stop old s__ from working it's way to the surface elsewhere, a case for tearing some down and re-sheeting where you logistically can.
 
/ Bad sheetrock prep for paint #8  
How did you get pictures of my house?

Looks exactly like my ongoing projects.

Former owners used shelf type paper for wallpaper. It ALWAYS takes off chunks up to the 1/4" deep when removed.

Where I had a large section with few corners to trim I demo'ed and replaced. In tight areas I sanded down and put on skim coats with the widest knife I could find (18"?) and sanded smooth. It isn't fun, but slow work is best. I find it easier to put on a lot of skim coats and sand it down.
 
/ Bad sheetrock prep for paint
  • Thread Starter
#9  
Thanks guys. I shoulda noted that this is a small 1/2 bath, so no real water issues and no mold. First floor, only three electrical boxes (light, light switch, outlet), one HVAC register. About 1985 construction; 1/2" rock for walls and ceiling. As far as I can tell, there is nothing in the wall/ceiling joints except a tape/mud joint.

I hate to demo and redo or cover over with 3/8 because I want to TRY to avoid removing the vanity and a large glued-down mirror above it. Also hate to remove the base mould and shoe mould, but that's not as much of a consideration.

For skimming over, would regular mud (joint compound) work best or a modified thinset? KennyG, exactly what do you mean by "setting type compound"?

- Jay
 
/ Bad sheetrock prep for paint #10  
When you buy drywall compound you can buy the bucket/tub of premixed stuff or you can buy "setting type" which is dry powder in a bag. The setting type comes in various types that set in 20, 45 or 90 minutes. I suggest getting the "lightweight" or "sandable" versions. Maybe it's just me, but I find it easier to work and stronger than the premixed stuff.
 
/ Bad sheetrock prep for paint #11  
I had the same problem in a bedroom found some 1/4" sheetrock at HD. You have to look for it or call around to find a HD or Lowe's that has it but it is available. Cover over the existing walls with the 1/4" tape mud and paint. Easy to put up and a lot quicker than trying to skim coat and fix all the imperfections. You will end up with a nice clean wall to paint without all the mess associated with ripping it out and starting over.
 
/ Bad sheetrock prep for paint #12  
My BIL is a drywall man and we have done a few jobs together. He buys 1/4" drywall and covers bad walls like you have. It is quick and easy and looks good when you finish.
 
/ Bad sheetrock prep for paint #13  
When you buy drywall compound you can buy the bucket/tub of premixed stuff or you can buy "setting type" which is dry powder in a bag. The setting type comes in various types that set in 20, 45 or 90 minutes. I suggest getting the "lightweight" or "sandable" versions. Maybe it's just me, but I find it easier to work and stronger than the premixed stuff.

Durabond is one trade name
 
/ Bad sheetrock prep for paint #14  
I remodel for a living. If things are not to bad, I would use Gaurdz, It glues everything down, and then a skim coat of mud. I might have missed it, but what are the finished walls going to be? If texture, some are pretty forgiving. You can apply a knock down texture (which is probably what your house has if 80's era) or it might have some thick stuff. There were some pretty heavy textures in the 80's so maybe you could get lucky and it could match the rest of your house. If you are going to go with the texture that is popular now (light trowel swirls) you have to use really thinned down mud and have your walls really smooth.
Dave
 
/ Bad sheetrock prep for paint #15  
I remodel for a living and deal with wall paper fairly often. Depending on the decade the wall paper was made will depend on how successful you are at getting the glue off. The 70's was a very good decade for glue. No EPA to mess with and as a result, some very good glue was used!!!! Everything built and used in the 80's is crap, and usually pretty easy to clean up. By the 90's it all sort of got worked out and it comes off pretty easily.

Of the different types of glue removing products, I like the one with the shark on it. I think it's made by Zinnsser. The trick is letting it do it's job, but not waiting too long. You want to soak it, then wait for it to work. Then it scrapes of real easy. If you wait too long, it dries up again and the glue holds it onto the sheetrock again. Timing is everything, so work in a small area at a time.

If it's really sticking and nothing is getting it off, I either replace the sheetrock or put another layer over it. This is always more work because in addition to hanging the sheetrock, you also have to tape and bed it. This is my last resort, but sometimes the fastest and cheapest if the wall isn't salvageable.

Either way, you will have to float, feather and sand it to make it look nice. Go with the 80 grit paper from Home Depot. The Gator stuff from Lowes is just pure crap.

I like the premixed joint compound with the blue on the box. It's a lightweight, easy to sand, easy to mix and apply joint compound. The green label box dries so hard it wears you out sanding it. I always buy it by the box. I have a plastic cup in my drywall toolbox that works great for how much water to add to the box. Always add water and mix up your premixed joint compound. You want it like butter. Soft and smooth when you apply it.

I use three trowels. I start out with an 8 inch and work up to the 16 inch. For inside corners I have two trowels, a small and a big one. For outside corners, I prefer the metal corner beads, but will use the plastic from time to time if I think there is a reason for it.

Are you going to texture the walls? If you have never done it before, and you don't have a hopper, the spray cans work great for small areas. I use them all the time for patch jobs. Be sure you get the non odor type if you want to do the wall. It goes pretty quick and you will need quite a few of them, but they are simple and easy to use with great results. For an entire wall, a room or a house, I use my hopper. It's more work, but a lot cheaper with the hopper. You just need to own a hopper, air compressor and hose.

Good luck,
Eddie
 
/ Bad sheetrock prep for paint
  • Thread Starter
#16  
Thanks again guys. I think I got it. I still have some of the glue-like stuff I used before (sounds very similar to the "Gaurdz"), then a light sanding to knock off most of the raised latex edges, then I'll try skimming with dry-mix compound. If I can't get a decent surface (for final coating of latex paint), I may wind up covering over with 1/4".

- Jay
 
/ Bad sheetrock prep for paint #18  
Just remember - go wide
I spent years using an 8" taping knife and now 12" is minimum.

I really enjoy hanging drywall because it's a challenge to see how well you can fit the boards...taping and mudding are what I hate doing...my work looks like a chimp with a pushbroom spread the mud....:laughing:
 
/ Bad sheetrock prep for paint #20  
For "skim-coating", wide knife (for initial taping you want smaller knives because you can over-load the joint and the tape will not bed properly). The USG premixed compound is widely available in either "green" (general purpose) or "blue" (lightweight). Maybe just my experience but I thought the "blue" had higher shrinkage but does sand much easier than the "green" which will be important on a skim coat because it's hard to avoid the ridges where your knife overlaps. You probably will want a texture on the wall when you paint because texture hides a lot of flaws (that's why they do it!). For a small powder room it will be hard to justify buying/renting a texture sprayer so see what your paint guy has. They used to sell a sand type product that you added to the paint, otherwise you might want to checkout textured primers. You will definitely want to prime.
 
 
Top