Back Deck

/ Back Deck #1  

DennisFolsom

Gold Member
Joined
Oct 6, 2003
Messages
427
Location
Central Maine
Tractor
John Deere 4600, John Deere X380
When we built our house, in 2004 - 2005, the plan was to put a deck across most of the back side, which faces south. However, due to lack of money, time, and energy, we didn't start the back deck until this year. I did build a very nice front porch deck about 5 years ago.

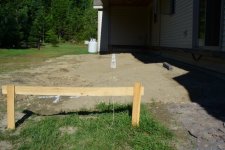
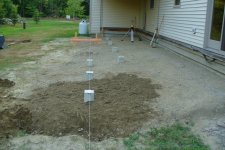
Photo 1 shows where the deck is going. Note the overhanging portion of the truss roof. The area under the roof will be screened in (approx 8' x 16'). There will be a 12' x 12' section, roughly centered on the atrium door. The middle portion will be approx 8' x 12'. The total length comes out approximately 40'.

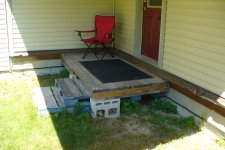
Photo 2 shows our old "temporary deck," in the future screened porch area. It was made from an 8' x 4' pallet.

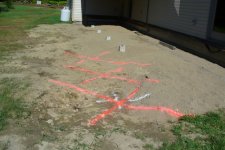
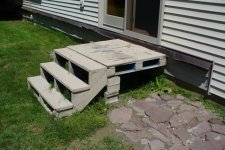
Photo 3 shows our old temporary back step at the atrium door.

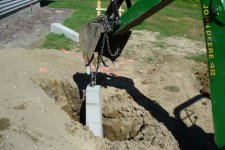
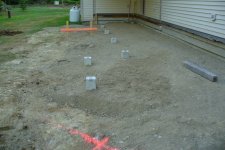
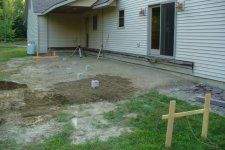
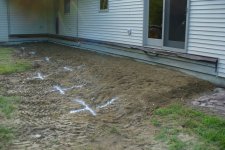
Photo 4 shows the area after I had removed the temporary structures, stripped the sod, and placed some of the gravel. The white paint was a preliminary layout of where my precast piers are going. Note the copper flashing over the first ledger board is wrinkled, but is all there. There will be spacers and another ledger board, bolted on, through the spacers, the first ledger board, the rim joist and into backers that I am installing between the joists in the basement. The spacers allow water to drain between the deck and the house.

By putting the first ledgers on before we sided the house, and installing J-channel around them, we avoided having to mess with the siding when we build the deck. However, we made one slight mistake, which I now regret. somehow, the whole thing comes out about 4 inches OVER 40 feet long, which means that my beams, ledger, and rim deck joists will require a 12', a 14', and a 16' piece. For the decking itself, I can get away with two 12' pieces and a 16' piece, because I will be running a transverse piece at the end to hide the end cuts anyway.

More coming in my next post.
 

Attachments

  • Photo1.JPG
    Photo1.JPG
    138.5 KB · Views: 386
  • Photo2.JPG
    Photo2.JPG
    148.3 KB · Views: 406
  • Photo3.JPG
    Photo3.JPG
    159.9 KB · Views: 323
  • Photo4.JPG
    Photo4.JPG
    146 KB · Views: 414
Last edited:
/ Back Deck
  • Thread Starter
#3  
I am using precast concrete piers to support by beck beams. They are 4' tall, 12" square at the bottom, and 6" square on the top. This is the second time I've used these. I also used them on my shed project, which was reported here last fall.

Because my deck will be fairly low, I am not using posts. There will be a bracket bolted to the pier, shims, and then the beam (two 2 x 10's) in the bracket. This method of construction requires that the elevation of my piers is controlled very tightly. I am using a laser level to help with that. In calculating the elevation for the bottom of the piers, I allowed for 1/4" of shim. That way, if I have a pier that is a little high, I am still not out of luck.

I first dig a trench with my backhoe. There are too many rocks here to get away with using a post hole auger. The soil is mostly clay. Fortunately, it is dry enough in this area that I am not getting water running into my holes (like I did on my shed project). My foundation drain has been working for 6 years, which helps the water situation. I set the target on my leveling rod to allow a 4" gravel bed for the pier.

When my hole is deep enough, I reset the leveling target to the bottom elevation of the pier. I very carefully grade and tamp the gravel bed with a rake. My goal is to keep the elevation within 1/8".

I set the pier in with the backhoe, and keep it chained while I start to backfill. I try to keep to all gravel within 6" of the pier, and use the excavated material outside of that radius. In the real world, I'm using a bit more gravel than that. At times, I may also have a bit of clay that comes closer than 6", but that's what I shoot for.

I backfill and tamp by hand for about 1/3 of the way up the pier. Then I take the chain and shackle off and stretch a string (from batter boards) over the top for transverse alignment. My brackets allow a little play here, but they need to be close. Longitudinal placement is not as critical. I put marks on my string as an aid in checking longitudinally, but the marks move, depending how tight you stretch the string. I make any final adjustments in the alignment at this time by leaning the pier in the direction needed and retamping the backfill.

I backfill and some more by hand - to about the 2/3 point - before I fill the top with gravel from the bucket.

Photo 5 was taken after I got the first two piers in.

Photo 6 shows the string stretched over the first row of 4 piers.

Photo 7 shows the first 4 piers and orange X's for digging in the second row of 3. Due to the fact that the first pier in the second row is not far from the last pier in the first row, I decided to make my trenches at a 45 degree angle. This worked out very well. It let me pile my excavation farther out with the backhoe. It also allowed me to place a bucket of gravel on the inside (for hand backfilling) before each dig.

Photo 8 shows how I hook the pier up to the backhoe. The last pier is on the ground in the photo.

Photo 9 shows where I was when I quit yesterday.

As of this writing, I still have one more pier to place. I had to work today at my paying job.
 

Attachments

  • Photo5.JPG
    Photo5.JPG
    155.8 KB · Views: 384
  • Photo6.JPG
    Photo6.JPG
    147 KB · Views: 329
  • Photo7.JPG
    Photo7.JPG
    135.7 KB · Views: 284
  • Photo8.JPG
    Photo8.JPG
    152.7 KB · Views: 390
  • Photo9.JPG
    Photo9.JPG
    134.5 KB · Views: 350
/ Back Deck
  • Thread Starter
#4  
In my previous post, I referred back to my shed moving project. Here's the link to my thread on that one:

http://www.tractorbynet.com/forums/projects/225643-moved-shed.html

Yesterday, before putting the tractor away, I decide to pull out what I thought was a small rock in my back lawn. This rock was a "granite iceberg!" there was a whole lot more of it lurking under the surface. Here's a photo of it after I loosened it up, and one showing it in the bucket.
 

Attachments

  • Photo10.JPG
    Photo10.JPG
    159 KB · Views: 357
  • Photo11.JPG
    Photo11.JPG
    173.3 KB · Views: 372
Last edited:
/ Back Deck #5  
Looks like it is going to be a great deck.

I am impress with your ability to keep the piers on level and in line with the back fill. Are you worried about settling affecting the alignment?
 
/ Back Deck
  • Thread Starter
#6  
Looks like it is going to be a great deck.

I am impress with your ability to keep the piers on level and in line with the back fill. Are you worried about settling affecting the alignment?

The original clay soil under the excavation is hard-packed and it is down about 3.5 ft. Especially on the south side, and near my semi-heated basement foundation, I don't expect to have frost trouble. I tamped my 4" bed of 1.5" gravel quite well. I still possibly could get a bit of setttlement, but I don't expect much. If I do have a problem, I can unscrew the brackets on the beams and re-shim them.

Thanks for your comment and interest.
 
/ Back Deck
  • Thread Starter
#7  
This afternoon and evening, I got the 7th (and last) pier in. Here are a couple of photos.

Next, I plan to shape my gravel, put plastic down and cover it with more gravel.

If it fits with my work schedule tomorrow, I'll meet with the sales rep from my lumber company and finalize the order for the framing lumber. If all goes well, we should be framing this weekend.
 

Attachments

  • P1040166.JPG
    P1040166.JPG
    134.6 KB · Views: 306
  • P1040168.JPG
    P1040168.JPG
    144.6 KB · Views: 304
/ Back Deck #8  
Unsolicited opinion: (isn't that what makes TractorByNet great, the unsolicited opinions ... anyway) may I suggest landscape fabric over plastic? The plastic will be basically tatters within 3-5 years whereas the fabric will still be there. It's more expensive but longer lasting, and it doesn't seem like your skimping. Also, and don't tell anyone I said so, but a little motor oil around the outside of your piers will keep the frost from heaving 'em. If you have frost wherever you are and all the other appropriate disclaimers included.

Just saying .....
 
/ Back Deck
  • Thread Starter
#9  
jomar215 -
Thanks for the advice. I always appreciate getting advice and opinions, whether I use them or not.

The tapered design of the piers is supposed to keep the frost from grabbing the sides of them. A little lubrication probably wouldn't hurt, though.

I bought 6 mil plastic. My thinking was that water goes through the landscaping fabric, and I'm trying to get the water away from the foundation as much as I can. I plan to slope the gravel away, lay the plastic, and put a couple more inches of gravel on top of the plastic. I'm only talking about the area under the deck. If I have plastic extending beyond the deck (and I may), I will cover it with more gravel. Hopefully, the plastic will last that way.

We have some thinner plastic (garbage bags actually), that's been down for 5 years, covered with flat rocks and stone dust in the cracks. I dug into the end of those and they seem to be holding up OK.

We did use some landscaping fabric on an area that we mulched over and planted shrubs in. In that case, we wanted the water to go through, but wanted to keep the weeds down. That has worked well for a couple of years, now.
 
/ Back Deck #10  
Yeah, I have seen thos plastic bags like you would wrap your produce in at the grocery store last a long, long time without much sign of wear. But then, I've used that same 6 mil as tarps and seen it gone in 1 year of being baked in the sun. I've dug up the same plastic a year or 2 later and it was pretty well gone, too, but not quite as bad as the sun baked portion.

If you want to get the water back I'd just slope the surface, presuming you've got some clay in your soil we do around here, away from the house and pack it down but good. Cover it with a good drainage stone and it'll drain. The ground might become saturated some in real heavy storms. They say a level pipe will drain, and it will, but code only calls for 1/4" of drop in 10' of run. If you can put 2" of pitch over 8'-10' you won't see too much water accumulate.

Do you get water in your basement? Is that the problem?
 
/ Back Deck
  • Thread Starter
#11  
Do you get water in your basement? Is that the problem?

I had a shrinkage crack in my 60 ft long basement wall. (I should have known better and provided a waterproof joint. I am a civil engineer. I designed the house and I was my own prime contractor.) I have chisled out a groove on both the inside and the outside. I filled the grooves with hydraulic cement, then coated with DryLock on the inside and on the outside above the ground line. Below the ground line, I covered the repaired crack generously with the sticky asphalt and a layer of heavy felt paper. Since doing the repair work, I have had no more trouble with water coming in the basement, even in the heaviest downpours. Also, my foundation drain is working well. I keep the outlet clear. It runs a bit, even in dry weather.

The lawn area adjoining the deck is relatively flat, but does have a slight slope away. I may do some fine-tuning on that, too, before I'm done.

I'm working on sloping the gravel now. I'm giving it about 3 inches of slope in 8 ft. You may well be right that the slope and a gravel or stone layer is all I need. My wife is convinced that we need the plastic to keep weeds and grass from growing into it.

In this situation, the 6 mil plastic will be covered with 2 inches of gravel and will be under the deck. There shouldn't be enough sun baking to bother it.

Thanks, again for your thoughts and suggestions.
 
/ Back Deck #12  
Meh, plastic would be cheap assurance, at that point. Good work on the foundation crack repair. You're doing a good job .... I'm looking forward to more pictures of your progress.
 
/ Back Deck
  • Thread Starter
#13  
Here is an update on my progress:
I finished installing backers between the joists in the basement. it was great to be able to work in the cool basement during this hot weather, even though I did have to unload my lumber rack to gain access.

I laid the plastic sheeting (see 1st photo). My wife and I spread and graded approximately 2" of gravel over the sheeting (see 2nd photo). The tractor was very handy for distributing the gravel so that raking and shoveling was reduced.

I finalized the order for framing lumber and had it delivered near the work area (see 3rd photo). I met with the Hammond Lumber sales rep about 10 AM, and it was delivered about 2 PM the same day!

I assembled and installed the longer beam (28 ft). I staggered the joints and put 32 screws into each joint. I also put sets of screws about every 18" along the beam. I have the leveled the beam with shims, adjusted the brackets, and tightened everything down. I have installed the ledger/1st joist at the garage end. I have also made and installed the spacers over the copper flashing. (See 4th photo)

I had to get a bit creative where my beam attaches to the garage (See 5th photo). I have a propane gas line running through there and a satellite TV cable. I cut a 45 degree piece off the top of the beam end. I also had to shorten the double joist hanger to stay under the gas line. I drilled an extra pair of screw holes in the hanger to make up for the two that I cut off. Previously, I had installed a backer in the garage wall to provide more for the screws to bite into. I used 2.5" screws here. The TV cable wasn't much of an issue, it slipped below the sheathing, around the end of the beam.

For various reasons, I'm not quite so far along as I had hoped I would be at this time. However, I'm stll making progress. I'll be installing the second ledger along the house next.
 

Attachments

  • P1040170.JPG
    P1040170.JPG
    160.4 KB · Views: 276
  • P1040176.JPG
    P1040176.JPG
    148.5 KB · Views: 238
  • P1040174.JPG
    P1040174.JPG
    143.6 KB · Views: 250
  • P1040178.JPG
    P1040178.JPG
    152.1 KB · Views: 284
  • P1040179.JPG
    P1040179.JPG
    124.8 KB · Views: 328
/ Back Deck
  • Thread Starter
#15  
I'm in the southeast corner of Readfield. I'm less than 10 miles from Hammond's Belgrade store.
 
/ Back Deck #16  
Ha, I'm 1 mile from their Brunswick store. Good folks over there. Well, it sure is a nice day to be in Maine, eh! Enjoy.
 
/ Back Deck
  • Thread Starter
#17  
With work and various other interruptions, progress is still kinda slow on my deck project. However, I did get the ledgers finished and have started installing joists. The first photo shows where I left off today.

The second photo shows the jig I made for installing joist hangers. I screw the jig to the ledger at the point I have marked. I then wrap the hanger around the jig and screw it into place. Next, I drop the joist in. The jig makes it easier to mount the hangers consistently. So far, I've only had one joist that was low enough that I needed to shim it. For whatever reason, that one was about 1/8" narrower than the others.

The third photo shows where I notched the ledgers on the bottom side for the dryer vent. I am planning to frame a hatch in the deck to provide access to clean the vent. I also will have a downspout connected to a 4" pipe that will run to the outside of the deck. The downspout will be right next to the dryer vent. To complicate matters further, one of my double joists (for a joint in the decking) also comes into the same area. I have a scheme in mind for how I will frame all this. Hopefully, I'll have that done tomorrow, and will post a photo then.

I am hoping to get in most of tomorrow on the deck.
 

Attachments

  • P1040184.JPG
    P1040184.JPG
    130.1 KB · Views: 294
  • P1040181.JPG
    P1040181.JPG
    122.1 KB · Views: 282
  • P1040183.JPG
    P1040183.JPG
    125 KB · Views: 256
/ Back Deck
  • Thread Starter
#18  
Back deck taking shape!

I got in a good day today. I worked until 8 PM. The first photo shows that I now have all the joists in for the 8 ft wide section and have installed the beam for the 12 ft wide section. I need to trim both ends of the 2nd beam.

The second photo shows the framing around my hatch for maintaining the dryer vent.

The third photo shows the section that will get the 12 ft joists.
 

Attachments

  • P1040185.JPG
    P1040185.JPG
    140.5 KB · Views: 278
  • P1040187.JPG
    P1040187.JPG
    139 KB · Views: 396
  • P1040188.JPG
    P1040188.JPG
    133.3 KB · Views: 260
/ Back Deck #19  
Dennis I don't know if you are subject to permits and inspections where you are so this may not matter. Where I am after a few decks collapsed with large groups of people on them the inspectors got real picky about using screws on joist hangers. Screws don't have the shear strength that joist hanger nails have so that is their issue. I think there are some screws now that are rated for hangers but I have never used them. Personally I don't think you have a problem but I thought I would mention it in case it applied in your situation.

MarkV
 
/ Back Deck #20  
If I understand your problem correctly would it not be better to shorten the deck to 40' and patch the 3 inch gap on the house siding than to fix it by extending every piece of decking?
 
 
Top