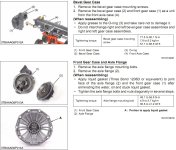
EDIT: Please read the thread for @
DaveD1944 post re: my mistake on not removing the seal's inner race on the bevel gear case. This mistake is why i had to use the press / so much force for reassembly. Those statements are WRONG; you do NOT need a press for this job..
just to circle back on this, i was able to replace the leaking seal and figured i'd document some of it. apologies for the few pictures, but this should be helpful for anyone wishing to do this job on their own..
first, a caveat; based on my experience, i think you'll need a hydraulic press (20ton or greater) to be able to do this job. getting it apart took nothing more complicated than a ratchet, a few sockets, dead blow hammer, and circlip pliers (a single, external circlip - more on this later). you'll also need a clean place to work, a drain pan, and jack stands.
outline of the procedure:
a) raise front tires off the ground with bucket or jack and lower/secure with jack stands
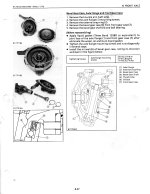
b) remove wheel of affected side
c) remove cotter pin and castle nut, pop tie rod end out of 'front gear case'
d) drain axle lube (there is a drain on each - left/right - of the 'front gear case') - do yourself a favor and drain both sides, otherwise an unexpected pivot of the axle can shower you in SUDT/gear oil
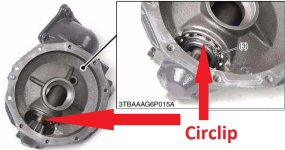
e) remove 'axle flange' (poorly named - it's really the outer half of the 'front gear case') and release the external circlip holding the 'bevel gear case' to the 'front gear case'
f) separate 'front gear case' from the 'bevel' gear case' - this is where the seal that needs to be replaced lives.
g) remove 'bevel gear case' from tractor/axle
h) remove bad seal, press in new one
i) as they say..reassembly is the reverse...almost
i'm going to assume that a-d is self explanatory. lessons learned from the other steps:
e) the two halves of the front gear case - in kubota-speak, the 'front gear case' (inner half) and the 'axle flange' (outer half) are secured with 10 bolts and a liquid gasket. once the bolts are out, the only way for me to separate the two halves was carefully and methodically 'walk' around the seam with a cold chisel and lightly tap. eventually, i got a visible gap, and from that point was able to get the 'axle flange' separated within a minute. patience is key here - you do NOT want to damage the sealing surface of the two pieces. there is a large ball bearing attached to the 'axle flange' that seats in the 'front gear case'. because of this, DO NOT try to lever one side of the case to separate it; the 'axle flange' must pull straight out from the 'front gear case'
e2) the circlip is the elephant in the room. getting it off isn't too difficult, although it may help to put a jack under the 'front gear case' and apply some light pressure upwards. this will take any load off of it. the circlip sits above the small gear at the bottom of the 'front gear case'. putting the circlip back in place...well, that's when the press comes into play.
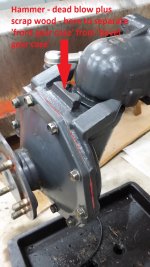
f) once the circlip is removed, the only thing holding the 'front gear case' to the 'bevel gear case' is friction between those two parts and the bad seal. now you get to release some frustration. on the top of the 'front gear case' is a cast boss (between the two cast steering stop bosses). plop a scrap ~6" long 2x4 on it, and beat the bejesus out of it with a dead blow hammer. i'd recommend you keep the jack under the 'front gear case' but with ~1" of space between the jack and bottom of the case. when the two parts separate, you don't want the 'front gear case' crashing to the concrete.
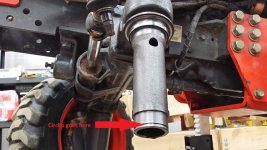
g) 4 bolts hold the bevel gear case to the axle tube. remove them, and using a dead blow hammer, GENTLY tap the cylindrical portion of the bevel gear case (roughly vertical) to separate it. there is an o-ring that provides the seal between these two pieces and as long as you're gentle, you won't have to replace it.
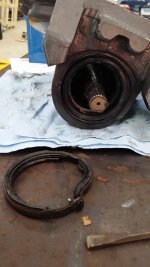
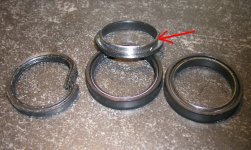
h) once the 'front gear case' and 'bevel gear case' are separated, removing the seal from the 'front gear case' also was a bit of a challenge. i tried all sorts of picks, seal pullers, etc. in the end, i took a 3/8" cold chisel and tapped around the external perimeter of the seal (where it was bound to the 'front gear case'). only a couple light blows got the stiction broken, and from there i was able to pull it out with a seal puller. again - DO NOT DAMAGE THE MACHINED SURFACE THE SEAL SITS IN. this is no little rubber seal - it is steel encapsulated in rubber, and is seriously tough.
h2) i drove in the new seal (P/N 32721-56223) with a 50mm impact socket and a dead blow hammer; improvise as needed. the thick walls of a 3/4 drive 50mm impact socket made a great seal driver
")
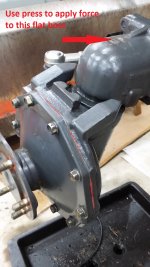
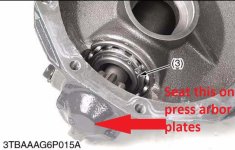
so...we've got three main parts off the tractor (ignoring the wheel/tire); the bevel gear case, front gear case, and axle flange. set aside the axle flange. i initially tried to re-attach the front gear case to the bevel gear case with the BGC still installed on the tractor. i eventually realized this is not possible. the two pieces need to be pressed together with enough force such that the circlip groove on the bottom of the vertical cylindrical portion of the bevel gear case clears the bearing in the front gear case (just above the small gear). thankfully, these parts are well engineered. on the bottom of the front gear case and on the top of the bevel gear case are flat bosses that are in the correct plane to apply force via a hydraulic press, seating the two pieces together and moving the circlip groove 'low' enough to put it back in place. my press (HF 20ton cheapie) doesn't have a guage, so i can't tell how much force i used...but it was quite a bit. i don't see any way to do this job otherwise. i couldn't even get the two pieces to really seat in the seal before putting it in the press - about 3/8" gap remained despite lifting the tractor via a jack on the FGC lower boss (ie, all of the tractor's front end weight was resting on that seal, and it still wouldn't even seat, never mind go deep enough for the circlip groove to be visible). Once pressed together, i was able to install the circlip (while still under pressure in the press).
now that the FGC and BGC are one unit, re-attach them to the tractor. NO liquid sealant is necessary for the BGC / front axle; the o-ring handles the oil sealing duties. once complete, COMPLETELY CLEAN/REMOVE any of the old liquid gasket from both the FGC and axle flange. the surface must be CLEAN; once i had scraped and brass brushed mine, i wiped it down with brake cleaner. lay a THIN bead of sealing compound (i used a hi-temp silicone because i had it laying around) on the axle flange sealing surface, and bolt it in place (note the two dowels to locate/clock it). i left mine to cure for 24 hours before refilling with gear oil, reattaching the tie rod end (well, i replaced mine - my shield got bent and tore the BJ boot), and remounting the wheel/tire.
was out and about cutting the grass and bushhogging for about 5 hours today and all seems well. no leaks, no bad noises
ahm


 .
.