Another Culvert Installation

   / Another Culvert Installation #1  

deputyrpa

Gold Member
Joined
May 24, 2008
Messages
364
Location
Fort Ann, NY
Tractor
2006 Massey Ferguson 3635 Cab
I'm at it again. :eek: This is the last field culvert I have to install for safe farming. The crossing site is just below a spring area, and we have been just driving thru the mucky clay to access the field for years. Last fall we almost tipped a loaded hay wagon over, and this winter I almost tipped my DK over while trying to get unstuck. My neighbor had to drag me out while I maintained bucket downpressure. It's time.

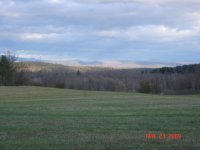
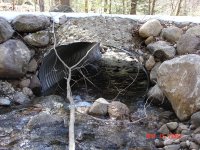
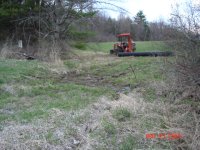
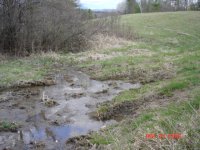
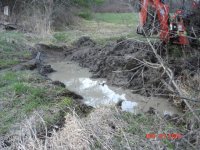
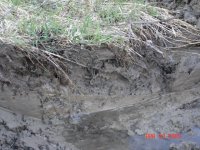
Here are some pics. As one can see, its's a mess. Since the discharge area is immediately upstream and there are ruts from driving thru it, there is no channel form until about 100 feet downstream, from the crossing. From thereon downstream, it's a typical incised clay channel. I'll deal with that later with cross vanes and such. The are is soup, with solid clay at least a foot or more down. I had to excavate all that soupy stuff out to prepare a solid base for the culvert to sit upon. That "schlop" kept running back into the excavation area. After I excavated tonight, I have to wait a few days to dewater the excavated clay. One pic shows the water pouring out, and the thick clay below the loam. It's looks ugly now, but it will only get better from here.:D

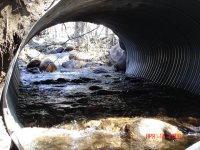
I have to place almost a foot of dry clay below the culvert to make sure I have the invert elevation high enough. Gravel over the clay will allow piping leading to failure. The problem is that I can't do it while water is present. So I have a choice - excavate a temporary bypass channel, or place the culvert in the current channel, get the water running thru it, and backfill little by little from the outlet to the inlet while lifting the culvert up each time. I did the latter sucessfully with my first culvert install. The problem with a bypass channel is that once the first foot of loamy ground is saturated, the bypass channel are will turn to mush and will take a very long time to dry.

More to come Saturday!
 

Attachments

  • DSC01659.JPG
    DSC01659.JPG
    156.1 KB · Views: 291
  • DSC01660.JPG
    DSC01660.JPG
    154.2 KB · Views: 256
  • DSC01663.JPG
    DSC01663.JPG
    158.2 KB · Views: 329
  • DSC01662.JPG
    DSC01662.JPG
    153.4 KB · Views: 251
Last edited:
   / Another Culvert Installation
  • Thread Starter
#2  
AND it was a nice drive home!
 

Attachments

  • DSC01664.JPG
    DSC01664.JPG
    154 KB · Views: 211
   / Another Culvert Installation #3  
Sounds like you know what your doing, I have a couple culvert questions. I'm thinking about installing a 20 ft section of culvert in a small creek to increase my yard space. It is a "dry branch" and mostly only has water in it when it rains. What is the best way to prep the area just before the culvert to keep it from filling up with mud, sand, leaves etc.? Also would it be better to surround the pipe with gravel then a layer of sod on top, or just fill dirt all the way around? I'm worried it may wash out from a heavy rain.
 
   / Another Culvert Installation #4  
Real nice deputy.

What is that stuff you are digging in??? I don't see any big round super hard things. I think your dirt is defective, it's missing the big hard round things.

Awsome picture, it's an amazing country we live in.

Joel
 
   / Another Culvert Installation
  • Thread Starter
#5  
Sounds like you know what your doing, I have a couple culvert questions. I'm thinking about installing a 20 ft section of culvert in a small creek to increase my yard space. It is a "dry branch" and mostly only has water in it when it rains. What is the best way to prep the area just before the culvert to keep it from filling up with mud, sand, leaves etc.? Also would it be better to surround the pipe with gravel then a layer of sod on top, or just fill dirt all the way around? I'm worried it may wash out from a heavy rain.

Well, I've studied some fluvial geomorphology and a bit of hydraulic engineering, in addition to biology, and established culvert installation standards for municipalities and the general public pursuant to our stream protection laws. It's part of what I do in my position for the state DEC. I prefer to actually do the work myself - try out techniques and determine their feasibility and level of success before I regulate the general public. I have numerous unprotected streams (do not have trout, culinary or primary contact values) on my property that drain into my pond, so any failures can only affect my property and waterbody, and be non-existent upon discharge from my property. If I can't do something, how the heck can I expect the genral public to? It would be setting them up for failure....and violations. I like to refer to it as the "servant" part of being a public servant.

Anyway, try to match the soil type that you have at the location. That way water will not try to "find" an avenue avoidance. That sort of issue, along with clogging, etc., lessens as the capactity of the culvert increases.

In other words, if the stream discharge from a 50 year storm exceeds the capacity of your culvert, water would pool upstream, developing more pressure as it tries to pass thru the culvert. This is actually part of hydraulic design, because pressure does increase culvert discharge, with water shooting out of it at greater velocity. However, the installatioin is then more vunerable to failure unless there is proper compaction of the design backfill, and adequate headwall protection. I would avoid all that in your situation.

A simpel design model, or surrogate for engineering, that we use is called the No-Slope design model developed by Kosmo Bates for the State of Washington. I converted it to fit the NY hydrograph, but it really doen't make much difference. Try this on.... Culvert diameter @ 1.25X the channel bed width (normal wetted area when running), should have the flattest possible slope (0% culvert slope for streams which have up to a 3% slope), and be embedded about 20% of the vertical rise. Shovel some of the excavated material back in the culvert and let the stream continue to function normally - transporting sediment, organic matter, debris, etc. If thats' too big for you, you can go smaller, but the failure potential increases. However, failure may not be sucha big deal in your case, so you can experiment too!

I'm sorry if I was long-winded or confusing, but I'm still slamming coffee.....
 
   / Another Culvert Installation
  • Thread Starter
#6  
Real nice deputy.

What is that stuff you are digging in??? I don't see any big round super hard things. I think your dirt is defective, it's missing the big hard round things.

Awsome picture, it's an amazing country we live in.

Joel

Thanks Joel. Yeah this is the clay section of my property... It's sometimes worse than rocks. At least rocks maintain their physical properties!

Yeah, it's great in our little valley. The views are awesome, and the land is fertile. Sad, though, only 2 out of 22 dairy farms remaining. I'm helping one of the last stay on his afloat.....with all of my might.....
 
   / Another Culvert Installation #7  
Wow! thanks deputyrpa! I'll have to save that message for when I get ready to do the installation. So when you say "shovel some of that excavated material back in the culvert" do you mean insinde the culvert? Should I do anything special at the mouth of the culvert, like large rocks or anything to keep things from plugging it up? Thanks again!
 
   / Another Culvert Installation
  • Thread Starter
#8  
The idea is to make the culvert "invisible" to the stream. The culvert will not clog when all stream material is allowed to pass through it. You should place good headpall stone protection upstream and downstream, and you should NOT widen the stream before or after the culvert. Yes, put material inside teh culvert to simulate the stream bottom. That way is has the same roughness coefficient of the stream.

Here's a basic diagram of what I explained. Pay no mind to the "40% countersunk" part...that's maximum allowable under the design model.

The two culvert pics are of a culvert we put in on a snowmobile trail that withstood a beaverdam failure located 1000 feet in elevation above the culvert, with only a few headwall rocks dislodged. One pic is the former beaver impoundment, and it lost A LOT of water. Millions of gallons came careening doen the ravine.
 

Attachments

  • LuzerneBeaverBreak2 001.jpg
    LuzerneBeaverBreak2 001.jpg
    597.5 KB · Views: 266
  • LuzerneBeaverBreak2 003.jpg
    LuzerneBeaverBreak2 003.jpg
    583.6 KB · Views: 230
  • ActiveChannelNH.bmp
    143.7 KB · Views: 180
  • LakeLuzerneBeaverDam 023.jpg
    LakeLuzerneBeaverDam 023.jpg
    610.8 KB · Views: 204
   / Another Culvert Installation #9  
I gotcha, thanks! your info will help alot when I do this project.
 
   / Another Culvert Installation
  • Thread Starter
#10  
Glad to help. Keep me posted on your project.
 

Tractor & Equipment Auctions

2009 Peterbilt 384 T/A Wet Kit Day Cab Truck Tractor (A50323)
2009 Peterbilt 384...
Avco / New Idea Hayrake (A50515)
Avco / New Idea...
Pro Tech 16' Snowbox (A50774)
Pro Tech 16'...
2013 Ford Explorer XLT SUV (A50324)
2013 Ford Explorer...
New Holland 1431 Discbine (A50515)
New Holland 1431...
AGT SSFM81 Drum Mulcher Attachment (A50322)
AGT SSFM81 Drum...
 
Top