48" Brush Hog Re-Assemble

   / 48" Brush Hog Re-Assemble #1  

MossRoad

Super Moderator
Joined
Aug 31, 2001
Messages
58,052
Location
South Bend, Indiana (near)
Tractor
Power Trac PT425 2001 Model Year
48\" Brush Hog Re-Assemble

As some of you may remember, I hit a large hidden rock while making my brush hog movies last year. It broke off a bolt head for one of the blades. I disassembled it and thought I'd take some pictures of the re-assembly.

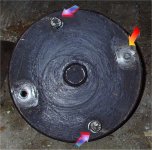
First picture is of the hub that the blades bolt to. This is what the bottom looks like. The orange arrow points to what's left of the bolt that sheared off. The purplish arrows point to two bolts that do nothing. I confirmed this with Power Trac. They are spare holes in-case the originals get damaged(at least, that's what they told me, but I've heard reference to 4 blades on a hub on some other machine). The hole with no arrow is where the other blade attaches. I removed it to get the bolt out to take to the bolt store for comparison.
 

Attachments

  • 332073-HubBottom.jpg
    332073-HubBottom.jpg
    93.1 KB · Views: 872
   / 48" Brush Hog Re-Assemble
  • Thread Starter
#2  
Re: 48\" Brush Hog Re-Assemble

This second picture is of the inside of the hub. Again, the orange arrow points to what's left of the bolt that broke and the purplish arrows point to the spare locations.

There really is nothing fancy about how the blades go on. There are nuts welded to the inside of the bolt holes. The bolt and a flat washer just goes through a bushing on the blade and you are supposed to use locktight on the threads, then just put it in.

Also note in this photo the hub with 5 bolt holes in it and the shaft with key. The 5 holes are for the bolts that hold the hub assemble to the underside of the deck with self centering bolts, similar to the nuts on car wheels(pictures another day). One half of the coupling device(forgot what it's called) goes on this shaft and it mates up with the other half on the motor.
 

Attachments

  • 332082-HubInside.jpg
    332082-HubInside.jpg
    94.6 KB · Views: 677
   / 48" Brush Hog Re-Assemble
  • Thread Starter
#3  
Re: 48\" Brush Hog Re-Assemble

This photo shows the top of the deck. The hub mounts from the underside, with the 5 bolts going down through the top of the deck, then into the 5 holes on the hub.

The stand up bracket with one bolt hole on each side of the main shaft hole is where the hydraulic motor mounts.

That's all I have for tonight. I need to pick up a bolt for the blade before I continue.
 

Attachments

  • 332083-DeckMotorMount.jpg
    332083-DeckMotorMount.jpg
    57.4 KB · Views: 589
   / 48" Brush Hog Re-Assemble #4  
Re: 48\" Brush Hog Re-Assemble

Did the bolt that holds the blade brake off? If so did it throw the blade very far? I sheared a bolt in mine the first time I used it, but it was one of the extra bolts in the hub and not one of the ones that holds the blades on. When it broke one of the blades folded backwards throwing it off ballance causing it to shake kind of hard. I pulled the blade back around and removed the broken bolt and replaced it with a new one. I was able to back the broke bolt out without having to take anything apart. I noticed on my blades that there was a nick on the back of both blades. I turned the blades back and the nicks in the back of the blades was where they were hitting the extra bolts. One thing I know is the brush hog takes a beating when it is in use, but it sure does a good job. Other than that broke bolt I haven't had any other problems with mine.
 
   / 48" Brush Hog Re-Assemble #5  
Re: 48\" Brush Hog Re-Assemble

Charlie, looks like MossRoad has taken some nice pictures of our Roughcut Mower stumpjumpers! Thanks, Moss.

toy: <font color="green">I sheared a bolt in mine the first time I used it, but it was one of the extra bolts in the hub and not one of the ones that holds the blades on. </font>

My roughcut came without bolts in the extra holes. I think I'd take them out if I were you guys.

I haven't sheared any bolts yet (I took Charlie's advise and upgraded to grade 8 bolts to hopefully slow the rounding off of the bolt heads) but I have broken two of my experimental high lift blades when the high back curve of the blade swung against the end of the center shaft. Breaking blades is something I'm familiar with - on my old Brush Hog 405 I would break one or two blades every year - the heavy duty 1/2 in x 4 in blades! When I would encounter a tree stump that had been cut off at an angle (or a similar rock) the blade would ride up the "ramp" of the cut and break off. Hit a square cut stump or rock and it kick back just fine. It was those ramps. On my high lift blades it's the rising curve of the back of the blade that is the ramp.

Sedgewood
 
   / 48" Brush Hog Re-Assemble #6  
Re: 48\" Brush Hog Re-Assemble

MR,

Did you pull the bottom stub shaft out of the hub. Just curious whether it is just a greased bushing, or has roller/ball bearings.

Duane
 
   / 48" Brush Hog Re-Assemble #7  
Re: 48\" Brush Hog Re-Assemble

Gee! I thought those extra bolts were there to make that big BANG when you start the mower. Don't know for sure, but I think they are there to limit the back swing of the blades so they don't get hung up.
 
   / 48" Brush Hog Re-Assemble
  • Thread Starter
#8  
Re: 48\" Brush Hog Re-Assemble

<font color="blue"> Did the bolt that holds the blade brake off? If so did it throw the blade very far? </font>

Yes. The bolt that held one of the blades on sheared off even with the bottom of the hub. It just started shaking violently, so I shut it off, waited for the blades to stop spinning, raised the deck and backed up. The blade dropped right under the deck(thank goodness). I've been tempted to lift the deck while it is running to drop it on shrubs and stuff, but am glad I never did that. It is just too dangerous to get the hog higher than ground level with blades spinning. You could get killed in an instant. With the hog being so tough, I just stop the blades, raise the hog up 52", push it onto the shrub and use power down to smash it to a workable height. Then back up, start the blades and run the shrub over chopping it into oblivion. /forums/images/graemlins/grin.gif

<font color="blue">I noticed on my blades that there was a nick on the back of both blades. </font>

Did they look like the dents in the picture that is attached to this post? I've put an orange arrow to the dent in the picture. If so, that is what caused it. Both blades have it in the exact same place and both spare bolts are dented on the same sides. I never put the two together and just figured I had hit something. When I finish the re-assembly, I'll take a picture of them hitting the spare bolts. /forums/images/graemlins/wink.gif
 

Attachments

  • 332391-dent.jpg
    332391-dent.jpg
    32.9 KB · Views: 424
   / 48" Brush Hog Re-Assemble
  • Thread Starter
#9  
Re: 48\" Brush Hog Re-Assemble

<font color="blue"> I took Charlie's advise and upgraded to grade 8 bolts to hopefully slow the rounding off of the bolt heads </font>

Power Trac recommended grade 5 minimum or 8 if I wanted, so I think I'll go with grade 8 for all of them as well.
 
   / 48" Brush Hog Re-Assemble
  • Thread Starter
#10  
Re: 48\" Brush Hog Re-Assemble

<font color="blue"> Did you pull the bottom stub shaft out of the hub. Just curious whether it is just a greased bushing, or has roller/ball bearings. </font>

No, I didn't pull the shaft from the hub, but will look at the bearing type when I re-assemble it, and take pictures, of course. /forums/images/graemlins/laugh.gif
 

Tractor & Equipment Auctions

2014 Dodge Charger Sedan (A50324)
2014 Dodge Charger...
2018 Caterpillar 416F2 4x4 Extendahoe Loader Backhoe (A50322)
2018 Caterpillar...
SET OF 48" QUICK ATTACH MAST PALLET FORKS (A51242)
SET OF 48" QUICK...
2019 FORD F550 XL SERVICE TRUCK (A51243)
2019 FORD F550 XL...
2017 Buick Regal Sedan (A50324)
2017 Buick Regal...
2016 CATERPILLAR CT660 TRI AXLE DUMP TRUCK (A51222)
2016 CATERPILLAR...
 
Top