buckeyefarmer
Epic Contributor
Nice edge.
Here is short video of the blue ridge tunnel near his build.
Here is short video of the blue ridge tunnel near his build.
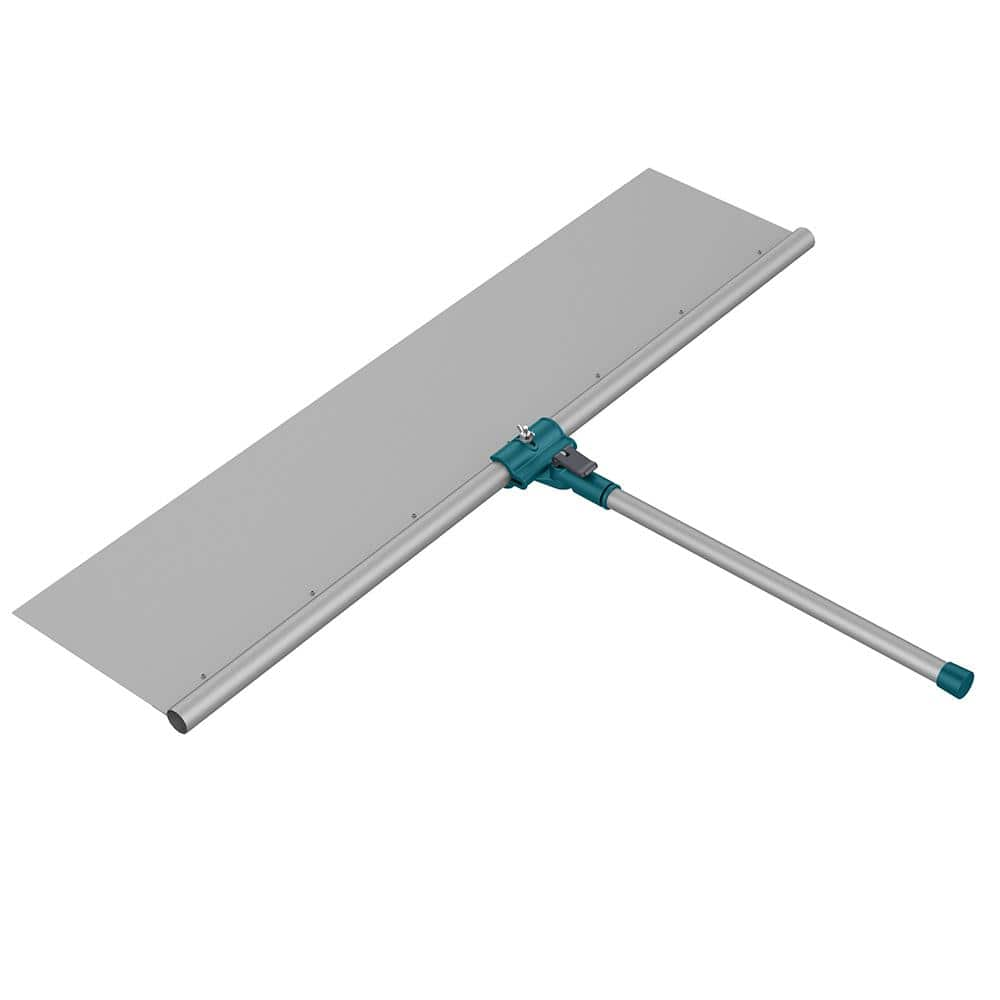
Something you may find helpful around all those beams so you don't get paint on them is a paint shield. It looks like the worlds largest drywall taping knife but is light weight aluminum typically. They are about 2-3 feet long or so with a handle maybe a foot or so long. You hold it up against what you don't want to get paint on and then you don't need to be quite as careful to avoid painting the beams, in your case. Just stay away from the ends of it and always use the same side out so you don't inadvertently transfer paint from the shield to your beam.
Like this:
Anvil 36 in. Aluminum Multi-Angled Paint Spray Shield 19PT0906 - The Home Depot
Remove unwanted dust or other impurities from your paint by using this Anvil Aluminum MultiAngled Paint Spray Shield.www.homedepot.com
Painting is not a fast operation, despite what many people think. And you have a lot of things to work around with the beams, so it will go slower than typical. You have a good plan to wrap up the smaller rooms first so you can get some areas finished and accelerate your move-in.
Your build is amazing. I feel that you are now at the stage that is like the final ascent of Mt. Everest. You can see that magnificent final destination, but the only way to get there is to keep taking one agonizing step after another. The journey makes it worth it.
Keep a wipe rag in your pocket or close by. Wipe the edge of the device frequently. I made a paper towel holder out of some scrap 2x6‘s for footers and 2x4‘s risers bored two holes in the top of the 2x4’s and inserted a rod through a roll of paper towels. I would grab a paper towel wipe the edge of the device throw the towel in a trash can and start painting again.I have one. And I hate to admit, but I have still managed to screw things up with it. It works great for the first 2 or three passes, then it is pained on the other side and starts making a mess. Maybe I went all the way to the end of it and it dripped around.
Curious how (or if) you plan to finish the wood beams once everything else is done?I forgot to get a picture of the drywall by beam when they were done but without paint.
Here is a picture after I painted.
View attachment 773029
That looks like nice stuff. Interesting application process. Will you have to fully sand the beams smooth in order to apply it? Seems like it would be problematic to apply on a rough wood surface.That has been a source of many spirited discussions. Jefanna has done test areas with several products. I finally got her to stop doing it on the beams and use some extra pieces that we have. We tested a couple products. We tried Heritage and I like it but she thought it was too dark and the wood took on too much of a red tone. So the product she likes is Rubio. It is a floor coating. It is pricey as heck.