chim
Elite Member
There's some cleanup to do here that will involve a fair amount of scratching. Since there was a piece of 6x4x3/8 galvanized angle in the scrap pile at work, I thought I'd give it a try. Since the material was mostly galvanized, it involved some grinding. When I weld galvanized steel, I run the grinder over the weld areas till the wheel throws a decent shower of sparks.
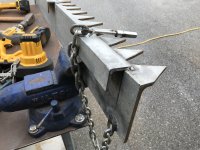
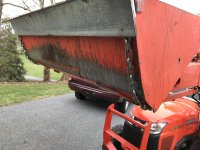
The teeth are on the 4" leg of the angle, and the 6" leg extends back under the bucket's cutting edge. Three smaller pieces of angle wrap up over the bucket edge to keep it in place.
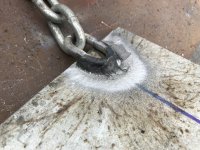
Two chains, welded to the top of the 6" leg go around the back of the bucket. I found a couple long 3/8" bolts and some rod couplings to secure the chains at the top. The original thought was to use the slotted angle for the bolts, but the angle they would have come through didn't look ideal. It seemed better to drill a hole in the bucket for each bolt to pass through. The way the chain wraps around the bend in the bucket worked pretty well.
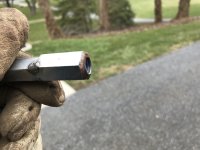
I assumed that the threads of the bolts would get messed up where they pass through the hole, so I stacked two rod couplings and tacked them together. The rod coupling that is against the bucket is a shortened 1/2" coupling. Its purpose is to provide a free and clear spot for the 3/8" bolt threads. I rounded the end that goes toward the bucket because even with this location, the bolt comes through at a slight angle.
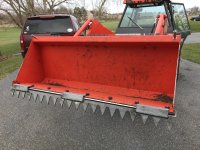
I ran it through some testing and it worked fine. With the bucket level and the teeth perpendicular to the ground, it scraped and gathered the "viney veggies" in the fencerow. With the bucket dumped so the teeth attacked the ground point-first, the teeth dug little furrows.
Had a great day today! Life is SOOO much better since completing the welding table. Till now, the choices were to throw a piece of plywood on a pair of saw horses, or grovel about on the ground.
The teeth are on the 4" leg of the angle, and the 6" leg extends back under the bucket's cutting edge. Three smaller pieces of angle wrap up over the bucket edge to keep it in place.
Two chains, welded to the top of the 6" leg go around the back of the bucket. I found a couple long 3/8" bolts and some rod couplings to secure the chains at the top. The original thought was to use the slotted angle for the bolts, but the angle they would have come through didn't look ideal. It seemed better to drill a hole in the bucket for each bolt to pass through. The way the chain wraps around the bend in the bucket worked pretty well.
I assumed that the threads of the bolts would get messed up where they pass through the hole, so I stacked two rod couplings and tacked them together. The rod coupling that is against the bucket is a shortened 1/2" coupling. Its purpose is to provide a free and clear spot for the 3/8" bolt threads. I rounded the end that goes toward the bucket because even with this location, the bolt comes through at a slight angle.
I ran it through some testing and it worked fine. With the bucket level and the teeth perpendicular to the ground, it scraped and gathered the "viney veggies" in the fencerow. With the bucket dumped so the teeth attacked the ground point-first, the teeth dug little furrows.
Had a great day today! Life is SOOO much better since completing the welding table. Till now, the choices were to throw a piece of plywood on a pair of saw horses, or grovel about on the ground.