Finally did it !!!!!!!!! Been dreading it for months.

/ Finally did it !!!!!!!!! Been dreading it for months. #1  

pharmvet

Platinum Member
Joined
Sep 28, 2008
Messages
535
Location
North East TX
Tractor
Ford 7710 II FWA, NH TB110 FWA w/ NH 46LB loader, JD 5303 2wd w/ loader
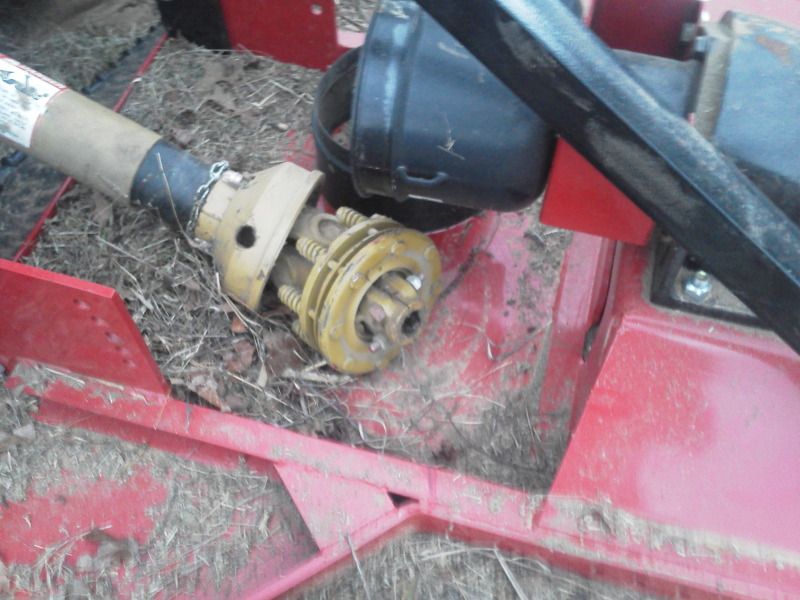
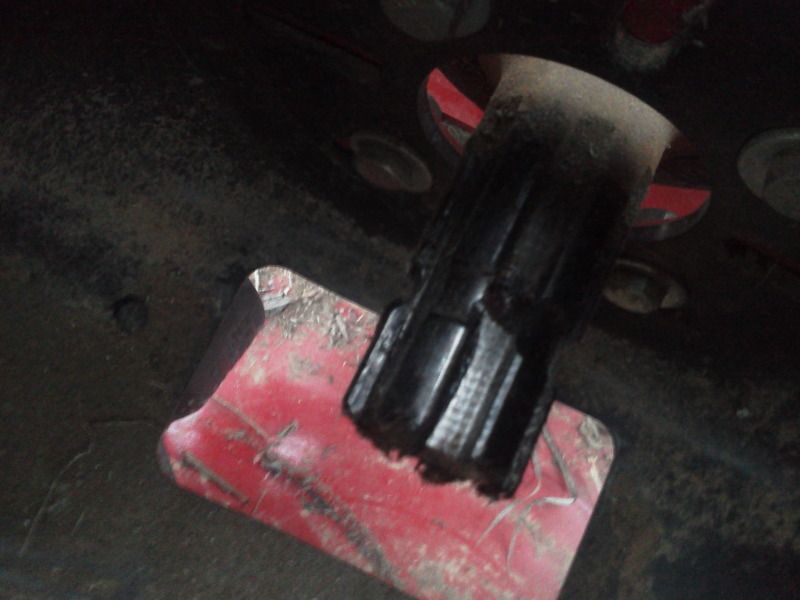
After much confusion I figured out that the drive line on my Bush Hog 406 was too long and was bottoming out. I don't know how, but I ran it just a little last year for about an hour. I must have hooked it up at just the right angle to allow me to attach the driveline to the PTO output shaft. Anyway, when I went to hook it up this year I realized the drive line needed to be shortened. To be honest, I kinda thought this was one of those things that you hear about doing, but that nobody really ever needed to do. I kinda figured the Manufactures had it all figured out and that todays tractors and implements would match up without any "adjustments". But such was not the case. It took some doing, mostly I have been dreading the chore and have had a hard time finding time. With a little help from my 12 and 5 year old and some good old fashioned elbow grease, I got it done. I am so happy now that next time I make it to the farm I can just start shreading without worring about the dreaded task of shortening the shafts. I cut 4 inches off of both male and female shafts as well as each guard. Here are some pics. Enjoy.

IMG_20130127_133053.jpg

IMG_20130127_134251.jpg

IMG_20130127_135309.jpg

IMG_20130127_140243.jpg

IMG_20130127_142045.jpg
 
/ Finally did it !!!!!!!!! Been dreading it for months. #2  
Good job!
 
/ Finally did it !!!!!!!!! Been dreading it for months.
  • Thread Starter
#3  
And for the second half of the day, I completed another chore I have been putting off for a couple of months. A large pine fell on one of my deer feeders. I have been looking at it for some time thinking "when I get time, I need to cut that tree off my feeder. Well, this afternoon I made time. Glad its done. Im gonna sleep well tonight!!!
IMG_20130127_162503.jpg

IMG_20130127_165115.jpg

IMG_20130127_165122.jpg

IMG_20130127_173831.jpg

IMG_20130127_172340.jpg

IMG_20130127_174129.jpg
 
/ Finally did it !!!!!!!!! Been dreading it for months. #4  
What I'm wondering, is how in the world did you keep from damaging your tractor or brush hog with a driveshaft that was 4 inches too long? You are one lucky fella!

Most of the time it tears out the PTO on the tractor(snaps the case), or sometimes it breaks the gearbox on the attachment.
 
/ Finally did it !!!!!!!!! Been dreading it for months.
  • Thread Starter
#6  
What I'm wondering, is how in the world did you keep from damaging your tractor or brush hog with a driveshaft that was 4 inches too long? You are one lucky fella!

Most of the time it tears out the PTO on the tractor(snaps the case), or sometimes it breaks the gearbox on the attachment.


The only thing I can think of that prevented that: I was incorrectly using the upper most top link attachment on the Shredder. If you look at the last picture, you can see that I now have it correctly in the middle (intended for Cat II) The way I finally decided I needed to shorten the drive line was that I hooked it up a while back (with the top link positioned correctly) and could not get the lift arm extension to collapse back into place as long as the shaft was attached to the PTO output.

I really don't think it was actually 4" too long, but I figured 4" would give me plenty of slack and make attaching it easier in July with sweat running down my forehead into my eyes. LOL The operators manual states that a minimum of 6" overlap is required and I certainly have more than that.
 
/ Finally did it !!!!!!!!! Been dreading it for months. #7  
I have not had to do this yet, but suspect the time is coming with all the new implements I'm currently buying. Like you I've dreaded the thought of doing this - until I saw your photos. The overlap photo is what did the trick.

IMG_20130127_140243.jpg


I can now "see" exactly what it is that would need to be done. Thanks for posting!
 
/ Finally did it !!!!!!!!! Been dreading it for months. #8  
I've had to do a couple. Used the 4" angle grinder for cutting, those shafts are thick.

A good way to fit your new pto shafts is to connect the equipment to the tractor as normal, except the pto shaft should be connected on the implement end only. Then raise and lower the implement through its full range. At the lowest, center and highest position, you should have to extend the tractor end of the pto driveshaft for it to reach the tractor's pto shaft. If you don't have to extend it, it is too long.
 
/ Finally did it !!!!!!!!! Been dreading it for months. #9  
The hardest part for me was getting the danged plastic covers off.
 
/ Finally did it !!!!!!!!! Been dreading it for months. #10  
Good job and timely.I had a friend rip the pto case out of his NH using a post hole digger that the shaft was too short.
Gets expensive fast.His tractor was brand new and the dealer sold him the PHD.
 
/ Finally did it !!!!!!!!! Been dreading it for months. #11  
Good job and timely.I had a friend rip the pto case out of his NH using a post hole digger that the shaft was too short.
Gets expensive fast.His tractor was brand new and the dealer sold him the PHD.

Did it come apart and flail the living daylights out of everything on the backend of the tractor?
 
/ Finally did it !!!!!!!!! Been dreading it for months. #12  
Did it come apart and flail the living daylights out of everything on the backend of the tractor?
It snapped the gear driving the PTO,dealer did not warranty....
 
/ Finally did it !!!!!!!!! Been dreading it for months.
  • Thread Starter
#13  
Now Im wondering about my drag type Rhino TR120. It hooks up straight just fine, but Im wondering if I am bottoming out when I turn. Im trying to think in my head if this would shorten or lengthen the distance between the pto shaft and the implement gear box??
 
/ Finally did it !!!!!!!!! Been dreading it for months. #14  
I did a quick CAD layout.

In a turn, the implement pivots about the drawbar and the PTO shaft pivots about its front u-joint. If the drawbar pivot is closer to the implement than the u-joint pivot, then the PTO shaft shortens in a turn.

Good catch.
 
/ Finally did it !!!!!!!!! Been dreading it for months.
  • Thread Starter
#15  
Suffered a confidence shattering setback. LOL was shredding some pretth heavy stuff this evening and heard an abnormal sound. Looked back just in time to see the PTO shaft come loose from the gearbox. Immediately shut things down and got off for closer inspection. Female portion just distal to the slip clutch came off the gear box input shaft. Looks like a bolt or pin should go through both the male and female shafts once joined. I wonder now if my running it some last year with the shafts bottoming out sheared this pin and the vibration of normal use allowed this??
IMG_20130128_173909.jpg

IMG_20130128_173935.jpg
 
/ Finally did it !!!!!!!!! Been dreading it for months. #16  
That's more than likely what happened. I can't tell from the pictures(blurry), can it be repaired?
 
/ Finally did it !!!!!!!!! Been dreading it for months.
  • Thread Starter
#17  
Yes, I think so. I don't think there was any damage done. There is a hole through the gear box input shaft (perpendicular to the axis of the shaft) as well as a hole through the male portion of the clip clutch attachment point. I suspect there should be a pin or bolt through this hole to prevent this from happening again???
 
/ Finally did it !!!!!!!!! Been dreading it for months. #18  
Yes, I think so. I don't think there was any damage done. There is a hole through the gear box input shaft (perpendicular to the axis of the shaft) as well as a hole through the male portion of the clip clutch attachment point. I suspect there should be a pin or bolt through this hole to prevent this from happening again???
Yes, there should be a bolt thru there. But while you have the opportunity, pull that black plastic cover off and inspect the shaft seal, and the front of the gearbox for cracks. While you are at it, check the tractor end also. Look for hairline cracks in the paint. If unsure, use a magnifying glass or something.
 
/ Finally did it !!!!!!!!! Been dreading it for months. #19  
In your second pic, of the shaft. See the 'cutout' section that is about 1/2 inch from the end? The bolt that goes thru your slipclutch. slides thru the slot(cutout section) on the black shaft(that holds them together).
 
/ Finally did it !!!!!!!!! Been dreading it for months.
  • Thread Starter
#20  
In your second pic, of the shaft. See the 'cutout' section that is about 1/2 inch from the end? The bolt that goes thru your slipclutch. slides thru the slot(cutout section) on the black shaft(that holds them together).

Ok, I can see how that works now. Wonder how that slid off??
 
 
Top