At Home In The Woods

/ At Home In The Woods
  • Thread Starter
#1,721  
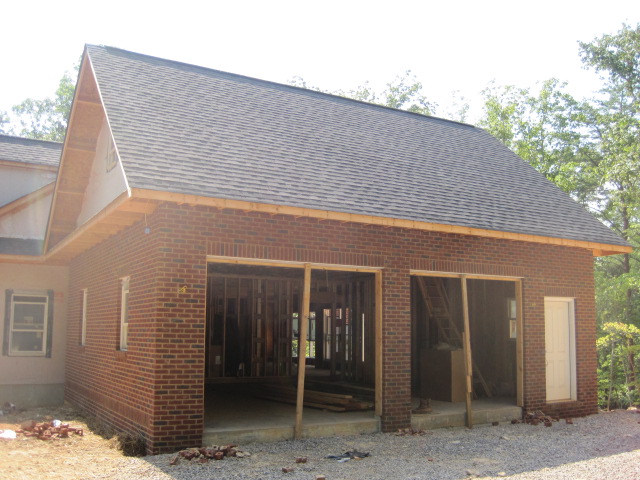
Brick work is finished. The mason will have to come back and add flashing over the basement porch and over the main floor back porch ledger board for the deck.

attachment.php


Tonight I started prep-work for putting in the drain tile for the retaining wall. The holes in the drain tile will be pointed downward when I install the pipes. After the drain tile is in, I can finish the grading so the back porch can be built.

The drain pipe that leads from the basement drain tiles had silt that had backwashed into the drain pipe. The fired construction manager we got rid of had backfilled dirt in a way that silt would just wash into the drain pipe. My wife constructed a U-Turn in the end of a water hose. We pushed the water hose into the drain pipe and flushed the silt out of the drain pipe. I used a flashlight and mirror to check the pipe. The water hose cleaned out the drain pipe very well.
 

Attachments

  • IMG_4560.JPG
    IMG_4560.JPG
    119 KB · Views: 1,096
  • IMG_4564.JPG
    IMG_4564.JPG
    191.2 KB · Views: 283
  • IMG_4570.JPG
    IMG_4570.JPG
    149.7 KB · Views: 365
  • IMG_4569.JPG
    IMG_4569.JPG
    131.9 KB · Views: 336
/ At Home In The Woods #1,722  
Thanks walleyed. You've been kinda quiet.


I'm pretty quiet by nature.. Well maybe not but you are a long way from me and I have no idea about building codes and methods there. I wouldn't want to give you wrong info. Besides the great folks here have looked after you very well.

I bet you are happy to see the end of another big part job (the brick). When were you planning on making the move into the house?
 
/ At Home In The Woods #1,724  
Obed...Nice looking brick job...If you did not have him clean the brick and he wants to charge you extra to clean the brick, if I were you I would pass and save the money since most of the bits of morter will get knocked off and cleaned off by rains and you can also pressure wash it. When we built our house they tried to charge me $1,000 to wash it off...I passed and did it myself with a pressure washer.
 
/ At Home In The Woods
  • Thread Starter
#1,726  
Where are you with your interior subs?
This week the insulation work should start. We've picked the drywall sub and the cabinet maker. We haven't picked the rest of the interior subs (hw flooring, tile, painter, trim carpenter). Have I forgotten any?

In addition, vinyl siding and soffits, gutter installation, and back porch framing should start this week. We've lined up the stone mason to lay the stone when the vinyl siding work is finished.

Obed
 
/ At Home In The Woods
  • Thread Starter
#1,727  
Obed...Nice looking brick job...If you did not have him clean the brick and he wants to charge you extra to clean the brick, if I were you I would pass and save the money since most of the bits of morter will get knocked off and cleaned off by rains and you can also pressure wash it. When we built our house they tried to charge me $1,000 to wash it off...I passed and did it myself with a pressure washer.
Bob,
We already have someone lined up to clean the brick. They use some kind of chemical to clean it with.
Obed
 
/ At Home In The Woods
  • Thread Starter
#1,728  
This weekend we were able to backfill and grade the area under the back porch so the porch work can start this week. The weather forecast was kind of bleak, 50% chance of showers Sat and Sun. However, it was clear and hot until it rained at about 5 PM Sat. I was able to get most of what I had to get done completed.

I was very thankful for the weather. It was extremely hot and miserable but dry enough for us to get the backfilling completed without having to delay the back porch construction. A lot of the backfilling work had to be done with a hand shovel and mattock. It was so hot that I had to take many breaks; I'm not acclimated to working in such hot conditions. This summer has been hot. August has averaged 5 degrees above normal. Every day except one has been over 90 degrees F, many have been in the upper 90's. I really feel for the brick workers having to work in this weather.

When I got up Sunday I was very happy as I thought I didn't have any work to do that day. However, my wife noticed that I had not backfilled along the backside of the garage wall footer where the deck and porch will meet the house. I had totally forgotten to do that section as I hurried with the retaining wall drain pipe and backfill before the rain started late Sat afternoon. So Sunday morning, we spent 2 hours backfilling the garage footer. Also, my wife wanted the grade next to the retaining wall and below the door to be higher so we added more dirt.

The drain pipes at the bottom end of the retaining wall still need to be connected so I haven't backfilled that section. I put some plastic over the area to help minimize silt from getting washed onto the lower drain pipe.
 

Attachments

  • IMG_4583.JPG
    IMG_4583.JPG
    164.2 KB · Views: 208
  • IMG_4582.JPG
    IMG_4582.JPG
    172 KB · Views: 222
  • IMG_4581.JPG
    IMG_4581.JPG
    156 KB · Views: 230
  • IMG_4580.JPG
    IMG_4580.JPG
    166.8 KB · Views: 236
  • IMG_4597.JPG
    IMG_4597.JPG
    172.3 KB · Views: 211
  • IMG_4596.JPG
    IMG_4596.JPG
    175.4 KB · Views: 201
  • IMG_4595.JPG
    IMG_4595.JPG
    162 KB · Views: 257
  • IMG_4585.JPG
    IMG_4585.JPG
    172.1 KB · Views: 203
  • IMG_4598.JPG
    IMG_4598.JPG
    159.3 KB · Views: 201
  • IMG_4599.JPG
    IMG_4599.JPG
    168.2 KB · Views: 211
  • IMG_4600.JPG
    IMG_4600.JPG
    173.2 KB · Views: 274
  • IMG_4602.JPG
    IMG_4602.JPG
    173.8 KB · Views: 236
/ At Home In The Woods
  • Thread Starter
#1,729  
This weekend, I removed some brick debris from the area where the back porch will go. The brickies were a bit wasteful with the mortar at times. Some days they would mix up a batch of mortar; reach the end of the day, and leave half a wheelbarrow full of fresh mortar to waste. You can see some large chunks of the wasted mortar in the picture. I dumped the brick waste below our culvert where it tends to wash.

The wife picked up with the nail magnet nails for the brick ties that were dropped on the ground during the work. The magnet has been well worth the cost for our construction project.
 

Attachments

  • IMG_4577.JPG
    IMG_4577.JPG
    174.4 KB · Views: 381
  • IMG_4579.JPG
    IMG_4579.JPG
    172.9 KB · Views: 253
  • IMG_4571.JPG
    IMG_4571.JPG
    174.7 KB · Views: 236
/ At Home In The Woods #1,730  
This weekend, I removed some brick debris from the area where the back porch will go. The brickies were a bit wasteful with the mortar at times. Some days they would mix up a batch of mortar; reach the end of the day, and leave half a wheelbarrow full of fresh mortar to waste. You can see some large chunks of the wasted mortar in the picture. I dumped the brick waste below our culvert where it tends to wash.

The wife picked up with the nail magnet nails for the brick ties that were dropped on the ground during the work. The magnet has been well worth the cost for our construction project.

Obed,

The house is looking great. Soon the outside will be finished and you'll be wrapping up the inside.:thumbsup:


Just remember...
...no more shoveling snow in the living room. :D
...and no snow angles in there either.:laughing:
 
/ At Home In The Woods #1,731  
This weekend, I removed some brick debris from the area where the back porch will go. The brickies were a bit wasteful with the mortar at times. Some days they would mix up a batch of mortar; reach the end of the day, and leave half a wheelbarrow full of fresh mortar to waste. You can see some large chunks of the wasted mortar in the picture. I dumped the brick waste below our culvert where it tends to wash.

The wife picked up with the nail magnet nails for the brick ties that were dropped on the ground during the work. The magnet has been well worth the cost for our construction project.

Putting them to use :thumbsup:

I really like the way the outside of your house is coming together, and I agree those nail magnets are worth it! We got one after our roof was redone and keep finding nails, bolts, screws, and more not just from the roofers!

After a hard rain, and after winter it's great to go use it again and fine pounds of nails :laughing:
 
/ At Home In The Woods
  • Thread Starter
#1,732  
Obed,

The house is looking great. Soon the outside will be finished and you'll be wrapping up the inside.:thumbsup:


Just remember...
...no more shoveling snow in the living room. :D
...and no snow angles in there either.:laughing:
Cyril,
Yes, I hope those days are behind us.


/ At Home In The Woods
  • Thread Starter
#1,733  
Vinyl work started today. I don't have any pictures yet. It started raining late this afternoon.

Getting an insulation company we liked was a struggle. We want to insulate the ceiling between the main floor and the attic. We have 18" high trusses between the main floor ceiling and the OSB that covers the attic floors. The trusses are at 19.2" O.C. Insulation companies were actually giving us quotes for laying 16" wide batting between the trusses. They were not going to put any insulation on top of the 2x4 bottom cord of the trusses. So for every 19.2" of ceiling we would only get 16" of insulation. Over 15% of our ceiling would not get insulated if we insulated it that way.

We found a company who was willing to work with us. The ceiling insulation will be blown from the attic. We will have to remove a bunch of the OSB off the floor in the attic so the insulation company can blow the insulation. In the middle/open sections of the attic, we can remove every other row of OSB. It gets trickier behind the knee walls. To remove the OSB flooring behind the knee walls, we will have to cut the OSB because the knee walls and roof braces are sitting on top of the OSB. We have a lot of space behind knee walls.
 

Attachments

  • IMG_3569.JPG
    IMG_3569.JPG
    112.1 KB · Views: 217
  • IMG_3577.JPG
    IMG_3577.JPG
    108.9 KB · Views: 205
  • IMG_3570.JPG
    IMG_3570.JPG
    113.7 KB · Views: 230
  • IMG_3585.JPG
    IMG_3585.JPG
    122.1 KB · Views: 203
  • IMG_3580.JPG
    IMG_3580.JPG
    109.3 KB · Views: 194
  • IMG_3567.JPG
    IMG_3567.JPG
    126.3 KB · Views: 208
  • IMG_4611.JPG
    IMG_4611.JPG
    141.9 KB · Views: 282
/ At Home In The Woods #1,734  
I'd skip that particular process and instead spray foam the underside of the roof and its joist areas and the same with the inside of the exterior walls from the soffit area up to where the roof rafters meet. Then install fireproof rated sheetrock on the rafters underside, as well as the knee wall areas. Put enough solid (closed cell) spray foam in these areas and you won't need to do anything else to insulate/ keep the attic and rooms below heated or cooled.
 
/ At Home In The Woods
  • Thread Starter
#1,736  
Flashing/Siding/Brick/Roofing Question

We are trying to figure out a good way to keep water from running behind the brick at the spot in the picture that is circled in yellow. Does anyone have any good suggestions?

attachment.php


Thanks in advance,
Obed
 

Attachments

  • IMG_4638Edited.JPG
    IMG_4638Edited.JPG
    43 KB · Views: 2,344
/ At Home In The Woods
  • Thread Starter
#1,737  
Siding Pictures So Far ...

The siding guys are Russian; their English is ok but not great. They put aluminum around the bottom of the front porch beam and slid the temporary roof support poles under the aluminum.

Not much work got done today. The siding guys got here mid-day, ate lunch, and left. The framers did not make it. The stone guy worked a half day today.

You can also see the new brick work around the porch. The brick cleaners finished cleaning the brick in one day. They used a muriatic acid solution with brushes and scrapers.
 

Attachments

  • IMG_4633.JPG
    IMG_4633.JPG
    100.9 KB · Views: 225
  • IMG_4632.JPG
    IMG_4632.JPG
    94.7 KB · Views: 221
  • IMG_4629.JPG
    IMG_4629.JPG
    97 KB · Views: 216
  • IMG_4618.JPG
    IMG_4618.JPG
    128.3 KB · Views: 208
  • IMG_4634.JPG
    IMG_4634.JPG
    107.7 KB · Views: 209
/ At Home In The Woods #1,738  
Flashing/Siding/Brick/Roofing Question

We are trying to figure out a good way to keep water from running behind the brick at the spot in the picture that is circled in yellow. Does anyone have any good suggestions?

Kickout flashing, both on the wall and the roof at the joint. Given the short distance you are dealing with, taking the brick all the way to the top may have been easier, but obviously that isn't realistic at this stage.
 
/ At Home In The Woods
  • Thread Starter
#1,739  
Stone work started today.
 

Attachments

  • IMG_4639.JPG
    IMG_4639.JPG
    121.6 KB · Views: 261
  • IMG_4640.JPG
    IMG_4640.JPG
    143.8 KB · Views: 272
  • IMG_4641.JPG
    IMG_4641.JPG
    154.8 KB · Views: 227
  • IMG_4642.JPG
    IMG_4642.JPG
    133 KB · Views: 270
  • IMG_4643.JPG
    IMG_4643.JPG
    134.8 KB · Views: 271
/ At Home In The Woods
  • Thread Starter
#1,740  
Kickout flashing, both on the wall and the roof at the joint. Given the short distance you are dealing with, taking the brick all the way to the top may have been easier, but obviously that isn't realistic at this stage.
Dave,
We did consider bricking the dormer sidewalls but doing so would have required additional framing support to that section of the roof. In fact, the brickies accidentally laid brick on one side of the dormer and we had to make them tear it down.

What is kickout flashing?
Thanks,
Obed
 

Marketplace Items

2017 Bobcat E55 (A60462)
2017 Bobcat E55...
Club Car Electric Utility Cart (A55851)
Club Car Electric...
2002 Kenworth T300 TMA Truck (A55973)
2002 Kenworth T300...
SKID STEER ATTACHMENT (A58214)
SKID STEER...
2018 International 4300 TMA Attenuator Truck (A60352)
2018 International...
24in pin on tooth excavator bucket (A61307)
24in pin on tooth...
 
Top