Timing of the knotter on my 14t JD Baler

   / Timing of the knotter on my 14t JD Baler #1  

DaveOmak

Platinum Member
Joined
Sep 24, 2009
Messages
503
Location
Omak, Washington
Tractor
'53 Jubilee
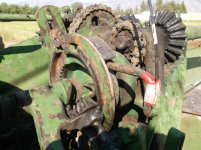
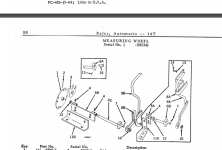
I've noticed, that on occasion, I can't manually initiate the knotting sequence... There is some sort of safety mechanism that won't allow that sequence UNLESS there has been approximately +/- 21 cycles of the plunger and the "safety bar"(#1) is lowered into the "go ahead and tie the bale" position... that safety bar is connected to the rotating "star" that measures the bale length... At the proper bale length the safety bar(#1) is in position to initiate the knot, BUT there is a second "guard"(#2) that won't move to clear a path until approx 21 plunger cycles have happened....
What or where counts the plunger cycles that allows all this to happen ???
After a bale is tied, #1 is on top of #2... approx. 21 plunger cycles, #1 moves to it's current location ... With the star rotation, #4 pushes on #3 and initiates a knotting cycle...
What I don't understand is... the rotation of #2, how it is moved and what initiates the movement after ~21 plunger cycles... I can't see or find anything that moves during the 21 plunger cycles..
I am amazed someone figured out how to build this knotter and I would like to have met him..

knotter 001.JPG...knotter 003.JPG...knotter 005.JPG
 

Attachments

  • knotter 002.JPG
    knotter 002.JPG
    1.1 MB · Views: 951
   / Timing of the knotter on my 14t JD Baler #2  
It's been many years since I messed with timing on a 14T but from what I remember the chain initiates timing. I remember replacing stretched chains to bring timing back into sync..
 
   / Timing of the knotter on my 14t JD Baler #3  
I found this on timing the 14T, it may help you understand what your looking for..


Timing a 14t baler isn't a bad job but it does take a few steps. The following steps will walk you through the process.

The feeder teeth that pull the hay into the chamber has an adjustable pin, start by setting the pivot pin in th e bottom hole of the feeder teeth.
Rotate the flywheel in a counter clockwise direction until the face of the plunger head is centered in the front feeder slot. The left edge of the feeder tooth should measure 16 3/4" to 18 1/4" inches from the left edge of the feeder support. Trip the bale measuring arm. The lug on the clutch ring should nearly contact the trip dog roller.
Next turn the fly wheel counter clockwise until the tip of the highest needle is flush with the top edge of the bale groover. The face of the plunger head should measure 1 to 2 1/4" from the tip of the needle.
Rotate the flywheel counter clock wise to raise the needles. The needles should raise far enogh to seat twine firmly in the bottom of the twine disk grove and contiune to raise for at least 1/2" after seating.
Rotate the flywheel to return needles to home position. Needle mounting bolts must have adequate clearance from the bottom of the bale case.
Remove the shield and main drive chain.
Remove the sield and knotter drive chain.
Adjust the feeder drive chain idler snugly against the chain with thumb pressure, and tighten the idler mounting bolt.
Turn the flywheel counter clockwise to move the plungerhead on the compression stroke to a point where the face of the plunger head is in the center of the front feeder slot in the bale case top.
Locate the left hand edge of the feeder tooth 17 5/8", measured horizontally, from the extreame left side top of the feeder support. A block may be used as a guide to hold the teeth in this position. It should be blaced between the teeth and the feeder support bracket, and should be held in this position until the timing has been completed.
Connect the main drive chain. Turn the flywheel clockwise as necessary to install chain with the drive side tight. Tighten the idler against the chan with thumb pressure.
With the needles in their home position, trip the trip dog roller with the bale measuring arm and rotate the clutch ring counter clockwise (facing the LH side of the baler) until the lug on the inside of the clutch ring contacts the trip dog roller.
Install the knotter drive chain. If necessary, back the clutch ring away from the roller to connect the chain. Replace knotter drive chain shield.
Check the needle timing by continuing the plunger head on its compression stroke. When the tip of the higest needle has risen flush with the top edge of the bale case bottom grove flanges, there should be from 2 1/4" between the face of the plungerhead and the center of the rounded portion at the tip of the needle.
If the plunger head and needles are not timed properly, make final adjustments by again removing main drive chain and moving plunger head away from the needles if they are less then 1 inch apart or toward needles. If they are more then 2 1/4" apart.
It is preferabel to adjust the plungerhead closer to the 2 1/4" rather then the 1 inch clearance. Replace main dirve chain and shield
 
   / Timing of the knotter on my 14t JD Baler
  • Thread Starter
#4  
Thanks for that tutorial.... Where did you find it ?? I'd like to see if there are any pictures explaining some of the points...

I realize now I need to add more information that i just thought of....

When i noticed the knotter not activating, #1 was on top of #2... Now, to be more specific, my windrows were pretty big... My travel speed was walking speed... as the windrows got smaller, I noticed the bales were tying.... HUH ??? Why is that... So, having a over-direct-under Sherman transmission AND an under drive Howard, I engaged the Howard to reduce my travel speed while keeping the baler feeding at the same rate... The knotter worked perfectly and all the bales were tied perfect...
That's when I did the test... Number of plunges until the safety was in the "tie the bale" position..
Now I realize you CAN'T feed the 14T too much hay or the knotter is "locked out" by some weird safety lockout... Which I can't figure out how the knotter counts plunger strokes... Well, it may not be plunger strokes but that's how I counted until #1 dropped below #2 so it would tie a bale...
I've been looking at the chains and thinking I should change them... I'm chicken... If I screw up the timing.... I'm sunk.... What I should do is measure a new chain and try to estimate, with a micrometer, how much stretch is in the old chain... It does look good.... sprocket teeth don't seem worn....
Now i should figure out what chains are on the knotter and look up the specs...
 
   / Timing of the knotter on my 14t JD Baler #5  
I do remember that my dads 14T’s did not like big windows and speed. I didn’t see any pictures were I found that information. If I do find pictures I will post them.
 
   / Timing of the knotter on my 14t JD Baler #6  
Knotter & needles on most sq balers are not dependent on any set number of plunger head strokes to cycle in fact knotter can cycle on every plunger head stroke if trip dog lock out mechanism isn't adjusted correctly or is not touching pawl correctly. The trip lever(key 9A or 9B) on an early model 14T would be a little more difficult to trip than later model sq balers but I think it could be manually moved BUT it's been many/many yrs since I made a service call on a 14T baler when I was employed at JD dealership.
 

Attachments

  • Capture.PNG
    Capture.PNG
    58.6 KB · Views: 526
   / Timing of the knotter on my 14t JD Baler
  • Thread Starter
#7  
I found 9A was sitting on the "wheel" and couldn't disengage properly... I attribute it to worn chains...
I changed out all the chains.... Found the directions to time the baler were wrong... I had to readjust the chains etc. based on the location of the plunger to needles... What a PITA... after maybe 6-10 chain adjustments to the main drive sprocket and chain.... I got it working and have baled hay 6 times... what a blessing.... no missed knots or no missed bales...
NOW, I have a camera that will take movies... I can set it up and watch the knotter work and troubleshoot stuff MOBETTA......
 
   / Timing of the knotter on my 14t JD Baler #8  
Glad it is working and you got it figured out. Did you document it for next time?
 
   / Timing of the knotter on my 14t JD Baler
  • Thread Starter
#9  
I'm hoping there's no next time.... I'm 71... With all the updates and fixes, it's almost like new.... This summer I'm gonna replace the bearings on the connecting rod for the bale plunger... Under load, it just about takes a 90.. I've gotta expertly sharpen the knives... maybe....
 
   / Timing of the knotter on my 14t JD Baler #10  
Thanks for update. I'm glad you got baler to bale hay. I seriously doubt "wear in chains" caused bale measuring mechanism to "not disengage properly" but I've witnessed several other strange things when repairing farm equipment during my life
 

Tractor & Equipment Auctions

2019 CATERPILLAR 308 CR EXCAVATOR (A51242)
2019 CATERPILLAR...
SOLDERING IRONS, GLOVES, AND STANDS (A50854)
SOLDERING IRONS...
CFG MH12RX Mini Excavator (A49461)
CFG MH12RX Mini...
2010 Triple B Gooseneck Inclosed Car Trailer (A50514)
2010 Triple B...
2015 DODGE RAM 1500 CREW CAB TRUCK (A51406)
2015 DODGE RAM...
2016 Ford F150 Ext. Cab Pickup Truck (A50323)
2016 Ford F150...
 
Top