running gear/deck attachment

/ running gear/deck attachment #1  

jimg

Veteran Member
Joined
Jun 5, 2003
Messages
2,039
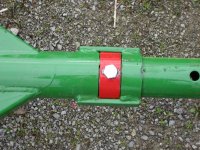
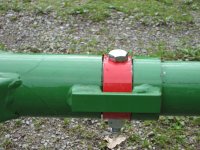
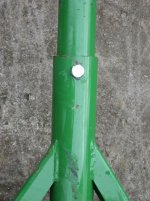
Got my running gear this w/e, put it together and have a question about adding a flat deck. From the first 3 pics you can see the front axle is fixed and the rear articulates. In fact the range of movement is pretty wide. I was thinking that both front and rear would be fixed but clearly thats not the case here. It seems that some Cory gear I looked at recently wasnt set up like this but I also didnt look that closely. Is it common for one of the axles to articulate?

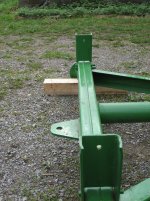
About the deck...it sure would be great if I could accommodate at least some of the rear axle movement instead of letting the deck twist or having wheels come off the ground. I thought about it for some time but really couldnt come up w/ a simple way of causing the deck to 'float' w/ the rear axle. Im sure though it has to be simple and Im just missing it. My feeling is that most decks are just built to twist. Eventually I think itll wind up pulling itself apart. So, if I can easily avoid that maintenance by building technique that would be better. The last picture shows the std attachment points where the back would be attached at each axle.

ETA: My plan for the deck construction was to run 2 4x8s the length of the gear and then either add 4x4s 2'OC across those and then a 2x deck on that or stick frame a wall sheathed w/ plywood layed flat on the 4x8s. The deck is planned to be 8'x20'. Ill eventually band it w/ heavy angle w/ stake pockets unless I can find a used rack.
 

Attachments

  • first.jpg
    first.jpg
    438.6 KB · Views: 198
  • second.jpg
    second.jpg
    352.5 KB · Views: 184
  • third.jpg
    third.jpg
    591.2 KB · Views: 198
  • fourth.jpg
    fourth.jpg
    871.4 KB · Views: 222
/ running gear/deck attachment
  • Thread Starter
#2  
I suppose some sort of scissor type affair that connects gear to deck would work. Not sure what thats called though.
 
/ running gear/deck attachment #3  
What if you leave the rear supports un-bolted? Gravity will hold it down. On the other hand, that same gravity is going to make it twist with the axle articulation. It would have to be a pretty beefy structure to NOT twist. OK, scratch my original thought and just let it twist.
 
/ running gear/deck attachment #4  
You would need to add a center pivot to the deck front (meaning a beam with a center hinge) to make it completely free. Why not consider using 4 motor mounts at each corner? This gives you some extension and compression flexibility yet still anchors the deck laterally and fore/aft to the support beams.
 
/ running gear/deck attachment #5  
I can tell you how older farm wagons/ gravity boxes/ hay racks are attached that I have been around. On the rear bolster(metal upright), you only attach one side with a bolt using a self-locking nut and big flat washers. You leave that nut/bolt assembly loose and the hole in the wood is oversized a little. Say 1/2" bolt in a 3/4" hole in the wood. On the other rear bolster/axle area, you add a chain around your 4x8" wood beam down around the axle with about 2-3" of slack in the chain.(This allows flex for gopher holes, but still keeps the 4x8" beam within the bolster height)
Don't worry about the tires/wheels coming off the ground, this happens all the time in the field with farm wagons even with 25,000 lbs of corn in a gravity box.​
On the front axle, you attach your bolt/washer/locknut assembly catty-corner form the rear bolt/washer/locknut assembly, then add a chain to the other side. I know the chain deal doesn't look too good, but many a farm wagons/ gravity boxes use this system. Another thought, maybe you could use 4 oversized(extra tall) U-bolts at each corner(over the beam), that would allow 3" of flex at each corner, but still keep the 4x8" beam below the top of the bolster. Hope this helps a little.
 
/ running gear/deck attachment
  • Thread Starter
#6  
Thanx very much for the help!

I really like the chain idea -- simple, quick, effective and cheap. :) One question about that though...why use any bolts at all, just chain all 4 corners. The only down side I can think of right off is that the deck will move front to back by 2-3"....which doesnt seem to really be a problem.

Its interesting about bolting only one side b/c the Cory gear I mentioned in my post had one front bolster drilled and the other not. The undrilled side was free to move up/down as it wanted. My gear has all 4 bolsters drilled.

When I think of tires coming off the ground I also think of loads begin put on other components that eventually tears them apart which means time spent fixing them.
 
/ running gear/deck attachment #7  
We attach the sills to both stakes on the rear bolster with 3/4" bolts and let the front float by using a chain to keep it from tipping.

Jim
 
/ running gear/deck attachment #8  
I'll pass on how its done here, all gears float or you would break the centre tube.

The racks generally are bolted at the rear and a loop of chain holds the front.

I built one with the front and rear bolted and it works fine too.

You can get an amazing amount of flex out of the unbolted ones before they lift. Normally they only hit the chain if you unload one side and take them on a steep side hill.
 
/ running gear/deck attachment
  • Thread Starter
#9  
Would the center pole break or just twist/wallow out the bolt holes? Guess that would depend on load and amt it was required to move.

Suppose thats what Ill wind up doing then...bolt 2/chain 2 although it *seems* better to chain 4. :) Then again that might be one of those learning lessons which only becomes obvious (why not to do it) once you give it a go. :) Although those times might be the ones I learn the most from. :D

Another quick question. On the used Cory gear I mentioned above it appears the X pieces were tied to the backs by way of a small piece of angle lagged or thru bolted to the back & X piece. Hows yours done? I was debating on that or running a hole right thru the X piece into the back and lagging.

I think its pretty interesting the chain idea is so widely practiced. Here I dont think its done at all or much. I believe one or perhaps 2 corners are let to float and the remainder is fixed. Ive got to start looking underneath wagons to see how theyre made.
 
/ running gear/deck attachment #10  
There are older racks here that simply have 2x4 pieces scabbed onto the main beams on either side of each beam bracket on the rack. This way the rack just sits on there by gravity. Great for swapping racks with boxes etc. Rarely lose the whole rack.

I'm not sure what you're talking about in the above post. I've noticed in some areas of the US, racks use main beams, then stringers then a deck running fore aft.

Locally they are all main beams then deck running east - west nailed into the beams. The best lasting ones have self sealing roof membrane drapped over the beams before nailing the deck on. Slows the rot in the beams from the chaff between the deck boards.
 
/ running gear/deck attachment
  • Thread Starter
#11  
My plan was to fasten cross pieces to the backs (what you call main beams) and then deck that N/S. My question was about how to fasten the cross pieces to the backs. I recently looked at a Cory wagon w/ a factory deck and on that they used pieces of angle w/ bolts to tie back and cross piece together. Alternatively I could nail them but Im thinking that isnt going to last. Could also lag the cross piece directly into the back but again that seems like it might pull apart. Just curious what other options I might have.

A question about the E/W decked wagons. I seems loading them N/S would be painful. Also does the deck flex much? Guessing teh deck is 2x material.
 
/ running gear/deck attachment #12  
Are we talking round bale carrier or flat rack?

I'm talking flat rack and the planks don't have an impact on the stack, The bale strings (for squares) are east west. Usually 2x material but some are lighter. There are a pair of strapping boards that are carriage bolted down each edge to keep all the decking in line.


I made a round bale / log rack similar to how you describe only without a deck. I used galvanized sheet metal brackets from the hardware store and lots of plated deck screws. It has worked pretty well so far, except that its easy to overload it with green logs. I have slots for side pins at the end of the east west "decks" so I can get a dozen or so 24"ers. The main beams are screaming for mercy then!
 
/ running gear/deck attachment
  • Thread Starter
#13  
Im talking flat for small squares. It always seems Im trying to push bales front to back and they just dont scoot well when the deck is side to side. The mows in my barn are that way too and Im not looking forward to moving hay on them. Just my (frustrating) experience.

My plan was to set 4x4s perpendicular on the backs and then put the deck on top of that (deck surface runs front to back). Until you mentioned it I had forgotten about the type w/ the E/W deck. I was thinking it would be too light and the deck springy toward the edges. My wagon will get used for firewood and who knows what else which has me thinking over-built.

Thanx for mentioning the sheet metal brackets. I was thinking they were too light but if youre getting good results handling green logs then they must be really rugged!
 
/ running gear/deck attachment #14  
jimg said:
Im talking flat for small squares. It always seems Im trying to push bales front to back and they just dont scoot well when the deck is side to side. The mows in my barn are that way too and Im not looking forward to moving hay on them. Just my (frustrating) experience.

My plan was to set 4x4s perpendicular on the backs and then put the deck on top of that (deck surface runs front to back). Until you mentioned it I had forgotten about the type w/ the E/W deck. I was thinking it would be too light and the deck springy toward the edges. My wagon will get used for firewood and who knows what else which has me thinking over-built.

Thanx for mentioning the sheet metal brackets. I was thinking they were too light but if youre getting good results handling green logs then they must be really rugged!
QUOTE=jimg]Im talking flat for small squares. It always seems Im trying to push bales front to back and they just dont scoot well when the deck is side to side. The mows in my barn are that way too and Im not looking forward to moving hay on them. Just my (frustrating) experience.

My plan was to set 4x4s perpendicular on the backs and then put the deck on top of that (deck surface runs front to back). Until you mentioned it I had forgotten about the type w/ the E/W deck. I was thinking it would be too light and the deck springy toward the edges. My wagon will get used for firewood and who knows what else which has me thinking over-built.

Thanx for mentioning the sheet metal brackets. I was thinking they were too light but if youre getting good results handling green logs then they must be really rugged![/QUOTE]

Almost all running gears are adjustable for length by telescoping the tube shown in your pics. There is inherently flex in the running gear which accomodates uneven terrain when your baling or using in the field.
If you are building a hay wagon for small square bales (or loading it up with firewood), run your 4"x8" main beams, 4"x4" cross beams 2' O.C., 5/4 x6" treated decking with about 3/4" of space between the boards (this allows the chaff to fall thru, plywood would be slick as **** on a moving wagon) , then 2"x4" on top of the decking in the front and both sides, then build your rack for the rear to slide into stake pockets mounted to the end of your main beams.
Bolts the beams in on all four bolsters (some gears have slotted holes), the wood hay rack and running gear will flex enough that it will not break under load. You can use pole barn spikes to nail the 4x4's to the main beams, 16d hot dip galvanized ardox deck nails for the decking and pole barn spike to nail the 2x4's down so they penetrate the decking and go into the 4x4's. I am assuming you are using all treated wood. All of the fasteners used have to be hot dip or stainless steel in the new treated lumber as it eats electro-galvanized fasteners.
The reason I know this works is because I have in my yard a wagon built in this manner on my folks farm in 1968 that is still used regularly.
The plan for the hay rack was originally from Michigan State University. The used to provide plans for pole barns, trusses and many other farm related things thru the extension service (dad built a pole barn fro their plans in 1964 that is still in great shape today).

Hope this helps,

Paul
 
/ running gear/deck attachment #15  
Your terminology has me totally confused.

The running gear (metal parts) look perfectly normal, like 90% of all eunning gears out there. It needs to pivot in the middle, or it will twist the welds apart.

Some hay racks had front bolsters that rocked - they thought the wheels would flex under, & the hay rack would stay level. Horrible idea - when a rear wheel would dip down, the whole load would pitch to that side & about tip.

You just run your stringers on each side (your 4x8s). I have seen both methods - bolt both stringers in the rear onto the uprights and leave the front free-floating. Or put a cable/ chain around the bolster/stringer on opposite corners, one rear, one front. I would _not_ bolt a front & a rear.

The 4 wheels need to be on the ground. The stringers will flex a little, and one corner the stringer will lift off the bolster from time to time. This is normal. You want it to do that.

Myself, I build a hayrack for small squares as low to the ground as I can. You are building it very high, with all that lumber under it! Here is what I did for a 16x7'10" hayrack:

I reused the 4x6 stringers dad had. I put new tin on top of them (This is the place that rots, rain gets in, doesn't get out. Cover the top of the stringer with valley tin. I put used motor oil on the stringer top as well, to help seal/coat the holes. I will expext the next generation can reuse these stringers as well.)

On top of this I put 5/4 treated deck wood cross ways. I pulled if fairly tight; it shrunk to a nice small gap bewteen the planks. allows chaff to fall through.

Lengthwise I put a 2x6 under on each side. Many people put these on top, but I don't like the extra height. They support better from the bottom anyhow.

Across the front & back I have a 2x2 angle iron for strength. Also makes a nice bumper so the wood doesn't get all beat up from tapping things. The rear one is facing up - sharp edge of the angle is an inch or so high in back. In front it faces down, like a cap over the stringers - so the front is smooth. Actually the angle iron is sitting on the stringer, with the decking on top of it.

Built a rack for the back.

That's all there is to it. I put 140 bales or so on it at times.

If it is slippery, I nail some wood lathe type material down each side - 1/2 inch high, 2 inches wide or so. This keeps bales from sliding off the side, but are not so high that it makes more work to toss the bales onto the rack.

I'vew never used a rack where the wood runs the long way - can't see any advantage to it, disadvantage is you need the 4x4s under it all.

I would not ever use plywood for decking, it will be the slipperiest mess you ever had.

I suppose a picture is worth a 1000 words, but I got none.

--->Paul
 

Marketplace Items

New/Unused Quick Attach Double Hay Spear (A61166)
New/Unused Quick...
SCAN TO RECEIVE TEXT UPDATES (A62130)
SCAN TO RECEIVE...
2020 INTERNATIONAL MV607 26 FT BOX TRUCK (A59905)
2020 INTERNATIONAL...
Woods BB72 72in Rotary Brush Cutter Tractor Attachment (A61567)
Woods BB72 72in...
2008 Kenworth W900 Grapple/Storm Truck, VIN # 1NKWX40X68J221827 (A61165)
2008 Kenworth W900...
UNUSED WOLVERINE BC-13-72W 72" HYD BRUSH CUTTER (A62131)
UNUSED WOLVERINE...
 
Top