My BX24D developed a case of "the squealies" at 7 years / 400 hours, a loud squeal mostly on cold startups and growing gradually worse. Tightening the fan/alternator belt relieved it temporarily, but eventually I reached the end of the adjustment slot, so it was time to replace the belt. I'm a better nerd than I am a mechanic, but I did get through it, dusty but unharmed. I've appreciated help I've received on this forum, so I'm sharing my experience.
As the belt wears out, it doesn't stretch all that much, but it gets thinner and thinner, so it sits lower in the pulley grooves, which makes it looser. It may squeal like mine, but you might also see low/erratic tach readings, or overheating because the fan isn't being driven consistently. You can adjust the alternator to tighten the belt to the recommended tension, but eventually you come to the end of the slot. So here's a step-by-step procedure to replace the belt:
1. Tools you'll need: 17 mm open-end wrench for the alternator mounting bolts and nuts. 12 mm socket with a socket wrench and 4" or longer extension. Also round up a hefty 18" screwdriver or an iron bar 1/2" - 1" wide, at least 18" long. If you're working alone, you may need a C-clamp too. And finally, goggles for when you get under the tractor. And of course, you've made sure the engine has cooled off enough to work on.
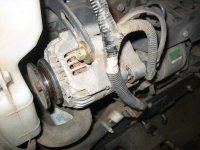
2. Remove the engine enclosure (the manual describes that so I'm not going to), and find the upper alternator mounting bolt (photo below). Loosen it with the 17mm wrench. You don't have to take it completely out.
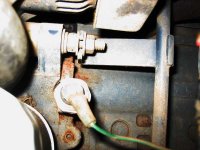
3. The lower alternator mounting bolt has 2 nuts on the end (photo below). These tend to "lock" the bolt, so you can't just loosen it by turning the head. Instead, loosen the nut on the right (which holds the dipstick brace) a few turns, then you can either loosen the second nut or loosen the bolt via the head. The alternator should now be movable.
4. Swing the alternator inward as far as it will go. You can then lift the belt off the alternator pulley.
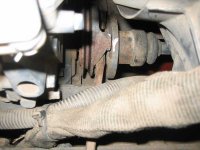
5. Now take the belt off the fan pulley and extract it from the fan shroud. To do this you'll gently flex a fan blade and work the belt out from between the blade and the shroud. Repeat this for each fan blade and the belt will be free from the fan, but still looped around the driveshaft pulley. Here's a look at that driveshaft pulley from the left side of the engine.
6. You're going to be loosening 3 bolts that hold the driveshaft to that pulley. The problem is, when you apply torque to the bolts, the engine crankshaft may turn, making it impossible to break the bolt loose. My solution was to wedge a hefty screwdriver between the openings in the driveshaft hub. Since I was working alone, I used a clamp to secure the screwdriver to the tractor frame. (Maybe if I had a helper, they could have just held the screwdriver.) You could also clamp a piece of angle iron to the frame so it engages a tooth of the flywheel at the front of the engine.
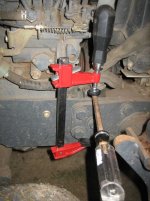
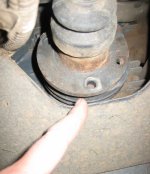
7. Put on your goggles and lay on your back under the tractor. Look forward toward the engine and you'll see an access opening in the bottom chassis pan. The driveshaft attachment is shown in the photo below. There are three bolts with 12 mm heads holding the driveshaft coupling to the engine. (In the photo the bolts are already removed and I'm pointing to one of the three attachment holes.) Loosen and remove the first bolt you can see. Then come back up, remove the screwdriver locking the hub and rotate the engine 1/3 of a turn. I don't recommend "bumping" the starter to do this, I found it easy and safest to just rotate the flywheel by hand at the front of the engine. Relock the driveshaft hub, crawl back under, loosen second bolt, and repeat for the third one too. Then take the screwdriver/bar off because it will get in the way.
8. The driveshaft which runs backward from the hub can then be compressed by pulling on the shaft by hand (don't pull on the rubber boot or it might tear). At this point, I got help from my wife. I held the shaft compressed, and asked her to yank the belt free through the opening between the driveshaft and the pulley.
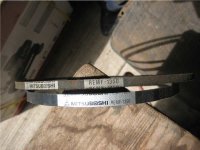
9. Here's the new belt held next to the old one. Scientific proof of the thinning phenomenon! OK, only a nerd would care. You have to replace the bugger anyway.
10. Fishing the new belt though the gap between the compressed driveshaft and the pulley required help again. Then I repositioned the driveshaft hub, got one hole matched up and inserted a bolt. I reinstalled my clamp mechanism and tightened the bolt. Then it's just unclamp, rotate, insert, tighten, and repeat for the third. I didn't use an impact wrench and I don't own a torque wrench, but about as hard as I could pull on a 10" ratchet handle felt about right. Be darn sure you then remove the screwdriver/clamp assembly because it would make starting up the engine later an unpleasant experience.
11. Now work the belt back between the fan and the shroud, again one blade at a time.
12. Finally install it on the alternator pulley. This proved one of the more difficult tasks. Even with the alternator swung fully inward, there wasn't enough slack to slip the belt over the pulley. I found a trick was to get the belt into the pulley groove where it just starts to contact the pulley, maintain inward pressure there with a gloved finger, then rotate the alternator pulley (unfortunately, you have to drag along the fan and engine too). The belt should ride up onto the pulley. This might have been easier with a helper. I sure didn't want to use a pry bar, damage the belt, and have to go through this all again soon.
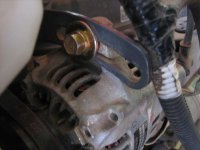
12. Here's the alternator tension setting I ended up with for the new belt. No more squeals! After about 10 hours of operation I'll recheck the tension.
Now, off to mow those fields...
As the belt wears out, it doesn't stretch all that much, but it gets thinner and thinner, so it sits lower in the pulley grooves, which makes it looser. It may squeal like mine, but you might also see low/erratic tach readings, or overheating because the fan isn't being driven consistently. You can adjust the alternator to tighten the belt to the recommended tension, but eventually you come to the end of the slot. So here's a step-by-step procedure to replace the belt:
1. Tools you'll need: 17 mm open-end wrench for the alternator mounting bolts and nuts. 12 mm socket with a socket wrench and 4" or longer extension. Also round up a hefty 18" screwdriver or an iron bar 1/2" - 1" wide, at least 18" long. If you're working alone, you may need a C-clamp too. And finally, goggles for when you get under the tractor. And of course, you've made sure the engine has cooled off enough to work on.
2. Remove the engine enclosure (the manual describes that so I'm not going to), and find the upper alternator mounting bolt (photo below). Loosen it with the 17mm wrench. You don't have to take it completely out.

3. The lower alternator mounting bolt has 2 nuts on the end (photo below). These tend to "lock" the bolt, so you can't just loosen it by turning the head. Instead, loosen the nut on the right (which holds the dipstick brace) a few turns, then you can either loosen the second nut or loosen the bolt via the head. The alternator should now be movable.

4. Swing the alternator inward as far as it will go. You can then lift the belt off the alternator pulley.
5. Now take the belt off the fan pulley and extract it from the fan shroud. To do this you'll gently flex a fan blade and work the belt out from between the blade and the shroud. Repeat this for each fan blade and the belt will be free from the fan, but still looped around the driveshaft pulley. Here's a look at that driveshaft pulley from the left side of the engine.

6. You're going to be loosening 3 bolts that hold the driveshaft to that pulley. The problem is, when you apply torque to the bolts, the engine crankshaft may turn, making it impossible to break the bolt loose. My solution was to wedge a hefty screwdriver between the openings in the driveshaft hub. Since I was working alone, I used a clamp to secure the screwdriver to the tractor frame. (Maybe if I had a helper, they could have just held the screwdriver.) You could also clamp a piece of angle iron to the frame so it engages a tooth of the flywheel at the front of the engine.

7. Put on your goggles and lay on your back under the tractor. Look forward toward the engine and you'll see an access opening in the bottom chassis pan. The driveshaft attachment is shown in the photo below. There are three bolts with 12 mm heads holding the driveshaft coupling to the engine. (In the photo the bolts are already removed and I'm pointing to one of the three attachment holes.) Loosen and remove the first bolt you can see. Then come back up, remove the screwdriver locking the hub and rotate the engine 1/3 of a turn. I don't recommend "bumping" the starter to do this, I found it easy and safest to just rotate the flywheel by hand at the front of the engine. Relock the driveshaft hub, crawl back under, loosen second bolt, and repeat for the third one too. Then take the screwdriver/bar off because it will get in the way.

8. The driveshaft which runs backward from the hub can then be compressed by pulling on the shaft by hand (don't pull on the rubber boot or it might tear). At this point, I got help from my wife. I held the shaft compressed, and asked her to yank the belt free through the opening between the driveshaft and the pulley.
9. Here's the new belt held next to the old one. Scientific proof of the thinning phenomenon! OK, only a nerd would care. You have to replace the bugger anyway.

10. Fishing the new belt though the gap between the compressed driveshaft and the pulley required help again. Then I repositioned the driveshaft hub, got one hole matched up and inserted a bolt. I reinstalled my clamp mechanism and tightened the bolt. Then it's just unclamp, rotate, insert, tighten, and repeat for the third. I didn't use an impact wrench and I don't own a torque wrench, but about as hard as I could pull on a 10" ratchet handle felt about right. Be darn sure you then remove the screwdriver/clamp assembly because it would make starting up the engine later an unpleasant experience.
11. Now work the belt back between the fan and the shroud, again one blade at a time.
12. Finally install it on the alternator pulley. This proved one of the more difficult tasks. Even with the alternator swung fully inward, there wasn't enough slack to slip the belt over the pulley. I found a trick was to get the belt into the pulley groove where it just starts to contact the pulley, maintain inward pressure there with a gloved finger, then rotate the alternator pulley (unfortunately, you have to drag along the fan and engine too). The belt should ride up onto the pulley. This might have been easier with a helper. I sure didn't want to use a pry bar, damage the belt, and have to go through this all again soon.
12. Here's the alternator tension setting I ended up with for the new belt. No more squeals! After about 10 hours of operation I'll recheck the tension.

Now, off to mow those fields...
