JOHNTHOMAS
Super Member
- Joined
- Apr 14, 2008
- Messages
- 7,717
- Location
- Somerset, Ky
- Tractor
- F2690 4WD RTV X1140 MX5400 HST ZD1211
Did my 50 hour service on my BX2660 this week. I removed the MMM during the 50 hour service. I took pictures of most of the steps. I see where some people claim to be able to remove and replace the MMM in under 60 seconds and never get dirty or break out a sweat.") I didn't have it that easy but it isn't really that complicated.
I didn't have it that easy but it isn't really that complicated.
I guess the filters and fluids can be drained with the deck still on the tractor but it's alot easier with the deck removed plus with the deck removed all of the fittings can be easily greased, the fluid in the deck gears can be checked and changed and the blades checked, sharpened and/or replaced easily.
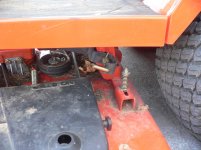
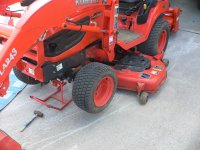
First, raise the deck off of the ground, turn the wheels on the deck to roll side ways instead of backwards and forward.
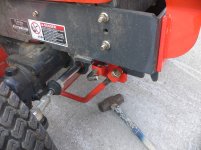
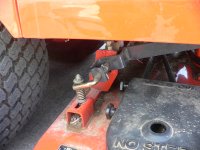
Lower deck to lowest setting. Slide your hand down the drive shaft toward the back. Feel the round ring at the back end of the drive shaft, pull the round ring forward. This will disengage the locked driveshaft from the mid PTO and let it drop down.
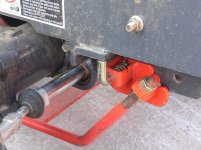
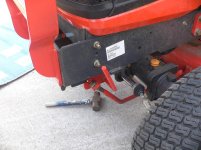
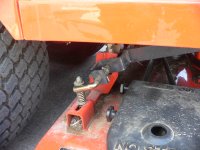
In the front there is a small lever that pulls toward you, twists and locks into place. See Picture. On the side you'll see a good sized lever. Pull the lever down which will disengage the front of the deck.
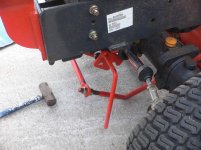
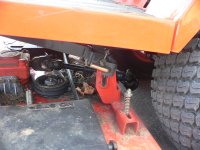
On each side of the deck there is a lever (see pictures) that is to be pulled toward you and it will turn and lock in a slot with the pin sticking up on it. Mine did not pull easily and I tapped it with a hammer to get it to move. After pulling the pins on each side and dropping the drive shaft the deck is now disconnected. Go to the front and pull the front bars out of the way.
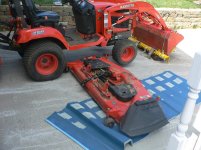
Start tractor and raise 3ph/mid mount arms to top position.
I didn't turn my wheels so my pictures don't show the turned wheels, I will the next time and I will when I reinstall the deck. Just roll the deck out from under the tractor. Now clean off your deck and grease all fittings. I think there are 5 grease fittings on the deck. One over each blade, one centered up toward the front of the deck and one centered near the middle of the deck. There is one grease fitting per wheel. Also check your blades while you have the deck off. I've bought an extra set of blades from Barlows for $60. I have installed the new ones on the deck and will sharpen the other set and have them ready to install the next time I have deck off.
When you reinstall deck and hook drive shaft back. Make sure the lock ring clips back into locked position. You'll feel it lock back into place, if it doesn't it isn't. Pull hard on drive shaft to make sure it's locked back. I didn't one time long ago and it came loose and busted my oil filter. Reverse the procedure to reinstall deck.
I didn't have it that easy but it isn't really that complicated. I guess the filters and fluids can be drained with the deck still on the tractor but it's alot easier with the deck removed plus with the deck removed all of the fittings can be easily greased, the fluid in the deck gears can be checked and changed and the blades checked, sharpened and/or replaced easily.
First, raise the deck off of the ground, turn the wheels on the deck to roll side ways instead of backwards and forward.
Lower deck to lowest setting. Slide your hand down the drive shaft toward the back. Feel the round ring at the back end of the drive shaft, pull the round ring forward. This will disengage the locked driveshaft from the mid PTO and let it drop down.
In the front there is a small lever that pulls toward you, twists and locks into place. See Picture. On the side you'll see a good sized lever. Pull the lever down which will disengage the front of the deck.
On each side of the deck there is a lever (see pictures) that is to be pulled toward you and it will turn and lock in a slot with the pin sticking up on it. Mine did not pull easily and I tapped it with a hammer to get it to move. After pulling the pins on each side and dropping the drive shaft the deck is now disconnected. Go to the front and pull the front bars out of the way.
Start tractor and raise 3ph/mid mount arms to top position.
I didn't turn my wheels so my pictures don't show the turned wheels, I will the next time and I will when I reinstall the deck. Just roll the deck out from under the tractor. Now clean off your deck and grease all fittings. I think there are 5 grease fittings on the deck. One over each blade, one centered up toward the front of the deck and one centered near the middle of the deck. There is one grease fitting per wheel. Also check your blades while you have the deck off. I've bought an extra set of blades from Barlows for $60. I have installed the new ones on the deck and will sharpen the other set and have them ready to install the next time I have deck off.
When you reinstall deck and hook drive shaft back. Make sure the lock ring clips back into locked position. You'll feel it lock back into place, if it doesn't it isn't. Pull hard on drive shaft to make sure it's locked back. I didn't one time long ago and it came loose and busted my oil filter. Reverse the procedure to reinstall deck.
Attachments
-
 P1060538.jpg307 KB · Views: 879
 -
 P1060539.jpg338.2 KB · Views: 741
 -
 P1060540.jpg306.3 KB · Views: 555
 -
 P1060541.jpg325.6 KB · Views: 819
 -
 P1060542.jpg303.3 KB · Views: 623
 -
 P1060545.JPG973.8 KB · Views: 634
 -
 P1060546.JPG926.9 KB · Views: 437
 -
 P1060560.jpg239.9 KB · Views: 656
 -
 P1060559.jpg374.9 KB · Views: 597
 -
 P1060555.JPG985 KB · Views: 611
 -
 P1060550.JPG967.6 KB · Views: 655
 -
 P1060561.jpg355.8 KB · Views: 1,099
 -
 P1060633.JPG996.6 KB · Views: 1,071
