PAPPASMURF
Gold Member
- Joined
- Apr 24, 2012
- Messages
- 338
- Location
- JACKSONVILLE, AL
- Tractor
- 2011 KUBOTA L3200 W/ LOADER, BH77 BACKHOE
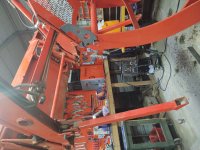
About a year ago I had my Kubota L3200 outfitted with the Quick Attach and third function. I also bought a Grapple and a new bucket. As some of you know, I have been using my tractor in a commercial capacity. I run a business called "Diggin' It" and man the business is good. Anyways, about a month after using the Grapple on a few jobs, I went to switch out my Grapple for the bucket (which I had already done a few times without any trouble) and VIOLA!!! the quick attach was out-of-wack and would not line up evenly with the bucket after taking the Grapple off. One side was sticking out about an inch further than the other, so when I went to grab the bucket only one side would make contact. I found out this a very common problem and actually (IMHO) a design flaw that can be fixed relatively easily if you have welding capabilities (which you WILL need). Let me explain what happened;
After everyone under the sun giving me advice as to what might be wrong, I ran into one Kubota mechanic who quickly laughed and told me "its that support bar on the quick attach....its twisted". He explained that it doesnt take much to twist that weak support bar and throw off the quick attach "paddles" that go into the attachments. He advised me that I would need to put the bucket on the quick attach, lift it up, and then cut the support bar and it would all pop back into alignment. He said I would then need to line the support bar ends back up and weld them back together and the problem would be fixed. Me, being the "bigger is better" type guy asked if I could also add another support angle bar of greater thickness to keep it from happening again, and I was told that would be a GREAT idea....so off to the shop I went to begin fixing my tractor and make it even better!
Now, before I get started on explaining the pictures attached to this post I would like to clear the air about my experience and capabilities; I am very experienced in the operation, safety, and limits of my tractor. I do not abuse it, but I do work it hard and walk-the-line on jobs I get from time to time. I service the tractor after every job, and I like to keep her clean. I also like to make additions to the tractor that help in areas of functionality, and versatility like the hood guard I designed (which works great) and the lighting bar on the ROPS which you might see in the pictures I post. I am not a professional welder (which you will see) but I think I did a decent job getting this task completed so you're free to poke fun at me, just understand I already know some of you may look at this work as "tacky". It functions...Im happy.....end of story. LOL
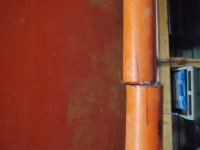
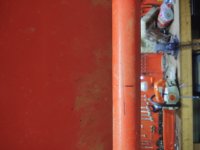
The fix: I started off like I was told by attaching the bucket, raising it up, putting the loader stands down, but not touching the ground (just in case), and then marking dead-center of the support bar and I cut it in half. In the pictures you will see that once I cut the bar it make a drastic shift and the marks I made clearly show the bar was in-fact twisted. I then hammered the bars back to line up again, then used a ratchet strap to pull the cut back together to make up for the gap (within the thickness of the cutting blade) and welded it back in place. I had a piece of steel from the frame of a tank (I will plea the fifth amendment as to how I acquired this scrap piece) and I cut it to length to go over the support bar-ultimately replacing the support bars functionality as the "main" support. I then welded the "tank bar" in place and after cleaning the welds up I painted it. THIS WORKS GREAT>>>>and it strengthened the entire Quick Attach system.
For those of you with this problem this is a better fix than what the factory makes, however always remember that when you add a Quick attach to your tractor you lose about 100 pounds of lift capacity because of the bulk of the quick attach system itself being heavier than the conventional fixed bucket that came with your tractor. Add a piece of heavy duty "TANK" metal as a support, and you lose a little more (not too much) but you gain rigidness. Let me know what y'all think.


After everyone under the sun giving me advice as to what might be wrong, I ran into one Kubota mechanic who quickly laughed and told me "its that support bar on the quick attach....its twisted". He explained that it doesnt take much to twist that weak support bar and throw off the quick attach "paddles" that go into the attachments. He advised me that I would need to put the bucket on the quick attach, lift it up, and then cut the support bar and it would all pop back into alignment. He said I would then need to line the support bar ends back up and weld them back together and the problem would be fixed. Me, being the "bigger is better" type guy asked if I could also add another support angle bar of greater thickness to keep it from happening again, and I was told that would be a GREAT idea....so off to the shop I went to begin fixing my tractor and make it even better!
Now, before I get started on explaining the pictures attached to this post I would like to clear the air about my experience and capabilities; I am very experienced in the operation, safety, and limits of my tractor. I do not abuse it, but I do work it hard and walk-the-line on jobs I get from time to time. I service the tractor after every job, and I like to keep her clean. I also like to make additions to the tractor that help in areas of functionality, and versatility like the hood guard I designed (which works great) and the lighting bar on the ROPS which you might see in the pictures I post. I am not a professional welder (which you will see) but I think I did a decent job getting this task completed so you're free to poke fun at me, just understand I already know some of you may look at this work as "tacky". It functions...Im happy.....end of story. LOL
The fix: I started off like I was told by attaching the bucket, raising it up, putting the loader stands down, but not touching the ground (just in case), and then marking dead-center of the support bar and I cut it in half. In the pictures you will see that once I cut the bar it make a drastic shift and the marks I made clearly show the bar was in-fact twisted. I then hammered the bars back to line up again, then used a ratchet strap to pull the cut back together to make up for the gap (within the thickness of the cutting blade) and welded it back in place. I had a piece of steel from the frame of a tank (I will plea the fifth amendment as to how I acquired this scrap piece) and I cut it to length to go over the support bar-ultimately replacing the support bars functionality as the "main" support. I then welded the "tank bar" in place and after cleaning the welds up I painted it. THIS WORKS GREAT>>>>and it strengthened the entire Quick Attach system.
For those of you with this problem this is a better fix than what the factory makes, however always remember that when you add a Quick attach to your tractor you lose about 100 pounds of lift capacity because of the bulk of the quick attach system itself being heavier than the conventional fixed bucket that came with your tractor. Add a piece of heavy duty "TANK" metal as a support, and you lose a little more (not too much) but you gain rigidness. Let me know what y'all think.