geminimoon66
New member
- Joined
- Feb 7, 2013
- Messages
- 21
- Location
- Ohio
- Tractor
- Satoh Elk S550G with Johnson Loader, John Deere GX345 w/ 54" mower deck
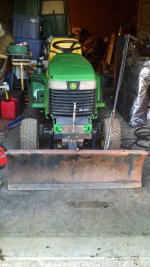
I took a Craftsman 42 Blade (Model 486.24441) and mounted it to the JD GX345.
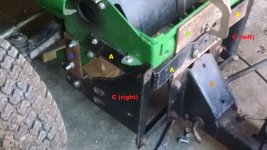
I used the existing side mounting brackets (C (left) & C (right)) from the blade; I switched them to make it wider for the GX345 frame and flipped them upside down. Then I made two brackets (B) that bolt to the ends, and to the existing holes in the tractor frame. These holes in the frame I used are the holes to mount the correct blade, as well as mounting points for other attachments for this model.
Using scrap from an old grass catcher (A), I made a mounting bracket that I bolted into the tractor frame. This bracket also holds ?ï½¼ plate (D) that bolts directly to the Craftsman blade mount (E).
More in depth:
A Is a 1/8 or 3/16 �ォ shaped part about 2 wide and within 1/8 the width of the tractor frame. I drilled 2 3/16 holes in the tractor frame on each side to hold this bracket in place.
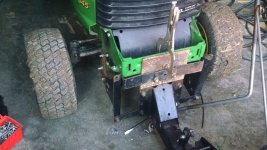
I also drilled 2 holes in the front of bracket (A) and bolted plate (D) to it. Plate (D) is the main upper support for (E). If you豎*e still following me, plate (D) also bolts into the top bolts of (E); better seen in other picture.
As for bottom support, brackets C bolt to the lower angle iron of (E), yes I know it is bent and needs replaced. All in due time my friend.
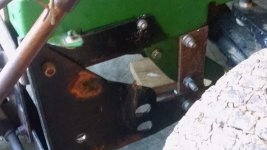
Now I squared up bracket C on each side and it lined up just below the mounting tabs for the mower deck and also for the snow blower and possibly others things I do not have.
In other pictures you can see these on the frame better. I just cut two 0.25" X 1.5" X 3? pieces and drilled 2 holes to line up with holes already in the frame, then drilled another hole for bracket C to bolt into. This handles all the lower pressure while the wings/tabs that stick out on the frame take all the upper pressure of bracket C.
The first time I used it out back where I have a big pile of dirt. I pulled up along the corn field, dropped the blade and stepped on the pedal. The feet were flush with cutting edge and it cut the top ¾" to 1" of dirt for 50 foot, which is the start of the pile. I backed up and made a deeper cut by leaving blade down and going forward a foot or so then backing up allowing the blade to go a little deeper each time. Within 10 foot the AG tires started spinning a little so I backed off and shut it down.
I got off and did a visual; it had easily dug a 2 deep path for 8 of that 10 feet, which is close to 4 higher than I want it to be in that area. Pulled it back into the garage and double checked all the bolts and alignment of everything and all was good, nothing at all out of whack. Pretty amazing, I know! Matter of fact I decided NOT to drill 2 more holes in the frame and still today have those vise-grips clamping the whole thing to the frame in front.
I plow a 20 foot X 50 ft. place at house garage that tees into a 35ft. X 60ft. all gravel, then narrows to a 14ft. concrete apron that is 10ft. long then onto a 12ft. wide X 32ft. long wood planked bridge. On the road side there is another concrete apron and around 20 of gravel to the road.
I plowed 3 of dry stuff a few weeks ago and another 2 to 3 of wet stuff just a week or so ago. Never spun a tire yet plowing at least. Those big lugs on those AG tires will throw a big ole rooster tail of snow when you full throttle and step on it!
I did tighten up the vise grips when I used it last but aside from that no changes yet.
My next plans are to make a single-point type hitch for the back of the GX345 and a drag to go along with it.
I have a few other projects I need to get put up here in hopes of helping someone out!
Best if you right click each picture and "open link in new tab", especially if you want to reference the first pic!


~gm66
I used the existing side mounting brackets (C (left) & C (right)) from the blade; I switched them to make it wider for the GX345 frame and flipped them upside down. Then I made two brackets (B) that bolt to the ends, and to the existing holes in the tractor frame. These holes in the frame I used are the holes to mount the correct blade, as well as mounting points for other attachments for this model.
Using scrap from an old grass catcher (A), I made a mounting bracket that I bolted into the tractor frame. This bracket also holds ?ï½¼ plate (D) that bolts directly to the Craftsman blade mount (E).
More in depth:
A Is a 1/8 or 3/16 �ォ shaped part about 2 wide and within 1/8 the width of the tractor frame. I drilled 2 3/16 holes in the tractor frame on each side to hold this bracket in place.
I also drilled 2 holes in the front of bracket (A) and bolted plate (D) to it. Plate (D) is the main upper support for (E). If you豎*e still following me, plate (D) also bolts into the top bolts of (E); better seen in other picture.
As for bottom support, brackets C bolt to the lower angle iron of (E), yes I know it is bent and needs replaced. All in due time my friend.
Now I squared up bracket C on each side and it lined up just below the mounting tabs for the mower deck and also for the snow blower and possibly others things I do not have.
In other pictures you can see these on the frame better. I just cut two 0.25" X 1.5" X 3? pieces and drilled 2 holes to line up with holes already in the frame, then drilled another hole for bracket C to bolt into. This handles all the lower pressure while the wings/tabs that stick out on the frame take all the upper pressure of bracket C.
The first time I used it out back where I have a big pile of dirt. I pulled up along the corn field, dropped the blade and stepped on the pedal. The feet were flush with cutting edge and it cut the top ¾" to 1" of dirt for 50 foot, which is the start of the pile. I backed up and made a deeper cut by leaving blade down and going forward a foot or so then backing up allowing the blade to go a little deeper each time. Within 10 foot the AG tires started spinning a little so I backed off and shut it down.
I got off and did a visual; it had easily dug a 2 deep path for 8 of that 10 feet, which is close to 4 higher than I want it to be in that area. Pulled it back into the garage and double checked all the bolts and alignment of everything and all was good, nothing at all out of whack. Pretty amazing, I know! Matter of fact I decided NOT to drill 2 more holes in the frame and still today have those vise-grips clamping the whole thing to the frame in front.
I plow a 20 foot X 50 ft. place at house garage that tees into a 35ft. X 60ft. all gravel, then narrows to a 14ft. concrete apron that is 10ft. long then onto a 12ft. wide X 32ft. long wood planked bridge. On the road side there is another concrete apron and around 20 of gravel to the road.
I plowed 3 of dry stuff a few weeks ago and another 2 to 3 of wet stuff just a week or so ago. Never spun a tire yet plowing at least. Those big lugs on those AG tires will throw a big ole rooster tail of snow when you full throttle and step on it!
I did tighten up the vise grips when I used it last but aside from that no changes yet.
My next plans are to make a single-point type hitch for the back of the GX345 and a drag to go along with it.
I have a few other projects I need to get put up here in hopes of helping someone out!
Best if you right click each picture and "open link in new tab", especially if you want to reference the first pic!


~gm66
Last edited:
