Ok, well....here comes the update. If you want blow by blow, keep reading. If you want "just the facts mam", I figured it out.
The center blades are the weakest. I have two rebuild kits on the way but, one (unopened) in my hand, so let's look at the worst offender first.
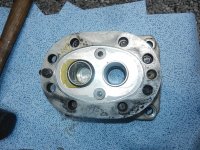
Here is the aforementioned part that I thought I had pulled out.
Let's take this bugger off and take it apart. I've removed both hoses and now have to unbolt the base.
Had fits getting the bottom bolts off the last time I did this. Bought a crows foot.... it snapped. (no pun intended) So I manned up and ordered a Snapon version and it's worked fine.
Let's carry motor up the hill to my pristine and ALMOST heppa qualified clean table...
DANG IT.... I forgot from the last time.... removing the bolts holding the halves together WITHOUT a vice, is near impossible....had to carry it back down to mower, put two base bolts in and then I was able to loosen the bolts holding the halves together.
Tap them apart with rubber mallet.... am now paying attention to specifics of what I see as evidently, I didn't last time!
Well, excuse me! I thought I'd pulled that part out and there it (they) are on the ends. I STILL thought I did it.... where did that extra come from? I don't know. This had all parts as expected.
Do you see what I see? I didn't catch it at first.... until the part fell out.
I don't know if this is 2% critical or 99% critical.... but seems it got eaten for lunch and spat out. I'm feeling pretty good so far.... all the parts strike my highly trained eye as no wear and reusable. I might try to just replace what appears to be broken....but let's keep going.
These little plates are annoying to try to get out. Fortunately, over life, I've ended up with this (valve puller tool???) Last time I did this I was flummuxed as to how to get this part out. The tolerances are VERY close and if it's not done perfectly, it will jam. I realized I had this in my tool box and it's absolutely perfect for reaching in there, grabbing the part and giving you ability to wiggle things and both, remove and then use same tool to replace the part on assembly.
This time, I actually read the directions (C'mon guys....you know most of you just dive right in!!)
Anyway, turns out one has a squared shoulder and other has a rounded shoulder. Long story made longer.... I read the instructions, discovered that the round shoulder goes "here" and the squared shouldered goes "here". What I will not confirm nor deny is..... did I read the schematic correctly or upside down and put them in the opposite place TODAY????? (yes, I did) Pulled things back apart to get them on the appropriate end.
I got all this back together, got the halves bolted back together.... then it hit me. The VERY FIRST part, at the top of this.... has a slight taper. I finally deduced that this taper would physically touch the upper and lower half. The FLAT PORTION would face the center section to help sandwich the seals on either side of the gears. I'm guessing this is one of the issues because I think ALL THREE of the motors have the non-tapered (what I'm calling flat) side on the OUTSIDE. I decided this had to be flipped.
Oh wait.... I had the halves back together....did I put the first (deepest loction) in the correct way or the way I did it before?
Yeah.....pulled halves back apart again and indeed, the flat side was facing the outside, not the inside. It's a slight taper so I told myself I was tired, been long day and it is easy to make a mistake!
Got the whole thing back together, what I feel to be correctly this time (as long as those flat surfaces face the impellers....so I'm either 100% correct or 100% wrong!
Mount, bolt and torque bolts.... time for a trial (oh, the key that locks the drive gear to the actual blades underneith needs replaced....but I have to see how this thing cuts.)
Fire up tractor, all is well..... put in drive, low RPM's so turn around, pull PTO lever.... tractor stalls/dies. WHAT the HECK??? IH-1066 has something like 125 HP and it can't get the blades turning?
Start tractor, try again....dies again. ???? In my brain I'm thinking what could it possibly be? Start glancing at controls....nothing.
Try again, dies. That's it..... start again, drive back to side yard.... looking at things on mower, then it hit me. Didn't the pressure relief use to point right and now it's pointing left? Because if so, that means I've got the stupid motor on backwards (180 degrees out of rotation)
UGH.... I'm a smelly, dirty, oily mess.... go get the tools, unbolt hoses, bolts, swap it around and reattach things. Fire up tractor.....give the PTO a gentle pull.....and vroooooooooooooooooom..... yeah, stupid me. To be frank, I'm surprised....I don't know why it will only turn one direction.
OK, so ahead of me is my target grass. Getting RPM's up, mower is working.... in 2nd gear so a slow ride over there.
You can see where I cut to the left a week or so ago....I'm heading to the tall uncut stuff straight ahead. The issue this was exhibiting is/was when I get into the tall stuff.....the center blades (this one) are over-whelmed and do not cut 90% of what's there.
'''
Looking like a success. The center grass would NOT have been cut the other day, now it is (but the left blade is only cutting 70%)
Here's some pesky grass on the left side that didn't get cut. You can see it behind the wheel. I'm curious about the middle part just behind the wheels but, I don't recall if I backed off throttle or not.
None the less......even as is, this is now cutting VASTLY better than it was. I think I've learned more about how to rebuild a (these) hydraulic motor. I had one part blow up on me (that first gasket) and some other parts that were on the wrong side AND upside down.
Learned you can't work a motor backwards and have it work....indeed, it killed the tractor. I'm still perplexed on this because the vanes/impellers seem to be non-directional but, facts are facts, it killed the engine.
I might not be able to get to the left bladeset for several weeks as I've got things happening in life..... but this is already SOOOOOOOOOOOO much better.... I drove down the road near the walking path. That was 4-5 feet tall.... took me a while because of some semi-scary side hills..... but got all that cut down so now, as you drive into the neighborhood, it's a nice pretty drive.
Can hardly wait for next couple weeks to pass so I can redo the left motor (make sure the parts are on the correct half of the motor AND probably have to flip those wedgie things the other way around....
So if this helps someone who might dig into a similar type hydraulic motor, well.... power to you! Don't make the Gomer mistakes that I made!!!