ETpilot
Gold Member
I have searched but I was not able to find much info on the Ford 4610 tachometer cable. So I write this post. It may help someone. The first time I replaced the tach cable it was an easy thing. Disconnect at the tach drive and the tach instrument. Then just remove and replace. This next go around was a bit different. When I removed the tach cable, it was frozen and not turning. I installed the new cable, tested the tach to make sure it would work. Started engine and no go. Tach did not work. It is always good to lubricate the tach cable. Lol.
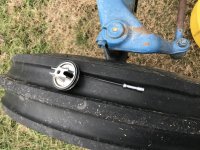
A parts search revealed that in addition to the tach cable there is also a short drive shaft cable that drives the tach cable. I pulled the old driveshaft cable and the end was really mangled and twisted. So I needed to buy a new drive shaft tach cable.
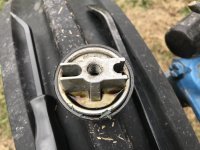
The drive assembly is on the left side of the tractor just under the oil filter. There is a bolt that holds on the drive shaft adapter, aka the cover. Under the cover is the drive shaft adapter mounting base. To remove loosen the bolt on the cover just enough to fit a pry bar under the cover. Then very carefully pry the cover up. The cover will pull the mounting base with it. The mounting base has a compression ring and a rubber seal. You need to be careful with them.
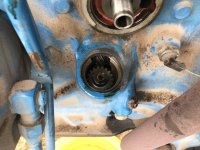
Once the cover and mounting base are removed you can look inside and see the square drive on the oil pump gear. In my case part of the broken drive cable was still in the square drive of the oil pump gear. I removed the broken piece and checked that my new part fit properly. And it did.
Now came my fun part. How to reassemble? The short cable enters at a 45* angle then inside it turns vertical to go straight down into the square drive. Only 2 ways to do this, I think. One is insert the cable into the cover. Install mounting base. Then work with a tool, thru the bolt hole, to get the cable square end into the drive gear. This one is just my thought and I did not even try this method. The second method is to assemble the cover to the mounting base then insert the cable. Holding the cable end so it does not push out, you can easily insert the square end into the drive gear. Now you place the assembly into the opening and tap the cover so the mounting base slips into position. This is a tight fit. This is how I did mine. I may have to tap the assembly down a bit more. I will do this when I get the tractor to operating temperature for an oil change. I don't have any leaks so it is good as it is.
You can run the engine with the tach cable disconnected to make sure the drive cable rotates under engine power. If it rotates attach the tach cable and you are done.
It is a good idea to make a mark on the throttle rod and instrument panel case to indicate the PTO speed. This is so if you lose the tach you can still find the PTO speed. I did not do this so I used my stroboscopic tachometer to find the PTO speed. When I fixed the tach problem, I checked my mark against the tractor tachometer and it was dead on.
Anyway a few helpful pictures.
A parts search revealed that in addition to the tach cable there is also a short drive shaft cable that drives the tach cable. I pulled the old driveshaft cable and the end was really mangled and twisted. So I needed to buy a new drive shaft tach cable.
The drive assembly is on the left side of the tractor just under the oil filter. There is a bolt that holds on the drive shaft adapter, aka the cover. Under the cover is the drive shaft adapter mounting base. To remove loosen the bolt on the cover just enough to fit a pry bar under the cover. Then very carefully pry the cover up. The cover will pull the mounting base with it. The mounting base has a compression ring and a rubber seal. You need to be careful with them.
Once the cover and mounting base are removed you can look inside and see the square drive on the oil pump gear. In my case part of the broken drive cable was still in the square drive of the oil pump gear. I removed the broken piece and checked that my new part fit properly. And it did.
Now came my fun part. How to reassemble? The short cable enters at a 45* angle then inside it turns vertical to go straight down into the square drive. Only 2 ways to do this, I think. One is insert the cable into the cover. Install mounting base. Then work with a tool, thru the bolt hole, to get the cable square end into the drive gear. This one is just my thought and I did not even try this method. The second method is to assemble the cover to the mounting base then insert the cable. Holding the cable end so it does not push out, you can easily insert the square end into the drive gear. Now you place the assembly into the opening and tap the cover so the mounting base slips into position. This is a tight fit. This is how I did mine. I may have to tap the assembly down a bit more. I will do this when I get the tractor to operating temperature for an oil change. I don't have any leaks so it is good as it is.
You can run the engine with the tach cable disconnected to make sure the drive cable rotates under engine power. If it rotates attach the tach cable and you are done.
It is a good idea to make a mark on the throttle rod and instrument panel case to indicate the PTO speed. This is so if you lose the tach you can still find the PTO speed. I did not do this so I used my stroboscopic tachometer to find the PTO speed. When I fixed the tach problem, I checked my mark against the tractor tachometer and it was dead on.
Anyway a few helpful pictures.