I continue to try to improve my weld quality and learn all the time.
I thought that I would ask for some feedback even though I am well aware that pictures do not always give a good idea and with a lousy iphone 3Gs as the only digital camera the quality is a bit lacking. I actually had a couple other pictures but the lighting and focus made the pictures unusable and I currently can't take new ones to replace. (not at home)
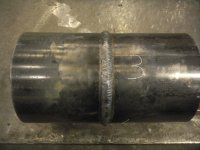
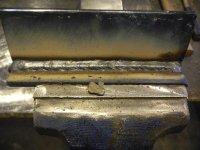
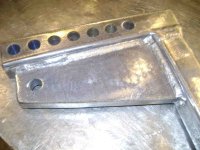
The project is made using C5-9.0# channel with 2x2x0.25 sq tubing cross-members with 1/4 inch end plates. The pictures are of the end plates attached to the ends of the channel steel. The end plates are cosmetic and serve no real purpose other than fairing the ends of the channel.
I was using 1/8" ESAB Acclaim 7018 running at 130 amps. I have to watch myself as I am inconsistent in travel speed and have been known to not weld as consistently as I would like to.
In the first picture I feel that I was really varying the speed of travel even worse than normal for me. The first two red lines depict what is about a 1 mm lip from not enough fill on the plate due to travel speed. Kind of herky jerky like. The restart kind of got buggered up and I did not fill the crater at the end as well as I should have by standing up the rod and waiting. I did stand up the rod but did not wait long enough (I think). I had mis-cut the end piece a little and rather than cut a new one I made a first pass with 3/32" at 68 amps to fill the "um how to you say resulting gap" :laughing: :ashamed: from my mis-cut. It was basically an open root edge for the end due to my mis-cut. That should not have had any effect on the weld that you see however.

The second picture my travel speed was over-all better, I think. Where the red line is I again had about a 1 mm lip where I should have a bit more fill and I think if I had been just a bit slower it would have been filled properly. Again the crater at the end point. I have been trying to get better at welding around the corners but did not on these two welds as I had already done the sides and tried to wrap around from those welds but this weld mostly washed it out and I cratered again.

Most of the time I just email these to SA but thought I would throw them out for constructive comments since we have had such a brouhaha lately regarding constructive comments.
Incidentally I did these with my Everlast 300. Thanks go to Amazon for their pricing and SA and Mark for bring it to everyone's attention.
I thought that I would ask for some feedback even though I am well aware that pictures do not always give a good idea and with a lousy iphone 3Gs as the only digital camera the quality is a bit lacking. I actually had a couple other pictures but the lighting and focus made the pictures unusable and I currently can't take new ones to replace. (not at home)
The project is made using C5-9.0# channel with 2x2x0.25 sq tubing cross-members with 1/4 inch end plates. The pictures are of the end plates attached to the ends of the channel steel. The end plates are cosmetic and serve no real purpose other than fairing the ends of the channel.
I was using 1/8" ESAB Acclaim 7018 running at 130 amps. I have to watch myself as I am inconsistent in travel speed and have been known to not weld as consistently as I would like to.
In the first picture I feel that I was really varying the speed of travel even worse than normal for me. The first two red lines depict what is about a 1 mm lip from not enough fill on the plate due to travel speed. Kind of herky jerky like. The restart kind of got buggered up and I did not fill the crater at the end as well as I should have by standing up the rod and waiting. I did stand up the rod but did not wait long enough (I think). I had mis-cut the end piece a little and rather than cut a new one I made a first pass with 3/32" at 68 amps to fill the "um how to you say resulting gap" :laughing: :ashamed: from my mis-cut. It was basically an open root edge for the end due to my mis-cut. That should not have had any effect on the weld that you see however.
The second picture my travel speed was over-all better, I think. Where the red line is I again had about a 1 mm lip where I should have a bit more fill and I think if I had been just a bit slower it would have been filled properly. Again the crater at the end point. I have been trying to get better at welding around the corners but did not on these two welds as I had already done the sides and tried to wrap around from those welds but this weld mostly washed it out and I cratered again.
Most of the time I just email these to SA but thought I would throw them out for constructive comments since we have had such a brouhaha lately regarding constructive comments.
Incidentally I did these with my Everlast 300. Thanks go to Amazon for their pricing and SA and Mark for bring it to everyone's attention.