Farm Pro 2430 Clutch Replaced

   / Farm Pro 2430 Clutch Replaced #1  

detel

Member
Joined
Mar 28, 2008
Messages
39
Location
Frankewing, TN
Tractor
Farm Pro 2430
HELP!! I have split my Farm Pro 2430 to replace the clutch. I installed both clutch disks and put everything back together. PTO engages just fine but the drive clutch does nothing. It will grind when I try and put it in gear. I readjusted several times with no luck so I split the tractor today and pulled the clutch pack back out to make sure everything was where it was supposed to be. Installed the clutch pack, married the front and back, adjusted the drive clutch and the same thing, it's like I have no clutch...... I have no clue what I'm screwing up but I would imagine it is something simple!
greg-g had posted, "..don't assume the replacement clutchpack will be properly adjusted upon arrival. You should put it on the bench, and start your adjustments there. When the space between clutches is to spec, and the finger heights both to spec AND all equal in height, only then should you bolt it to the flywheel." Can someone please explain to me how you make the adjustments? One thing for sure, it's taken half the time to split it and put it back together then the first time!! :dance1:
 
   / Farm Pro 2430 Clutch Replaced #2  
First, congratulations on splitting your tractor so quickly, you must have done it all in one day.

I don't know the answer, but I'm going to think out loud here and see if it's helpful. I never understood the stack height measurement, I understand that the idea is to be able to adjust the clutch before putting the tractor back together again.

Your tractor has a two stage clutch, the drive clutch and the PTO clutch. There are two gaps in a two stage clutch. When you first start to push on the pedal the first gap, between the fork and the throwout bearing, closes, and the bearing presses on the drive clutch. As you press further the drive clutch plate opens, and as the drive clutch plate moves the second gap, between the drive clutch and the PTO clutch, closes. Once that gap closes the PTO clutch opens.

If there is no gap between the drive clutch and the PTO clutch, the drive clutch won't be able to open. When you push on the pedal the force is transmitted directly to the PTO clutch. There are six places to check the two gaps: three fingers with a gap at the throwout bearing and the three attachment points between the drive clutch and the PTO clutch.

This link shows the adjustment points: Jinma Dealer, Wood Chipper , Compact Jinma Tractors

Scroll down to where it says "254LE clutch adjustment locations." Look at pictures 11-13. Do you see the gap between the red piece that says "PTO" and the red piece connected to it? If that gap isn't there the drive clutch won't release. I don't know what the dimension is but you can see it's pretty substantial. I think it might be 1.2mm. The gap doesn't have to be exactly right, it is important though that it's the same for all three.

You can check the gap and set it through the inspection port with the tractor assembled. I don't believe it's any less accurate than the "stack height" method, it's just harder.
 
   / Farm Pro 2430 Clutch Replaced
  • Thread Starter
#3  
Wow, that is a much bigger gap than what I have, my gap is more like the 354LE. Now, how to get that gap? I do know that when I had the clutch pack laying flat down on the bench I adjusted the main clutch to 30mm between the nut however, when I put the clutch on the tractor and buttoned up all of the bolts to the flywheel, my gap was around 100 mm and I reset them. Maybe I should have left them alone?
 
Last edited:
   / Farm Pro 2430 Clutch Replaced #4  
We have never pre adjusted a clutch pack before installation on a Jinma Tractor,or know anyone that has prior to installation, if you re-assemblied the clutch pack together correctly it should be very easy to adjust ? Note once the tractor is back together without the clutch pedal attached to the clutch arm.You should be able to adjust the PTO ( The 3- Double nutted sets of adjustments) by getting the 0.30 thousands gap under the big nut the retighten them make sure they are all the same.On the main clutch, you need a thin wrench to fit under the clutch finger to loosen the nut,adjust each one by loosening the nut under the finger, then turning the bolt head to get the 1/8" between the end of the finger and the throw out bearing, all 3- of these must be the same.When you reattach the clutch arm you should be able to turn the turnbuckle so that you can get 1" of free play .The clutch should be in adjustment now, we have installed well over a hundred clutchs in the past 12-15 years and they all worked great

Tommy
Affordable Tractor Sales
"Your Jinma Parts Superstore"
Home of compact Jinma, Foton, and Koyker Tractors and Parts, Wood Chippers, Backhoes - Affordable Tractor Sales Company
 
   / Farm Pro 2430 Clutch Replaced #5  
Do what Tommy says.

I'll add that if you have a helper who can push in the clutch while you look through the access hole you can see all of the pieces moving and figure out what is going on.

Note that adjusting the PTO gap affects the drive clutch gap so you have to do the PTO adjustment first.

As long as the gaps are big enough that nothing rubs when it shouldn't, the exact adjustment is something of a personal preference. The bigger the gaps, the more you have to push the pedal to get the clutch to disengage. My preference is that it's better to have the gaps big and have a long stroke to the clutch pedal, with a well-defined transition between the drive clutch and pto clutch. If you find you get the gaps where you want them but with the pedal down all the way the PTO clutch doesn't fully disengage (ie it grinds when you put it into gear) you can lengthen the stroke of the clutch pedal by adjusting the stop bolt. The only caution there is that the clutch safety switch needs to be backed out too, it is pretty fragile and you can crush it if it's not protected by the stop bolt.

Here's how I fine-tuned the PTO clutch travel: with the engine off, PTO engaged I had a helper push the clutch in all the way. If the clutch is releasing fully I can turn the PTO output shaft easily by hand. I adjust the clutch stop so that the bottom of the travel is just past that point.
 
   / Farm Pro 2430 Clutch Replaced
  • Thread Starter
#6  
I will check everything again to make sure all of my settings are correct. The only thing that is different on mine based on the photo attached is that on my clutch friction plates, the center hole lip that protrudes outwards, is facing the rear of the tractor and not the front as it appears to be facing in this photo.
DualClutch.jpg
 
   / Farm Pro 2430 Clutch Replaced #7  
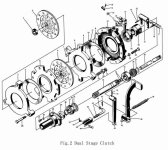
The parts diagram is helpful for visualizing what's going on inside the clutch, and I'm going to take back my answer in post #2, I don't think having the clutch out of adjustment can cause the problem you are having.

Just to get us oriented: pieces #5 and #12 don't move and are bolted to the flywheel. #2 is the PTO clutch, and it is squeezed between the flywheel and #3 by the spring, #4. #6 is the drive clutch and it is squeezed between #5 and #8 by its spring #10. When you push on the clutch pedal it pushes on the bearing #21, which pushes on the three fingers #15. They are attached to #8 by the three bolts #7, and the fingers pull #8 toward the rear of the tractor, which releases the pressure on the drive clutch disk and allows it to spin. #8 is connected to #3 by three bolts #24, and when #8 moves toward the rear of the tractor, once it has taken up the gap it moves #3 toward the rear of the tractor, which frees the PTO clutch disk to spin.

So there is no way that the PTO clutch can release if part #8 isn't moving toward the rear of the tractor. So even if the gaps on bolts #24 -- the PTO gap adjustment -- aren't set properly it only affects PTO clutch operation. It shouldn't affect the drive clutch.

I can see two possibilities. One is, as you mentioned, the clutch disk #6 is in backwards. It slides on the transmission input shaft #33. If you look at the picture the shaft only has splines for a short distance. It is possible that with the disk in backwards there is no room for it to slide toward the rear of the tractor, so that when #8 moves toward the rear of the tractor the clutch disk remains firmly pressed against #5 and the clutch remains engaged.

The other possibility I'll mention because I had it happen to me. When I replaced my clutch I put the PTO clutch spring #4 in backwards. When I did that, it got cocked at an angle and kept the PTO disk against the flywheel even when #3 moved toward the back of the tractor. If spring #10 were put in backwards the same thing could happen, but to the drive clutch instead.

Unfortunately both of these possibilities mean splitting the tractor again. Before doing that I would watch through the access hole while a helper pushes on the clutch pedal. You can see the pieces that are supposed to move, and make sure that everything that is supposed to move is moving and nothing that isn't supposed to move is moving.

When I don't have a helper I put a come-along on the clutch pedal.
 
   / Farm Pro 2430 Clutch Replaced
  • Thread Starter
#8  
I went out to the barn last night and took a look again at the setup. I first marked the location of #8 with a mark on #12 to see if #8 moved when the clutch was applied. It didn't. It appeared that #8 was not centered on #12 and possible being held up enough by abutting on #12. I loosened the bolts and tried to center #8 on 12 and freed it up enough to move a little bit but not enough as I still can't engage the gears. Today I will split it again and check my clutches to make sure they are in correctly as well as making sure everything is symmetrical when I put it all back together. I know that the springs are in correct as they have to fit within the groove of the pressure plates. I'm still thinking that it has something to do with the clutch plates. More to come..... Thanks!
 

Tractor & Equipment Auctions

2012 KENWORTH T800 MID-ROOF SLEEPER (A45333)
2012 KENWORTH T800...
2016 Chevrolet Equinox LS SUV (A44572)
2016 Chevrolet...
15 YARD HOOK LIFT ROLL OFF CONTAINER (A45046)
15 YARD HOOK LIFT...
2003 Ford F-650 Flatbed Truck, VIN # 3FDNW65243MB03484 (A44391)
2003 Ford F-650...
Year: 2013 Make: Jeep Model: Grand Cherokee Vehicle Type: Multipurpose Vehicle (MPV) Mileage: Pla... (A44572)
Year: 2013 Make...
2005 CHEVY C4500 BOX TRUCK (A43004)
2005 CHEVY C4500...
 
Top