I have been reading this forum extensively for the past few years. I taught that it would be time that I post a project that might help others. Sot here goes.
Last year bought a Wallenstein GX700 Backhoe with a 3 pt hitch attachment for our Kubota L3710. We have use this implement allot more that we had anticipated, our land is quite flat and heavily wooded. Making the need for ditches and small scale drainage work a necessity. The problem was that after on summer of work with the BH we found a few problems with the 3pt setup.
1. The stability of the whole thing was not great, this thing would flop around all over the place while working. making it difficult to maneuver the tractor from the BH seat (I know, I know... but I like to get the most out of the equipment). I ended up calling Wallenstein about this. It turned out that I was missing a piece going to the draw bar, they wanted 350$ for the missing parts, I built it for less that 30$ ( it's discussed in more details lower) .
2. the distance between the BH and the tractor was too great making it difficult to go over rough terrain in the bush.
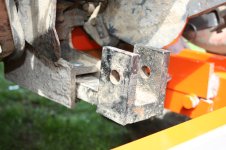
3. With the BH wobbling around all over the place the top link holder was taking quite a beating. The holes are no longer round but oval.
Then there are all of the other issues related to having so much stress on the back of the machine. There are other excellent threads about this subject The best one is probably http://www.tractorbynet.com/forums/build-yourself/171760-how-build-your-own-custom.html.
I called Wallenstein to get more information about their sub frame kit for the GX700 they told me that sub frame was of the ladder type (this is also available in their documentation), it does not couple the tractor and the BH any closer than the 3pt arrangement and it attaches via the pins where the 3pt arms attach to the tractor. They also wanted over 1000$ for the kit plus freight.
We (I say "we" because my wife and I both worked on the design and building of it) had a few requirements.
1. it has to be stable
2. it has to be easy to install and remove. This had to include not having to remove the 3pt arms I tired to do this on the tractor and it was not an easy job.
3. it must not be of the ladder type ( I didn't like the idea of having to trip over that thing when it is not mounted)
4. it must not reduce the ground clearance, In the bush I need all of the clearance I can get
5. as all the stuff I build for the tractor it must not permanently modify the tractor.
So here are the details for the build.
There are 3 main components to the build
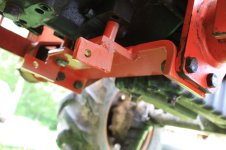
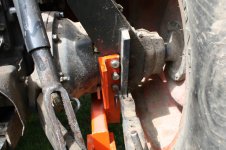
1. the tractor mounting bracket, This is basically a modification to the loader bracket to attach the front of the tractor portion of the sub frame to the tractor and the FEL frame. It is based on the woods design.


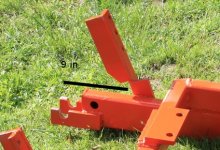
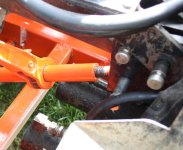
2. The main tractor frame. This component is made out of 0.25 2x3 and 0.25 2x4 rectangular tubing. The front attachment plate is 0.5 x 4 inches and the rear hooks are 5/8 plate . The brackets for the ROPS mount are 0.5 welded in a angle. It permanently attaches to the tractor via the tractor mounting bracket in the front, the mounting holes in the bottom of the transmission housing at the rear, this is what the two holes at the top of frame are for (this idea came from the woods kit), and the ROPS mounting plates at the rear.


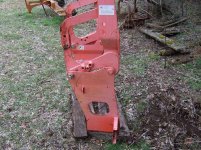
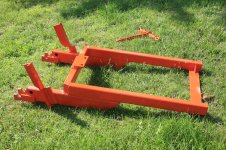
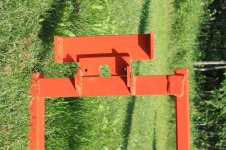
3. The BH frame. The BH Frame is built out of 0.25 2X4 rectangular tubing, the hooks are 5/8 and the permanent pin it 1" cat 2 top link pin. To attach the BH to the tractor I use the standard cat 1 pins. The bracing is done with 4 in C channel and 0.25 2x2 square tubing


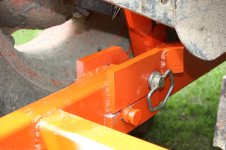
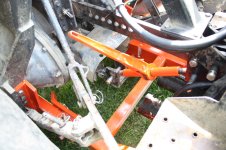
4. the other pieces to the kit. To attach the top BH I use the top link from the 3 pt kit, a three holed 5/8 plate, a ratchet load binder and a modified draw bar. This arrangement makes the the top link really easy to attach and the load binder tightens every thing down once all the pins are in. Most of these components where build and added last year to try to stabilize the 3 pt version.


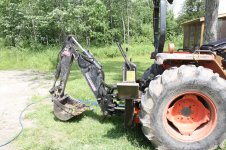
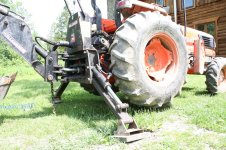
Here are a few picture of the whole thing assembled. I still have to work on finishing the seat mount and the hydraulic hose mount on the tractor as it was in the way of the seat.


I have already put about 20 hours of BH time on it with the new sub frame and I am entirely pleased with the results. I even tried it with out the top link and load binder to make sure the frame was strong enough, it was surprisingly quite rigid although I would not want to be between the BH and the tractor should it fail .
.
There are still a few tweaks to do on it. It will need more alignment brackets and new seat mount. I also found out once every thing is built that the stabilizer hoses are rubbing on the rear tires. At this point in time I am not too worried about it, I did put a covering on the hoses to try and protect them, when they fail I'll try and figure a better way to route them.
The total cost for the project was about 500$. There is about 350 $ of new steel 100 $ on paint and about 50 $ on bolts load binders and consumables . Kubota paint is stupidly expensive and I will not waist my money on this any more, I also realized that I can't pain worth s&^% . So the 10$ pint of black Tremclad will be fine for the next projects.
It was very pleasant to build and allowed me to spend allot of time working with my wife. We both spent numerous meals discussing designs over candle light and napkin plans. She did most of the cutting and the clamping I did the marking and welding.
I hope that this thread will help give ideas to others who wish to built this type of equipment.
Last year bought a Wallenstein GX700 Backhoe with a 3 pt hitch attachment for our Kubota L3710. We have use this implement allot more that we had anticipated, our land is quite flat and heavily wooded. Making the need for ditches and small scale drainage work a necessity. The problem was that after on summer of work with the BH we found a few problems with the 3pt setup.
1. The stability of the whole thing was not great, this thing would flop around all over the place while working. making it difficult to maneuver the tractor from the BH seat (I know, I know... but I like to get the most out of the equipment). I ended up calling Wallenstein about this. It turned out that I was missing a piece going to the draw bar, they wanted 350$ for the missing parts, I built it for less that 30$ ( it's discussed in more details lower) .
2. the distance between the BH and the tractor was too great making it difficult to go over rough terrain in the bush.
3. With the BH wobbling around all over the place the top link holder was taking quite a beating. The holes are no longer round but oval.
Then there are all of the other issues related to having so much stress on the back of the machine. There are other excellent threads about this subject The best one is probably http://www.tractorbynet.com/forums/build-yourself/171760-how-build-your-own-custom.html.
I called Wallenstein to get more information about their sub frame kit for the GX700 they told me that sub frame was of the ladder type (this is also available in their documentation), it does not couple the tractor and the BH any closer than the 3pt arrangement and it attaches via the pins where the 3pt arms attach to the tractor. They also wanted over 1000$ for the kit plus freight.
We (I say "we" because my wife and I both worked on the design and building of it) had a few requirements.
1. it has to be stable
2. it has to be easy to install and remove. This had to include not having to remove the 3pt arms I tired to do this on the tractor and it was not an easy job.
3. it must not be of the ladder type ( I didn't like the idea of having to trip over that thing when it is not mounted)
4. it must not reduce the ground clearance, In the bush I need all of the clearance I can get
5. as all the stuff I build for the tractor it must not permanently modify the tractor.
So here are the details for the build.
There are 3 main components to the build
1. the tractor mounting bracket, This is basically a modification to the loader bracket to attach the front of the tractor portion of the sub frame to the tractor and the FEL frame. It is based on the woods design.
2. The main tractor frame. This component is made out of 0.25 2x3 and 0.25 2x4 rectangular tubing. The front attachment plate is 0.5 x 4 inches and the rear hooks are 5/8 plate . The brackets for the ROPS mount are 0.5 welded in a angle. It permanently attaches to the tractor via the tractor mounting bracket in the front, the mounting holes in the bottom of the transmission housing at the rear, this is what the two holes at the top of frame are for (this idea came from the woods kit), and the ROPS mounting plates at the rear.
3. The BH frame. The BH Frame is built out of 0.25 2X4 rectangular tubing, the hooks are 5/8 and the permanent pin it 1" cat 2 top link pin. To attach the BH to the tractor I use the standard cat 1 pins. The bracing is done with 4 in C channel and 0.25 2x2 square tubing
4. the other pieces to the kit. To attach the top BH I use the top link from the 3 pt kit, a three holed 5/8 plate, a ratchet load binder and a modified draw bar. This arrangement makes the the top link really easy to attach and the load binder tightens every thing down once all the pins are in. Most of these components where build and added last year to try to stabilize the 3 pt version.
Here are a few picture of the whole thing assembled. I still have to work on finishing the seat mount and the hydraulic hose mount on the tractor as it was in the way of the seat.
I have already put about 20 hours of BH time on it with the new sub frame and I am entirely pleased with the results. I even tried it with out the top link and load binder to make sure the frame was strong enough, it was surprisingly quite rigid although I would not want to be between the BH and the tractor should it fail
. There are still a few tweaks to do on it. It will need more alignment brackets and new seat mount. I also found out once every thing is built that the stabilizer hoses are rubbing on the rear tires. At this point in time I am not too worried about it, I did put a covering on the hoses to try and protect them, when they fail I'll try and figure a better way to route them.
The total cost for the project was about 500$. There is about 350 $ of new steel 100 $ on paint and about 50 $ on bolts load binders and consumables . Kubota paint is stupidly expensive and I will not waist my money on this any more, I also realized that I can't pain worth s&^% . So the 10$ pint of black Tremclad will be fine for the next projects.
It was very pleasant to build and allowed me to spend allot of time working with my wife. We both spent numerous meals discussing designs over candle light and napkin plans. She did most of the cutting and the clamping I did the marking and welding.
I hope that this thread will help give ideas to others who wish to built this type of equipment.
Attachments
-
 main1.jpg724 KB · Views: 1,501
 -
 main2.jpg447.7 KB · Views: 1,307
 -
 main3.jpg312.3 KB · Views: 1,431
 -
 bh1.jpg615.8 KB · Views: 9,460
 -
 bh2.jpg508 KB · Views: 7,670
 -
 bh3.jpg266.7 KB · Views: 9,468
 -
 other3.jpg84.5 KB · Views: 6,674
 -
 other2.jpg354 KB · Views: 13,443
 -
 other1.jpg280.6 KB · Views: 7,417
 -
 assembled1.jpg615.4 KB · Views: 8,181
 -
 assembled2.jpg562.2 KB · Views: 9,335