woodlandfarms
Super Member
- Joined
- Jul 31, 2006
- Messages
- 6,155
- Location
- Los Angeles / SW Washington
- Tractor
- PowerTrac 1850, Kubota RTV x900
So, here we go on how the center section went and the many, many mistakes I made.
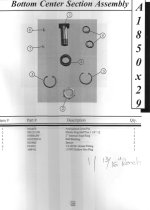
First, the kit is in the picture below. I believe it was round $150 or so. It had all the parts on this picture list. What is not clear is the center bearing is not much more than a fancy knuckle you find on the end of one of your hydraulic rams / jacks / pistons.
According to Terry, you get yourself 2 floor jacks, a prybar, wrenches and a special wrench to do the snap rings, maybe a hammer. support both ends of the tractor so it is level. Undo your top bolt and remove. Undo your bottom bolt and remove. disconnect your steering cylinders. Pry the tractor apart just far enough to get at the center section. The spacers will fall out, remove the snap rings (top is only one necessary) Cajole the old bearing out, put the new bearing in. Place the spacers on the top and bottom of the bearing and slide the tractor back together. Special note. The spacers have a little groove on the ends. That groove is the side that faces the bearing. The flat side faces the metal plates. Align the holes up. Push the new bolt through, put the nut on. Attache the upper bolt, reconnect your steering, lube the bad boy up and go enjoy quality seat time.
Now for the reality.
Roll your tractor in. For reference please remember this is the biggest of the PT line. It has brakes, 8 wheels and is not fun to deal with un-powered. Also, please remember that I forgot to remove my mower. It is 1100lbs.
So, I get the tractor in. Get it on jacks. remove one steering piston completely, unbolt one end of the other. Removed the top bolt. Went to remove the bottom bolt and #()$)(#%& I cannot get the wrench in. You have to angle the tractor sharply to get a wrench in...... So, put everything back together, start the tractor, and angle it. Undo everything.... Get the main nut and then cannot get the bolt to drop. So I have to pound it out. I had to put a screwdriver through the hose bundle and wail away. Finally it pops out.
Now comes the fun part. Separating the tractor. First.... I try and nothing happens. Then I realize the brakes are always on. So I have to pressurize them, and release. I do not release the tram pump as I do not need to move it that far (it may have helped, who knows,,,) Still I cannot get the tractor to move apart. So I get a large crow bar (AKA the jack handle on my floor jack). I realize the other steering cylinder is now blocking a good pry point so now I have to remove it, but of course it is on the pinched side. Cursing and broken knuckles resolved that issue. And now I start prying, and prying and prying, and pushing. I then hook up my pickup to the back of the tractor and pull. Maybe if I had a come-along, or even maybe used a ratchet strap, that might have helped. Finally I hear the tink of metal on the ground and see one of my spacers is loose. I then pry out the other spacer, and realize i still need to go quite a ways to get the bearing out. so pry, pry pry and finally it is pretty darn close. So I remove the upper and lower snap ring. and start pushing out the bearing. And it does not go. So I start pounding on it. And it does not go. So I lube it up, and same thing.... Finally I take my new bolt, put it in and realize that there is no wear on the bearing. So the heck with it. Time to put it all back together. Now, remember that the old spacers were kinda crunched down (the bottom one was) so, now everything is and tight. Try to imagine you, a semi truck and a 40 ft reefer trailer and you trying to get them to line up by hand, pushing them together by hand. Yes. It was not easy. About this time I called the wife out to help hold the spacer in place while I pushed and pried. Eventually it slid back together. But it was not perfectly aligned. So now comes subtlety with a pry bar and a wife. Let me tell you that we have never worked well together anyway. Finally we get the bolt up into the first spacer, but not into the bearing. It is so close, just a hammers throw away. So I start pounding up. And it goes up, and with a little prying it comes out of the top. WOO HOO... I grab the nut and put it on and it does not catch. I have my wife try. I then look closesly. Well, the new bolt is different from the old bolt. The old bolt is tapered, allowing for pounding The new bolt is straight cut. All the threads at the tip are mangled. My wife, in all her glory, gets the nut on. Tries to wrench it and strips out both the new nut and the bolt. So... Out comes the new bolt, and in goes the old one with the old nut.... But it hooks up... So back together everything goes. Of course it is a PITA to now put in the top bolt, and hook up the steering cylinder on the pinched side. But it works. I guess. I have guilt about not forcing the bearing out but it will live for another day. I feel the spacers are not well designed and will need to be removed sooner than later...
Anyway. Hope this helps...
")