Building a 12V Herbacide Sprayer

   / Building a 12V Herbacide Sprayer #1  

AllDodge

Platinum Member
Joined
Apr 28, 2017
Messages
515
Location
S, Central, KY
Tractor
Terramite T5C, Kubota M9540HDC24, F3990, RTV1100, Cat 416C, D3B, 955L
Instead of buying one, I'm looking into building a herbicide sprayer. Have a 250 gallon square tank on a pallet. So need a pump, tubing, bypass valve, wand, tubing and other stuff.

Want to put the tank on the Kubota RTV and then have tubing to make a boom to spread out maybe 20 to 30 feet. Then have another line to feed a hand wand.

Have about 10 acres which I bush hogged and they are starting to come back. Plan to use crossbow and afterwards, then spread grass seed
 
   / Building a 12V Herbacide Sprayer #2  
250 gal = 2000+ lbs. Can the RTV handle that? For the rest of the stuff, go to any agri supply place and start shopping. Just copy one of their ATV units.
 
   / Building a 12V Herbacide Sprayer #3  
Cant help with the sprayer, but if your going to use crossbow and then spread grass seed, good luck. Crossbow is a herbicide and pre emergent, while it might be safe for established grass, it will keep new seed from germinating.
 
   / Building a 12V Herbacide Sprayer
  • Thread Starter
#4  
Don't plan to fill the tank up. Have looked at some of the skid models and they can run off the hydraulics. Mine has hydraulics for the dump bed with quick connects.

Your probably right about the grass seed, but my thought is to let it sit long enough (need to read how long) so the dead briers will be used as straw so the seed can stay out of the sun for a short time.

Also guess I need to check my settings, I didn't get notified about your post
 
   / Building a 12V Herbacide Sprayer #5  
I deal with liquid hydraulics and would strongly recommend to not use that large of a tank. A 50-65 gallon would be more than enough. With a tank that large, and not being full woukd equal a very large area for the fluid to slosh around in. Potentially creating an unstable situation would you really don't want. Bite the bullet and buy a fimco system for the bed of the utv and get to spraying. 24d would be good for broadleaf or glyphosate it all and start over. Also, a hyd pump is usually pretty big money when a simple 12v pump can do what you want.

I started a thread about getting a utv setup for spraying and have been doing a bunch of studying up on it. Even to the point of looking into gps systems to keep me on track

Brett
 
   / Building a 12V Herbacide Sprayer #6  
Actually you can spray roundup and broadcast seed the same day. Used to do it all the time to kill off crabgrass and establish a fescue lawn.
 
   / Building a 12V Herbacide Sprayer #7  
The sum of the parts to build a sprayer will be more than if you just purchase one.They about give you the tank,wand and valves if you buy a pump.I.E. price a pump.
 
   / Building a 12V Herbacide Sprayer #8  
the plumbing cost for DIY = expensive. little fitting there, and here... and it begins adding up very quickly.

many folks DIY pond filters for ponds, and below searches should bring back a few things that cross over directly to a spray rig.
google "55 gallon sand and gravel filter site:koiphen.com" without quotes
google "55 gallon SG filter site:koiphen.com" without quotes
google "SG filter site:koiphen.com" without quotes
click up on images after search.

A) different type of bulkhead fittings.
A1) uniseals = awesome, check diy pond websites / koi dealers. more likely to find uniseals. drill hole a little smaller than uniseal, insert uniseal, take a dremal sanding disc to end of pipe and con the outside edge a little bit, toss some vasaline or like on end of pipe. and push it through. some folks have needed a piece of wood and tow strap to crank down and get pipe to fight through uniseal.
A2) 1.5" to 3" shower drains, to 3" to 4" toliet flanges can also work as nice bulkhead fittings for tanks.
A3) using electrical threaded fittings as a bulkhead sch40/sch80 plastic 1" or larger. would caution against this. not enough "lip" of fittings for spray rig via vibrations to stay put IMHO (in my humble opinion)
A4) EXCEPTION to A3 electrical metal conduit water tight fittings. they come with a rubber washer. and can be nice for smaller size bulkhead fittings 1.5" and smaller

B) how to create a spray bar / cleaning wand. in Sand and gravel filters folks push in air into the filters to boil the water and rock and sand to clean the filters. for a sprayer. this would be the mixing wand / cleaning wand inside the tank.
B1) drill press + 2x4 with V notch in it, plus clamps. and small drill bit = easy way to make spray bar)
B2) drill 2 holes through tank (at same level) on each side of tank. stick pipe through both holes. the pipe inside tank = 2 rows of spray holes pointed up (45 degrees off pointing straight up) think a yard sprinker. one end of pipe (on outside of tank) place end cap, and other side of pipe hook to pump.

C) accessing tank through top.
C1) do not cut the entire top out of tank. if you do cut entire top out. tank will flex and bend about. leave a lip and only cut out center of tank/drum.
C2) 4" toliet flange with either a test plug or rubber end cap can make for a nice manhole with lid. for accessing top of tank.

D) valving
D1) stay away from pvc / plastic valves. they are hard to turn. and the more expensive fully port valves are extremely expensive.
D2) go with metal valves, example brass quarter (1/4) turn on/off valves. example natural gas or LP gas valves generally are 1/4 turn valves. they have cheaper versions.

E) pipe
E1) stay away from sch 40 and/or sch80 pvc or like plastic pipe for plumbing if possible. it may seem strong, but that is until you begin hitting bumps and everything vibrating, and then CRACK / BUST. suggest only to use for manhole / spot in top of tank were not pipe or like connected.
E2) use metal pipe or hose when possible. it will last longer through vibrations
E3) stay with same size inlet pump size for what ever is connected to inlet side of pump, and stay with size for outlet side of pump for what ever is on onlutet side of pump. with suggestion of going up 1/4" larger than what pump inlet/outlet has. do not go up much larger or less. specifically draining tank. do not go smaller or you have issues with not enough GPH / pressure from pump.

F) pump
F1) PTO pump = hand wand / spot spraying = trouble some and needing a more costly "pressure relief valve" when you want to use a hand wand that turns on/off as you squeeze the trigger.
F2) 12v on demand pump = pressure sensor built normally into the pump. so much easier to use and less costly for spot spraying. pending on size of pump and boom nozzles they can run a few feet of booms.

G) hand wands / spot sprayer wands/guns
G1) have found the wands that let you add on the cheap plastic 2 to 3 feet extends to the nozzle preferable. generally use any were from 2', 4',6', 8' total length. ya the cheap plastic extensions bend and bow. but are light weight. if you written your name with pee in snow/dirt. or ran a weed whacker/trimmer. the cheap extensions wave/fan back and forth with a little shake. allowing for spot spraying a larger area a bit easier. and helps get the nozzle were you want it vs bending over, or being up close and personal and peeing into the wind and having spray come back on you.
G2) having an exchangeable "tip" for the nozzle has been beneficial. from watering plants in garden to flowers, to spot spraying fence lines to bushes in pasture.
G3) prefer using cheap smaller diameter garden hose as spot sprayer wand hose. so i can add/remove 10 to 20 feet at a time as needed.

H) boom sprayer nozzles
H1) get something with a little filter in it and a little valve with ability to switch different tips. have caught a lot of little crud in the filters (easy pull out filter, wash and put back in), and the little valve lets you get all the nozzles spraying the same vs nozzles nearest to pump spraying the most. and nozzles furthest away (end of boom) spraying very little).

I) place everyone on a pallet
I1) pallet lets you raise tank up off floor and actually install a drain line to fully empty tank / clean it out
I2) if you have pallet forks (enough said)
I3) if you have a cherry picker / engine lift or like. you can put in some eye bolts. and have lifting points to pick up everything
I4) it is advised to mount / support all piping / hoses and more so Tees and valves. less likely breaking / cracking / bending.

J) spot sprayer wand hose
J1) personally do not like any sort of automatic or crank hose reel. personally just rather take hose and coil it up on a couple long bolts. for about 2 to 3 foot diameter loops. when the reel and hose gets tangle and hose will not go back on the reel = fighting it. when i know i need length you pull and pull off a reel. rather just grab a couple loops off some bolt/s / hanger and toss on ground, or hand feed the loops out of one hand, as i walk given distance around stuff.
J2) prefer garden hose for spot sprayer hose. the softer rubber hoses like radiator hoses = a mess. the get a little water on them, then you rub pants, sleeves hands on them, and you end up getting rubber marks all over.

K) plumbing....
inlet on pump -> filter micro screen -> (1) TEE ->
(1) TEE -> valve -> tank
(1) TEE -> valve -> actual drain line. -> put a garden hose connector or like on end. so you can hook up hose and run it were ever (less mess)

---above serves following = less bulkhead fittings on tank, less leaking, allows you to suck water from tank or suck fluid from tires to drain tractor tires, or suck water/chemicals from a bottom or 5 gallon bucket or like.

outlet on pump -> (2) TEE -> (3) TEE -> (4) TEE -> (6) TEE -> (7) TEE
(2) TEE -> valve -> quick connect / garden-hose -> spray wand / spot sprayer gun
(3) TEE -> valve -> (5) TEE -> mixing wand/tank cleaner (what is inside the tank with holes in it)
(4) TEE -> pressure relief valve -> (5) TEE
(6) TEE -> LEFT boom + nozzles
(7) TEE -> middle boom + nozzles
(7) TEE -> right boom + nozzles

---the pressure relief valve and tee's for it, by passes given valve for mixing wand inside tank. this is only needed for PTO pumps. 12v on demand pumps do not need this.
---add extra TEE valve if wanting another hand wand/gun.

==========

cost of manufactured 12v on demand sprayers, can be costly, but the drain ports, mixing wand, manhole in top, placing of valves can be easier than a DIY setup. fittings can be rather costly once you hit local hardware store and price begins going from 50 bucks to couple hundered bucks plus for all the misc fittings.

Tanks can be cheap. if you need more capacity tank wise. buy a prefab sprayer that will run your boom length. then get a couple extra fittings and some hose. to connect extra tank to prefab setup.

if you are only going to run sprayer once or twice every couple times in a few years to deal with acerage. just deal with smaller tank size and smaller boom. for tossing cash away on larger setup that will be ackward and heavy mess to deal with, for smaller jobs. i get by with 35 gallon drum spray rig. ya i refill tank up a 2 to 4 times. but generally it lets me mix/match amount of water /chemical for what i need to get the job done. vs wasting a bunch of chemicals and leaving in a tank that i have no use forth till next year, or a couple months from now if at all needed till next year.
 
   / Building a 12V Herbacide Sprayer #9  
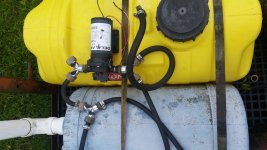
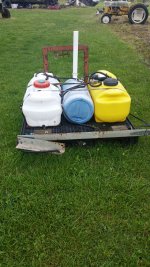
Here is My Spray Rig, they are 25 gal, 12v pump, mounted on a plastic pallet. It is attached to a cheap carryall that I had, so just hook and spray. The blue barrel is Soapy Rinse Water. Dandelions are Yellow, so I put my "good Bye Juice" in the Yellow sprayer and use the white tank for "Bug Off Juice", for my fruit trees and garden.

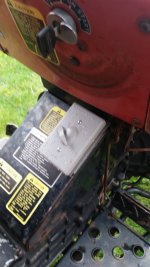
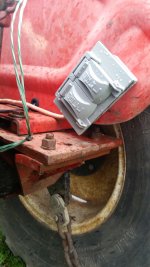
Ok, so I put a 120 electrical plug on the 12v wiring, I plug it into the covered 120 box on the fender. I turn the sprayer on and off with the switch box under the dash, which is wired to the battery, works great.

You can see the Gated Garden Wye's mounted on the pump, one on intake and outlet. Open the line to the dandelion tank and it sprays "No Grow Juice" thru the 6' folding boom or thru a hand wand or both. It is set up so I could spray both Herbicide or Pesticide at the same time. Then when I'm done spraying, I close the gate to the poison tanks and open the line to the Blue Tank and spray Soapy Water to clean the system out.

The only problem I have is with the 12v pumps drawing moisture and rusting and locking up. Then I have to take them apart and clean the insides and keep going till they just refuse to work, then buy a new pump. As a Farm Fertilizer truck driver, I Know how Hard these chemicals are on stuff.

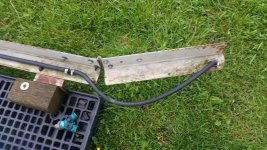
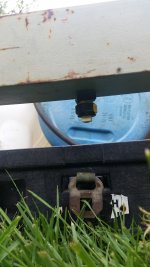
The boom is a piece of 3" angle iron with holes drilled for the nozzles, it has 5 nozzles all together. A bungee cord holds the boom extension open and folded up. I bought all the parts at my local farm store, T.S.C.

sprayer plug in.jpgsprayer system.jpgSprayer shut off.jpgsprayer boom.jpgsprayer boom 2.jpgsprayer tanks.jpgsprayer nozzle.jpg

Hope you can get some ideas out of this and anybody else that needs a good Spraying Rig....

Smokin'
 

Attachments

  • sprayer system.jpg
    sprayer system.jpg
    7.1 MB · Views: 285
   / Building a 12V Herbacide Sprayer #10  
the plumbing cost for DIY = expensive. little fitting there, and here... and it begins adding up very quickly.

many folks DIY pond filters for ponds, and below searches should bring back a few things that cross over directly to a spray rig.
google "55 gallon sand and gravel filter site:koiphen.com" without quotes
google "55 gallon SG filter site:koiphen.com" without quotes
google "SG filter site:koiphen.com" without quotes
click up on images after search.

A) different type of bulkhead fittings.
A1) uniseals = awesome, check diy pond websites / koi dealers. more likely to find uniseals. drill hole a little smaller than uniseal, insert uniseal, take a dremal sanding disc to end of pipe and con the outside edge a little bit, toss some vasaline or like on end of pipe. and push it through. some folks have needed a piece of wood and tow strap to crank down and get pipe to fight through uniseal.
A2) 1.5" to 3" shower drains, to 3" to 4" toliet flanges can also work as nice bulkhead fittings for tanks.
A3) using electrical threaded fittings as a bulkhead sch40/sch80 plastic 1" or larger. would caution against this. not enough "lip" of fittings for spray rig via vibrations to stay put IMHO (in my humble opinion)
A4) EXCEPTION to A3 electrical metal conduit water tight fittings. they come with a rubber washer. and can be nice for smaller size bulkhead fittings 1.5" and smaller

B) how to create a spray bar / cleaning wand. in Sand and gravel filters folks push in air into the filters to boil the water and rock and sand to clean the filters. for a sprayer. this would be the mixing wand / cleaning wand inside the tank.
B1) drill press + 2x4 with V notch in it, plus clamps. and small drill bit = easy way to make spray bar)
B2) drill 2 holes through tank (at same level) on each side of tank. stick pipe through both holes. the pipe inside tank = 2 rows of spray holes pointed up (45 degrees off pointing straight up) think a yard sprinker. one end of pipe (on outside of tank) place end cap, and other side of pipe hook to pump.

C) accessing tank through top.
C1) do not cut the entire top out of tank. if you do cut entire top out. tank will flex and bend about. leave a lip and only cut out center of tank/drum.
C2) 4" toliet flange with either a test plug or rubber end cap can make for a nice manhole with lid. for accessing top of tank.

D) valving
D1) stay away from pvc / plastic valves. they are hard to turn. and the more expensive fully port valves are extremely expensive.
D2) go with metal valves, example brass quarter (1/4) turn on/off valves. example natural gas or LP gas valves generally are 1/4 turn valves. they have cheaper versions.

E) pipe
E1) stay away from sch 40 and/or sch80 pvc or like plastic pipe for plumbing if possible. it may seem strong, but that is until you begin hitting bumps and everything vibrating, and then CRACK / BUST. suggest only to use for manhole / spot in top of tank were not pipe or like connected.
E2) use metal pipe or hose when possible. it will last longer through vibrations
E3) stay with same size inlet pump size for what ever is connected to inlet side of pump, and stay with size for outlet side of pump for what ever is on onlutet side of pump. with suggestion of going up 1/4" larger than what pump inlet/outlet has. do not go up much larger or less. specifically draining tank. do not go smaller or you have issues with not enough GPH / pressure from pump.

F) pump
F1) PTO pump = hand wand / spot spraying = trouble some and needing a more costly "pressure relief valve" when you want to use a hand wand that turns on/off as you squeeze the trigger.
F2) 12v on demand pump = pressure sensor built normally into the pump. so much easier to use and less costly for spot spraying. pending on size of pump and boom nozzles they can run a few feet of booms.

G) hand wands / spot sprayer wands/guns
G1) have found the wands that let you add on the cheap plastic 2 to 3 feet extends to the nozzle preferable. generally use any were from 2', 4',6', 8' total length. ya the cheap plastic extensions bend and bow. but are light weight. if you written your name with pee in snow/dirt. or ran a weed whacker/trimmer. the cheap extensions wave/fan back and forth with a little shake. allowing for spot spraying a larger area a bit easier. and helps get the nozzle were you want it vs bending over, or being up close and personal and peeing into the wind and having spray come back on you.
G2) having an exchangeable "tip" for the nozzle has been beneficial. from watering plants in garden to flowers, to spot spraying fence lines to bushes in pasture.
G3) prefer using cheap smaller diameter garden hose as spot sprayer wand hose. so i can add/remove 10 to 20 feet at a time as needed.

H) boom sprayer nozzles
H1) get something with a little filter in it and a little valve with ability to switch different tips. have caught a lot of little crud in the filters (easy pull out filter, wash and put back in), and the little valve lets you get all the nozzles spraying the same vs nozzles nearest to pump spraying the most. and nozzles furthest away (end of boom) spraying very little).

I) place everyone on a pallet
I1) pallet lets you raise tank up off floor and actually install a drain line to fully empty tank / clean it out
I2) if you have pallet forks (enough said)
I3) if you have a cherry picker / engine lift or like. you can put in some eye bolts. and have lifting points to pick up everything
I4) it is advised to mount / support all piping / hoses and more so Tees and valves. less likely breaking / cracking / bending.

J) spot sprayer wand hose
J1) personally do not like any sort of automatic or crank hose reel. personally just rather take hose and coil it up on a couple long bolts. for about 2 to 3 foot diameter loops. when the reel and hose gets tangle and hose will not go back on the reel = fighting it. when i know i need length you pull and pull off a reel. rather just grab a couple loops off some bolt/s / hanger and toss on ground, or hand feed the loops out of one hand, as i walk given distance around stuff.
J2) prefer garden hose for spot sprayer hose. the softer rubber hoses like radiator hoses = a mess. the get a little water on them, then you rub pants, sleeves hands on them, and you end up getting rubber marks all over.

K) plumbing....
inlet on pump -> filter micro screen -> (1) TEE ->
(1) TEE -> valve -> tank
(1) TEE -> valve -> actual drain line. -> put a garden hose connector or like on end. so you can hook up hose and run it were ever (less mess)

---above serves following = less bulkhead fittings on tank, less leaking, allows you to suck water from tank or suck fluid from tires to drain tractor tires, or suck water/chemicals from a bottom or 5 gallon bucket or like.

outlet on pump -> (2) TEE -> (3) TEE -> (4) TEE -> (6) TEE -> (7) TEE
(2) TEE -> valve -> quick connect / garden-hose -> spray wand / spot sprayer gun
(3) TEE -> valve -> (5) TEE -> mixing wand/tank cleaner (what is inside the tank with holes in it)
(4) TEE -> pressure relief valve -> (5) TEE
(6) TEE -> LEFT boom + nozzles
(7) TEE -> middle boom + nozzles
(7) TEE -> right boom + nozzles

---the pressure relief valve and tee's for it, by passes given valve for mixing wand inside tank. this is only needed for PTO pumps. 12v on demand pumps do not need this.
---add extra TEE valve if wanting another hand wand/gun.

==========

cost of manufactured 12v on demand sprayers, can be costly, but the drain ports, mixing wand, manhole in top, placing of valves can be easier than a DIY setup. fittings can be rather costly once you hit local hardware store and price begins going from 50 bucks to couple hundered bucks plus for all the misc fittings.

Tanks can be cheap. if you need more capacity tank wise. buy a prefab sprayer that will run your boom length. then get a couple extra fittings and some hose. to connect extra tank to prefab setup.

if you are only going to run sprayer once or twice every couple times in a few years to deal with acerage. just deal with smaller tank size and smaller boom. for tossing cash away on larger setup that will be ackward and heavy mess to deal with, for smaller jobs. i get by with 35 gallon drum spray rig. ya i refill tank up a 2 to 4 times. but generally it lets me mix/match amount of water /chemical for what i need to get the job done. vs wasting a bunch of chemicals and leaving in a tank that i have no use forth till next year, or a couple months from now if at all needed till next year.

BOGGEN..........I'm thinking You have Way to Much Time on your Hands.......Holy Cow....Love your "Books"....lmao
 

Tractor & Equipment Auctions

2016 Ford Explorer AWD SUV (A42744)
2016 Ford Explorer...
2015 Chevrolet Silverado 1500 Pickup Truck (A42744)
2015 Chevrolet...
2017 INTERNATIONAL LF687 (A45046)
2017 INTERNATIONAL...
2017 FORD F-350 (A45333)
2017 FORD F-350...
2015 TYRSOL PNEUMATIC TRAILER (A45333)
2015 TYRSOL...
Heavy-Duty 4-Wheel Rolling Warehouse Cart  74in x 32in (A44789)
Heavy-Duty 4-Wheel...
 
Top