jeff9366
Super Star Member
- Joined
- Jan 14, 2011
- Messages
- 12,787
- Tractor
- Kubota Tractor Loader L3560 HST+ ~~~~~~~~~~~~~ 3,700 pounds bare tractor, 5,400 pounds operating weight, 37 horsepower
If you are considering the acquisition of a Disc Harrow, first read this LINK covering Disc Harrow selection:
LINK: Disc Harrow Selection For 18-45 Horsepower Tractors (Revision 2b)
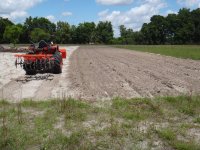
The Three Point Hitch mounted Tandem Disc Harrow is a secondary tillage implement. The Disc Harrow is a form of tiller, most efficient mixing and smoothing soil in long runs, i.e. fields. The goals in harrowing are mixed soil and a smooth bed behind the implement.
Primary tillage implements are mostly plows: most often traditional Moldboard Plows, less often Disc Plows (which are NOT Disc Harrows). The primary purpose of plowing is to invert the upper 6" to 8" of soil, bringing nutrients to the surface, burying sod, weeds and the remains of previous crops; encouraging decomposition. Plow goals are distinct from Tandem Disc Harrow goals.
Other primary tillage implements are Offset Discs, and Chisel Plows. Primary tillage implements should break sod in a single pass.
Light tractor implements pressed into service for sod breaking include Subsoilers, Middle Busters, (aka Potato Plows) and Field Cultivators. None flip/turn/invert sod like a plow.
Convention: I call Disc Harrow 'discs', "pans".
When you take delivery of a new Tandem Disc Harrow from a common carrier, you will receive it mal-adjusted. To save space Disc Harrows are shipped with the gangs collapsed inward, to minimize shipping width.
So, to start, mount the Disc Harrow on your tractor's Three Point Hitch, raise the implement with your hydraulic control to float all pans above the ground, PLACE BLOCKS TO SUPPORT HARROW BOX FRAME SO FRAME CANNOT DROP, loosen gang hangers, usually U-bolts, and slide the gangs out/wider along the frame. Usually, thumb pressure will suffice. As the paint ages and dust accumulates, spray lube helps overcome stickiness and a soft-blow mallet helps overcome inertia.
FRONT GANGS, which are the CUTTING GANGS, throw soil OUT, and should be fairly close together. You do not want an untilled center strip between the left/right front gangs. Neither do you want the inside pans of the two gangs to collide when tractor bucks over rough ground.
(Very large Disc Harrows sometimes have an optional Middle Buster shank, center mounted after the front gang, to disturb soil between two front gangs.)
REAR GANGS, which are SMOOTHING GANGS, throw soil IN, are set wider apart. Rule of thumb for initial spacing between rear gangs: Diameter of rear pans, less two inches. So a rear gang with 18" pans should be trial-set with 16" space between the inner pans on the right and left rear gangs. The rear gangs collect soil. The widest point on an operating Disc Harrow will be rear collecting and smoothing gangs.
Level Disc Harrow left-to-right, adjustment via 3-Pt. (threaded) right Lifting Rod.
The FRONT GANGS are the CUTTING GANGS. Increasing pan angles and increasing weight/pressure on the front gang will increase front gang's ability to cut. Draft force resistance to the tractor increases as pan angles increase.
To increase pan angles, slacken retainers and move gangs on center pivot to increase 'V' angle/angle of attack. As either front or rear gangs are adjusted more aggressively, its working width decreases.
To increase weight/pressure on front gangs, shorten the Top Link, which raises the rear of the Disc Harrow, shifting weight from the rear gangs to the front gangs. (Some rear gang weight is transferred to the Disc Harrow front gang, some weight is transferred to the tractor's front and rear tires through the 3-Pt Lower Links, increasing traction.) It is possible to shorten the Top Link until the rear gangs are lifted entirely above the soil. However, start with a weight distribution of around 55% front, 45% rear.
Output of the front gangs is input to the rear, smoothing gangs. So if front gangs are set very aggressively the input received by the rear smoothing gangs will be large lumps and the output bed behind the implement will be less than smooth.
The REAR GANGS are SMOOTHING GANGS. Start with the rear pans set two increments less aggressively than the front pans. Shortening 3-Pt. Top Link decreases weight on the rear gang. As the rear gang is a long distance from the 3-Pt., a half-turn adjustment of the Top Link will make a difference. Modify angle of attack of rear gangs as necessary. If you have "outrigger" furrows trailing the outboard pans of the rear gang, slightly lift entire Disc Harrow, perhaps one inch, with hydraulic control.
Too much rear pan angle will cause too much 'return' soil to be thrown in the center, leaving a low swell in the field. This is aggravated if the rear gang hangers are set too narrow. The rear gangs should collect from a wider swath than the front gangs, as the center space between the rear gangs is wider. The widest point on the implement should be the outer dimension of the rear gangs.
The goal in harrowing is a smooth bed behind the implement.
For good soil mixing a Disc Harrow must be pulled at brisk speed, so soil is thrown in and out vigorously. Pulled too slowly, soil falls off the pans and does not mix. Pulling a Disc Harrow as wide, or wider than tractor tire width, aggressively adjusted, will remind you to engage tractor 4-WD.
During second pass lengthen Top Link to shift weight 40% front gang, 60% rear gang, increasing implement float.
If you decide to make multiple passes, steer tractor at 45 degree angles, preferred to 90 degree angles, on successive passes. (Because of bias angle on Disc Harrow pans.)
Do not over till.
LINK: Disc Harrow Selection For 18-45 Horsepower Tractors (Revision 2b)
The Three Point Hitch mounted Tandem Disc Harrow is a secondary tillage implement. The Disc Harrow is a form of tiller, most efficient mixing and smoothing soil in long runs, i.e. fields. The goals in harrowing are mixed soil and a smooth bed behind the implement.
Primary tillage implements are mostly plows: most often traditional Moldboard Plows, less often Disc Plows (which are NOT Disc Harrows). The primary purpose of plowing is to invert the upper 6" to 8" of soil, bringing nutrients to the surface, burying sod, weeds and the remains of previous crops; encouraging decomposition. Plow goals are distinct from Tandem Disc Harrow goals.
Other primary tillage implements are Offset Discs, and Chisel Plows. Primary tillage implements should break sod in a single pass.
Light tractor implements pressed into service for sod breaking include Subsoilers, Middle Busters, (aka Potato Plows) and Field Cultivators. None flip/turn/invert sod like a plow.
ADJUSTING THREE POINT HITCH MOUNTED, BOX FRAME, TANDEM DISC HARROWS
Version 1
Version 1
Convention: I call Disc Harrow 'discs', "pans".
INITIAL ADJUSTMENT OF A NEW TANDEM DISC HARROW
When you take delivery of a new Tandem Disc Harrow from a common carrier, you will receive it mal-adjusted. To save space Disc Harrows are shipped with the gangs collapsed inward, to minimize shipping width.
So, to start, mount the Disc Harrow on your tractor's Three Point Hitch, raise the implement with your hydraulic control to float all pans above the ground, PLACE BLOCKS TO SUPPORT HARROW BOX FRAME SO FRAME CANNOT DROP, loosen gang hangers, usually U-bolts, and slide the gangs out/wider along the frame. Usually, thumb pressure will suffice. As the paint ages and dust accumulates, spray lube helps overcome stickiness and a soft-blow mallet helps overcome inertia.
FRONT GANGS, which are the CUTTING GANGS, throw soil OUT, and should be fairly close together. You do not want an untilled center strip between the left/right front gangs. Neither do you want the inside pans of the two gangs to collide when tractor bucks over rough ground.
(Very large Disc Harrows sometimes have an optional Middle Buster shank, center mounted after the front gang, to disturb soil between two front gangs.)
REAR GANGS, which are SMOOTHING GANGS, throw soil IN, are set wider apart. Rule of thumb for initial spacing between rear gangs: Diameter of rear pans, less two inches. So a rear gang with 18" pans should be trial-set with 16" space between the inner pans on the right and left rear gangs. The rear gangs collect soil. The widest point on an operating Disc Harrow will be rear collecting and smoothing gangs.
Level Disc Harrow left-to-right, adjustment via 3-Pt. (threaded) right Lifting Rod.
FIELD ADJUSTMENT OF THE TANDEM DISC HARROW
The FRONT GANGS are the CUTTING GANGS. Increasing pan angles and increasing weight/pressure on the front gang will increase front gang's ability to cut. Draft force resistance to the tractor increases as pan angles increase.
To increase pan angles, slacken retainers and move gangs on center pivot to increase 'V' angle/angle of attack. As either front or rear gangs are adjusted more aggressively, its working width decreases.
To increase weight/pressure on front gangs, shorten the Top Link, which raises the rear of the Disc Harrow, shifting weight from the rear gangs to the front gangs. (Some rear gang weight is transferred to the Disc Harrow front gang, some weight is transferred to the tractor's front and rear tires through the 3-Pt Lower Links, increasing traction.) It is possible to shorten the Top Link until the rear gangs are lifted entirely above the soil. However, start with a weight distribution of around 55% front, 45% rear.
Output of the front gangs is input to the rear, smoothing gangs. So if front gangs are set very aggressively the input received by the rear smoothing gangs will be large lumps and the output bed behind the implement will be less than smooth.
The REAR GANGS are SMOOTHING GANGS. Start with the rear pans set two increments less aggressively than the front pans. Shortening 3-Pt. Top Link decreases weight on the rear gang. As the rear gang is a long distance from the 3-Pt., a half-turn adjustment of the Top Link will make a difference. Modify angle of attack of rear gangs as necessary. If you have "outrigger" furrows trailing the outboard pans of the rear gang, slightly lift entire Disc Harrow, perhaps one inch, with hydraulic control.
Too much rear pan angle will cause too much 'return' soil to be thrown in the center, leaving a low swell in the field. This is aggravated if the rear gang hangers are set too narrow. The rear gangs should collect from a wider swath than the front gangs, as the center space between the rear gangs is wider. The widest point on the implement should be the outer dimension of the rear gangs.
The goal in harrowing is a smooth bed behind the implement.
For good soil mixing a Disc Harrow must be pulled at brisk speed, so soil is thrown in and out vigorously. Pulled too slowly, soil falls off the pans and does not mix. Pulling a Disc Harrow as wide, or wider than tractor tire width, aggressively adjusted, will remind you to engage tractor 4-WD.
REASONS TO CHANGE DISC HARROW ADJUSTMENT IN THE FIELD.
More Aggressive
Crop residue or field has not been broken or soil is hard: Adjusting the front/rear gangs to more aggressive settings may increase pan penetration, however tilled ground will be relatively rough. Increasing gang angles will make the Disc Harrow pull harder so tractor may require a lower gear. (Typical wild game food plot scenario.)More Aggressive
Less Aggressive
With each pass of the Disc Harrow tilled ground is softer, so tractor and pans sink deeper, increasing draft force. Tractor may stall out or not be able to pull Disc Harrow at 4-5 mph, to mix soil. Decreasing front/rear gang angles will decrease draft force, allowing tractor to pull Disc Harrow faster and leaving a smoother finish, to a certain degree. Lifting the entire implement via hydraulic control will decrease draft force on tractor.During second pass lengthen Top Link to shift weight 40% front gang, 60% rear gang, increasing implement float.
If you decide to make multiple passes, steer tractor at 45 degree angles, preferred to 90 degree angles, on successive passes. (Because of bias angle on Disc Harrow pans.)
Do not over till.
Last edited: