Backhoe 758C Broken pin on swing cylinder

   / 758C Broken pin on swing cylinder #1  

pikewrench

Member
Joined
Dec 2, 2016
Messages
37
Location
Soddy Daisy. TN
Tractor
NH TC40A
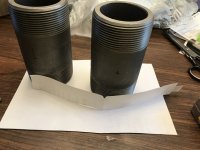
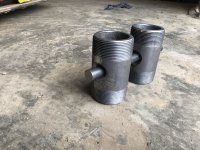
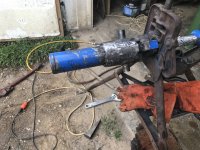
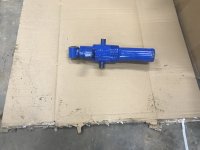
I discovered that the top pin on the right swing cylinder on this backhoe had sheared into and that it appears that it happened some time in the past. I have looked for parts and even a new cylinder but it appears that this cylinder along with the bucket cylinder have been discontinued for this model. I am not sure if this pin is pressed into collar that circles the cylinder or if is part of that collar. The pin mics out at just slightly under 1". but looking at the break it looks like it may be cast or duct iron. I have considered cutting a section of the collar off since it is welded to the cylinder body and drill the pin out and replacing it with a new piece, but am hesitant. I am looking for someone that has made this repair for input or a part number for a new cylinder.
 
   / 758C Broken pin on swing cylinder
  • Thread Starter
#2  
I contacted Rhino, who manufactured this unit. This cylinder they supplied to four manufacturers. The cylinder is obsolete and have combed the net and also looked for similar units from other manufacturers. I did get a design sheet for this cylinder. I thought about welding it, but-am afraid of damage to the cylinder with all that heat. I have sent it to a machine shop to have a hole milled out to press a new piece of 1inch round stock back in. When I get it back I will decide whether to run a small bead of weld to it.
 
   / 758C Broken pin on swing cylinder #3  
Do you have any pictures of the broken pin?
 
   / 758C Broken pin on swing cylinder
  • Thread Starter
#4  
Do you have any pictures of the broken pin?

I meant to take some, but forgot to take a camera/iPad down to the shop. My shop is half underground and have no phone reception so I leave it at the house. The area in the collar was dished out where the rod sat, but it had a center ridge and the pin had a corresponding center cut. The broken metal area looked granular like cast, but I ran both a stick and heliarc bead across the face of the pin with no problem.
 
   / 758C Broken pin on swing cylinder #5  
Hope your fix lasts much longer than this one did, which it should.
 
   / 758C Broken pin on swing cylinder
  • Thread Starter
#6  
Got the cylinder back today from the machine shop. The original post are part of the collar. They milled the broken post out down to the cylinder wall and made a new pin several thousands larger so that they pressed in for an interference fit. The fact that it goes to cylinder wall and has the collar walls and the weld of the collar should be all this needs. Thought about putting a tig pass on, but have decided against it after I looked at it. Did discover that the bottom post is slightly bent and found the bushing a little oval shaped. Everything bolted back together without any problems. May consider doing the bottom post the same way if I change the bushings. The worse these cylinders see is when my wife buries the unit in the mud(last time you could change all 4 tires without a jack) and I have to get it out. Cost at a local machine shop was 125.00 for the fix.
 
   / 758C Broken pin on swing cylinder #7  
Glad to learn your back running!
 
   / 758C Broken pin on swing cylinder
  • Thread Starter
#8  
Wife was using the backhoe and apparently the bolts that hold the top bar came loose and dropped off. The result was on the repair cylinder that had been milled it elongated the hole making a repair not possible. It also sheared the bottom trunnion. The cylinder on the other side broke the bottom trunnion.
So I thought about how this could be fixed and measured the cylinder and it was 2.63” with paint. Got to looking and thinking that 3” schedule 120 or 160 might be close. Turns out that schedule 160 has an ID 2.61 and can be easily made larger with a flapper wheel as the interior is not smooth. Order 2 -3x6 schedule 160 nipples and a 1” rod 12” long. Order came in today From Zoro. Laid out two center points 180 degrees out on each nipple. Drill a one inch hole at each point an beveled around each whole for welding.
I‘ll weld each one with the rod going thru both holes and cut the rod out after it is welded out And weld/wash the ends with a heliarc rig. Once you trim it to fit and that the trunnion center points are approximately 4.5” from the end cap you will need to cut a section out of the side so this can be slide on into position. The cut piece needs to be big enough to clear the square oil port on the cylinder. I plan on welding that piece back in place. You will need to remove the end and the rod prior as it will not fit over the end of the rod. I plan on keeping the replacement longer than original and use 3 or 4 1” welds on each end to weld it to the cylinder. Planning on keeping cylinder full of old anti freeze during cylinder welding.
With that said, I not covered the hard part and that being the removal of the old trunnion. I will probably use my plasma cutter to shave it down a then use a large side grinder to remove the rest. The cylinder is thin and can be easily damaged with a chisel or by cut off grinding wheels.
Here are two pictures of my progress. Should weld the two out tomorrow and will post pictures as this develop.
 

Attachments

  • 3FAA38F5-57B2-47A0-B415-642D4EE3A74F.jpeg
    3FAA38F5-57B2-47A0-B415-642D4EE3A74F.jpeg
    1.9 MB · Views: 150
  • F420E94D-F1E8-4FA7-B239-F12BFA14A512.jpeg
    F420E94D-F1E8-4FA7-B239-F12BFA14A512.jpeg
    2.5 MB · Views: 135
   / 758C Broken pin on swing cylinder
  • Thread Starter
#9  
Got the two nipples and rods welded today after a late start. Cut 7/8” off one end and put an 1 1/4” notch so that it will slide around the oil port (Picture 2). 180 from the notch I cut two grooves with a grinder down the length of the nipple. This 1 1/2 cut and removal of the side of the nipple will allow this piece to be slid into position (Picture 1). This piece will be welded back into place. I didn’t get to cut the rod out of the inside of the nipple as I found my oxygen cylinder empty. The second nipple will have these cut with a torch. The great thing about this is that there is enough material to weld on if needed in the future. Most of you have found that welding on the original trunnion is really not a good choice.
 

Attachments

  • 603F644E-76AC-438A-96F2-E54876A30071.jpeg
    603F644E-76AC-438A-96F2-E54876A30071.jpeg
    3.1 MB · Views: 130
  • F0DEE7E0-4744-49BB-97BD-D7EA174E464F.jpeg
    F0DEE7E0-4744-49BB-97BD-D7EA174E464F.jpeg
    3 MB · Views: 130
   / 758C Broken pin on swing cylinder
  • Thread Starter
#10  
Today I worked on just one unit and if you attempt this and buy pipe that is foreign made, have the inside of the nipple turned on a lathe to 2.64”. The made in Mexico nipple I bought were a bit wavy internally and did not really notice until I cut the side out of it. I literally spent a lot of time with a ball file, I still ended up pressing it on. The second one will go to a machine shop on Monday. There needs to be only one cut to go pass the oil ports and you need to shorten the cut off piece to maintain the 4.5 inches from the end of the head. I two passed the weld to replace the cut out piece. Put four one inch welds at each end (1 pass). Ground the sharp edges off the threads and did general clean up. It looks ugly because of the size of the nipple, but it provides one hell of a heat sink if you need to do a weld repair in the future. Grinding the old trunnion off is time consuming but a new metal wheel on my big grinder helped a lot. Had a small 4 1/2” grinder to do the clean up. You’ll need to square up the rod weld with a large file to ensure a washer will set flat. 1” thrust washers were .79 at a local Ace Hardware. Paint hides a bit of the ugly. Waiting on a new seal kit and have to install all new bushings before this one get installed.
 

Attachments

  • 139522E4-4878-4EAE-9E24-39D3B67A2B68.jpeg
    139522E4-4878-4EAE-9E24-39D3B67A2B68.jpeg
    2.3 MB · Views: 146
  • 1EF5791A-9324-4777-A2AC-45D3676681DD.jpeg
    1EF5791A-9324-4777-A2AC-45D3676681DD.jpeg
    2.5 MB · Views: 138
  • FBB4A8BC-CF41-4B00-9244-3D75C066432E.jpeg
    FBB4A8BC-CF41-4B00-9244-3D75C066432E.jpeg
    1.7 MB · Views: 127

Tractor & Equipment Auctions

2013 CASE 580N BACKHOE (A50458)
2013 CASE 580N...
UNUSED KJ 7' X 20' METAL FARM DRIVEWAY GATE (A50460)
UNUSED KJ 7' X 20'...
RIDE AND DRIVE INFO (A50775)
RIDE AND DRIVE...
2016 Ford Explorer AWD SUV (A48082)
2016 Ford Explorer...
2011 Terex Fuchs MHL340 Wheeled Material Handler (A49346)
2011 Terex Fuchs...
Pallet Fees (A50775)
 
Top