Rebar chair spacing.

/ Rebar chair spacing. #1  

wedge40

Veteran Member
Joined
Oct 8, 2007
Messages
2,197
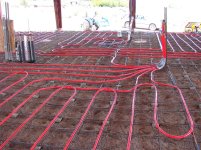
Getting stuff together for cement pour. 40'x56', 5" thick, 3/8" rebar on 1' spacing. How far apart can I space the chairs.

Wedge
 
/ Rebar chair spacing. #2  
With 3/8" bar and the activity of them walking all over the bar as they pour, I'd say you need the chairs at about 2' max along the bar. If you want to be sure there will be no significant bending during the pour, you'll have to go closer.

If you have a grid with the bar on 1' centers, running both ways, put the chairs under just the lower bars and offset on each one, or staggered. I'd try it with the 2' OC layout, staggered, and step on it to see if you are satisfied.
 
/ Rebar chair spacing.
  • Thread Starter
#3  
With 3/8" bar and the activity of them walking all over the bar as they pour, I'd say you need the chairs at about 2' max along the bar. If you want to be sure there will be no significant bending during the pour, you'll have to go closer.

If you have a grid with the bar on 1' centers, running both ways, put the chairs under just the lower bars and offset on each one, or staggered. I'd try it with the 2' OC layout, staggered, and step on it to see if you are satisfied.

Thanks John, that's exactly what I was looking for. I was afraid I was going to get some nebulous answer. I can purchase for 18" along one way and should have more then enough.

Wedge
 
/ Rebar chair spacing. #4  
Ya dont use too many or the concrete flowing into the slab will just knock them out of position and float them away cause there is not enough weight on them to hold them in place.
 
/ Rebar chair spacing. #5  
Have you bought the rebar yet? Two years ago when I built the slab for my garage it was cheaper to buy 1/2" than 3/8". I'm not sure if that's still the case now.
 
/ Rebar chair spacing. #7  
My contractor tied the chair with that very type of handle and ties. They worked decent however he put them on 2' OC and in some areas near the intersection points I noticed that the weight of the rebar was crushing the chairs. I went back in and had to add some more chairs in strategic spaces.

My guy was trying to skimp in places though. He didnt want to cut shorter pieces of rebar so he took several bent t-post that i had laying nearby and threw them in instead. Of course i didnt know about this until my wife told me AFTER the pour.
 
/ Rebar chair spacing. #8  
My guy was trying to skimp in places though. He didnt want to cut shorter pieces of rebar so he took several bent t-post that i had laying nearby and threw them in instead. Of course i didnt know about this until my wife told me AFTER the pour.

Don't you just love contractors that borrow your tools and supplies! I had a basement repair job and they borrowed my wheelbarrow, 1/2" Milwaukee 18v drill, and several metal chairs.

You should have done another pour and put the contractor in.
 
/ Rebar chair spacing.
  • Thread Starter
#9  
No haven't bought the rebar yet. 3/8" can only be found at Menards and IT IS cheaper then 1/2" I'm going order the pex and manifolds today. Hope to have the company I order from do a basic layout. Got a couple of places I need to work around. I want to have everything set and ready for a 2 post lift in the future.

Wedge.
 
/ Rebar chair spacing. #10  
wedge,

Here are a few pix that might help you with your radiant layout. it's just common sense. I've found it counter productive when a PEX or manifold supplier tries to give or sell you a layout. A few basic rules to follow and a bit of thought will get you what you want. It's much better for you to design it, and understand it, than it is for an unexperienced guy to do a roll out design from his office, for you.

Figure out the number of loops you want and don't let the supplier tell you how many. In the pictures you'll see I ran 3/4" PEX on 12" centers over most of the area. You might want 1/2" tubing which is more common, I don't know.

Also, I used concrete dobies under my bar. They tie to the bar with tie wire that comes sticking out of them.
 

Attachments

  • DSC00485.jpg
    DSC00485.jpg
    397.7 KB · Views: 4,850
  • DSC00506.jpg
    DSC00506.jpg
    375.3 KB · Views: 6,786
  • DSC00568.jpg
    DSC00568.jpg
    359.4 KB · Views: 2,147
  • DSC00448.jpg
    DSC00448.jpg
    373.2 KB · Views: 1,969
  • DSC00559.jpg
    DSC00559.jpg
    493.4 KB · Views: 2,123
  • DSC00509.jpg
    DSC00509.jpg
    390 KB · Views: 1,279
/ Rebar chair spacing. #11  
Another thing about PEX layout, if you plan on bolting anything to the slab, you have to know where that can be done without putting a hole in the PEX. I am thinking of things like a floor model drill press, bench grinder pedestal, work bench, large air compressor, etc.
 
/ Rebar chair spacing. #12  
Another thing about PEX layout, if you plan on bolting anything to the slab, you have to know where that can be done without putting a hole in the PEX. I am thinking of things like a floor model drill press, bench grinder pedestal, work bench, large air compressor, etc.

Lots of photos and an accurate bar schedule helps you come back in later to determine where you can drill. Plus, of course, some thought before you do the layout. But the future bolting schedule can certainly change. Mine changed as I added equipment, a stairway, moved a wall and added more work benches.

Another thing is to fire up the system in the area you are concerned about and search for the heat. Feel with your hands to establish where the warmest spot is and then which way the warmth is running. "Look" carefully with your hands. Mark that line with a crayon. With photos, measuring and establishing the heat tracks, you can be confident where to drill. Don't ever assume the tubing is at a certain depth.
 
/ Rebar chair spacing. #13  
if you dont want to buy chairs, you can simply use concrete pavers and break them up. They alot more solid, they dont sink, and the are cheaper.
 
/ Rebar chair spacing. #14  
if you dont want to buy chairs, you can simply use concrete pavers and break them up. They alot more solid, they dont sink, and the are cheaper.

Yeah, that will work. Dobies are better because they can be tied directly to the rebar. If the ground is not perfectly level, and is it ever?, dobies can allow for it by being different thicknesses. You can always add some broken pavers, assuming you have some laying around, here and there for extra support or where the ground is way off.

Just be sure to put them only under the lower bars.
 
/ Rebar chair spacing.
  • Thread Starter
#15  
Raspy, thanks for the photos. I've been doing some of the layout on my own. Included is a photo of what I have so far. Not sure what I had posted earlier, but I'm using 3/8" rebar on 12" centers and the pex will be placed on 12" centers. In the photo there are two room in the upper right. The first will be easy to lay out but the second is a bathroom and it will have a toilet and shower that I will need to work work around. I'm think of using only two loops on the right 1/3 where the rooms are located with the pex running vertical instead of horizontal like on the right. Between loops 1 and 2 there I have an area I'm going to work around for a 2 post lift in the future. I will frame this out special and have the cement about 8" think for these two pads.

Wedge
 

Attachments

  • Layout_NoFixtures.jpg
    Layout_NoFixtures.jpg
    356 KB · Views: 475
  • Basic Layout.jpg
    Basic Layout.jpg
    352.3 KB · Views: 316
Last edited:
/ Rebar chair spacing. #16  
Wedge,

Let's be sure we are talking the same language here. I define a loop as one run of tubing from the manifold and back. A zone is an area controlled by a thermostat. It can have any number of loops. Some rooms might have more than one loop, but the loops should be set up to only heat one area. In other words, a given loop only heats one room, but runs of tube, to and from that room, can travel through common areas. That's the way you show yours and that is good. then you can balance the flow to adjust the heating level in all the various areas. Bedrooms can be cooler than kitchens and warmer than storage rooms, etc. If you use 1/2" PEX make your maximum length 300'. 3/4" can be 500' max. Or mix and match for different areas. A bathroom might have 1/2" tube on 6" centers with 150 linear feet, and a shop might have 3/4" tube on 12" centers with 400 linear feet. Try to make all loops about the same length if practical, or near the same restriction with different diameters. If you have a small room with a 150' loop, do the larger rooms with (2) 150' loops, etc. Once you get this more or less worked out you will know what manifold to get. A manifold with one more set of outlets than you plan is a good thing because you can add one more loop or make a short crossover from out to in for stabilizing the flow and temp.

No need to run the tubing under any cabinets. Keep it 10" or more in front of the toilet pipe, no need to go behind it. Don't put it under the refrigerator. Closets are optional. Pantries are optional. Be sure to put it where your feet will be in any office spaces or work stations near machinery. Be sure it is in pathways. Run the tubing into and out of each room by going through the door, if possible. This frees you up to drill under floor plates and it makes a warm path through the door for walking.

Try to arrange the bar or the tube so you can run the tube along with the upper bar.

Hold the heat back about 1' from the inside of exterior walls.

Near exterior doors you can make an extra pass at 6" and you should also keep the spacing closer in the bathroom.

Route your supply line along the outside wall first and then make your runs across the room that came back and "touch" the feed line as they do their U bend. See it in my pictures.

You can run your sup and ret lines to a given room side by side, or siamese them, as you pass through a common area to get to your destination room. The siamesed lines can run on 12" centers with other paired lines.

Pass the PEX through PVC conduit 90s to enter and exit the slab. 3/4" for 1/2" PEX and 1" for 3/4" PEX.


You seem to show two manifolds. Why?
 
/ Rebar chair spacing.
  • Thread Starter
#17  
John we are on the same page. I know the difference between a loop and zone. I've been told/read that you should have zone for each area you want to have at different temps. I would like the rooms in the upper right side of the photo to be able to be adjusted separately from the main area. I have been trying to keep the loop lengths to as close to 300' as possible. The lower right open area will be a wood working area so I thought of some sort of sliding door thing to separate that area from the main garage area. I do plan on using all 1/2" pex and right now I will have two manifolds One 8 port and one 4 port. Like said I really just want to get the pex and manifolds ordered for now so I can get it layed out prior to the cement being poured. I live in central Indiana so lately a large candle might heat the garage :D, but once the cement is poured you can't go back and place the pex. I've been dreaming of this barn for years and now that it's started I want to do it right.

I do appreciate the comments and experience.
PS I've added a basic layout of the final design.

Wedge
 
Last edited:
/ Rebar chair spacing. #18  
Wedge,

Bear with me if I'm being too specific.

You do not need a thermostat, which is a zone, for each area you want at a different temperature. For instance, you might have a kitchen and a dining room on one thermostat, but run the two rooms at different temps by balancing the flow to give you a proportional difference. One would lead the other by a few degrees. But you'd want separate thermostats in the bedroom and kitchen because they have different schedules and different heating characteristics. The manifold will have balancing valves that adjust the flow in each loop. This gives the proportion. More flow means higher temps in that loop area. More time means higher room temperature. A thermostat will control a group of loops or a whole manifold that represents a zone.

You can make different rooms, that are running on the same thermostat, run at different temps. That is why I'm being so specific about your design. Do you need more than one thermostat? How will you control the various groups of tubes?

If you want more than one stat, you can still have one manifold if you control the individual loops with telestats. This gives the best flexibility and means you can switch rooms to other thermostats with a very simple wiring change.

The maximum number of loops per manifold is usually 12. More than that will mean another manifold.

Remember, 300' is a recommended max for 1/2". Shorter is better.

Looking at the pix I sent, you'll see I went with 3/4". This is not normal, but means fewer loops, more tube area per sq. ft. of floor and a much more durable tube than 1/2", to get you through the pour without damage. You might consider it.
 
/ Rebar chair spacing.
  • Thread Starter
#19  
John I understand and do appreciate the details. I want to have two area's heated at different temps or maybe even the same temp at different times. I did a quick look at the difference between 1/2" and 3/4" pex and it was significant.

Wedge
 
/ Rebar chair spacing. #20  
What's the verdict on in-slab thermostat heat sensors? I know my thick slab, the few times I have tried it, will overshoot considerably from the air temp sensed by the thermostat mounted on the wall reading air temp.
 
 
Top