My first of many Retaining Walls to tame my slope - DIY

   / My first of many Retaining Walls to tame my slope - DIY #31  
   / My first of many Retaining Walls to tame my slope - DIY #32  
The Geotextile 'fabric' that is recommended by the manufacturer is more of a plastic mesh than a fabric. I am not doing this as I am staying within the 4ft limit of a gravity wall with a 6 degree set back dictated by the block design. I will however in other walls probably need an 'engineer's stamp' to be legal. The pisser here is that I am an engineer, just not licensed in Washington. Oh well.. a second opinion on design is never a bad thing!

I am compacting the 3/4in clean crushed stone because this is per the block manufacturer install specs! Once compacted there is still plenty of drainage potential. The compacting I assume will help alleviate any settling and shifting that might occur until the surrounding soil reaches equilibrium states (summer/winter).

Not to be argumentative... but I am not understanding your logic about 3/4in 'holding' the most amount of water. If the drain below will carry the water away, it will theoretically be able to drain faster as there is more voids... right?

Poor explanation on my part-my reference to 3/4 holding more water I guess is more applicable to say a leech field design-note I made reference to the water "dropping" to the perforated pipe.

Also my thinking on the filter fabric vs. a grid is that the fabric -I think- will let water pass but will not allow sand to migrate-which if it does eventually ends up at the bottom of the wall diminishing the ability of the pipe to move water.

Just a thought:laughing- and I flunked out of CE and had to switch to Bus.Adm! So for sure, my comments with a grain of salt:laughing:
 
   / My first of many Retaining Walls to tame my slope - DIY #34  
Great views. A couple of things to keep in mind for the remainder of this first of many walls. I say the following having done my retaining wall twice now over a number of years, both times with assistance of landscaping contractors. I can't say what the spec is for your specific brand block, but the ones I used require anchoring them with a least one block's depth into the ground below grade. Since you are way too far along to do that now, you may want to consider driving some rebar deep into the ground in front of your bottom course to just at or slightly above grade and then cover same with plantings or more crushed stone so they remain invisible.
Don't know what your frost potential is in your area but if it is a real factor then I would want to make sure your drainage is excellent around the entire wall, sides, top and at each course.
I would start, since you have a hoe to use, as close to the hill next time. Dig along side where the wall is going to be placed and disturb as little of the hill material as possible. As you bury your first course and possibly more, depending on slope and wall height, to keep the wall from being able to kick out, make sure you use water to fill each block after placing your stone in it to help it settle out most fines and to allow you to fill the blocks if more stone is needed. I'd lay fabric over the stone used as backfill too so when you add soil fill it will not jam the stone with dirt.
As to the dilemma to how to tie sides into the bank, does your manufacturer sell curved blocks for this purpose?
Mine does and my blocks are held in by plastic pins which go into pre-formed holes and then the curved blocks can be rotated slightly to allow for gradually formed curves in any direction, like you see in one of the pics someone posted of their landscape wall.

I'm hoping for the best for you and this wall. Get the plate compactor. You're going to be glad you did. It is an essential tool for this work.
BTW I'd also run some drain tile directly out from the center of your next wall at the drain's level by adding a 't', so path of flow is that of least resistance.
 
   / My first of many Retaining Walls to tame my slope - DIY
  • Thread Starter
#35  
Great views. A couple of things to keep in mind for the remainder of this first of many walls. I say the following having done my retaining wall twice now over a number of years, both times with assistance of landscaping contractors. I can't say what the spec is for your specific brand block, but the ones I used require anchoring them with a least one block's depth into the ground below grade. Since you are way too far along to do that now, you may want to consider driving some rebar deep into the ground in front of your bottom course to just at or slightly above grade and then cover same with plantings or more crushed stone so they remain invisible.
Don't know what your frost potential is in your area but if it is a real factor then I would want to make sure your drainage is excellent around the entire wall, sides, top and at each course.
I would start, since you have a hoe to use, as close to the hill next time. Dig along side where the wall is going to be placed and disturb as little of the hill material as possible. As you bury your first course and possibly more, depending on slope and wall height, to keep the wall from being able to kick out, make sure you use water to fill each block after placing your stone in it to help it settle out most fines and to allow you to fill the blocks if more stone is needed. I'd lay fabric over the stone used as backfill too so when you add soil fill it will not jam the stone with dirt.
As to the dilemma to how to tie sides into the bank, does your manufacturer sell curved blocks for this purpose?
Mine does and my blocks are held in by plastic pins which go into pre-formed holes and then the curved blocks can be rotated slightly to allow for gradually formed curves in any direction, like you see in one of the pics someone posted of their landscape wall.

I'm hoping for the best for you and this wall. Get the plate compactor. You're going to be glad you did. It is an essential tool for this work.
BTW I'd also run some drain tile directly out from the center of your next wall at the drain's level by adding a 't', so path of flow is that of least resistance.

Hey Coyote... thanks for the great reply and tips. Yes I am nervous about this first wall. I am feeling okay about drainage and we don't get hard frost here in the Seattle area. Rarely below 30 degrees here... maybe 25 degrees at lowest. Our climate is relatively mild compared to the rest of the US. I am concerned about the compaction. I could have done better and am thinking of spending $500+ on a HF compactor... as much as I hate to buy a one trick pony tool. Love to find a used one.

Yes, do plan to the next wall to be as close as possible to the undisturbed soil.

I will backfill a little in front of the bottom row but I know that isn't as good as starting below cut grade.

The water fill idea in the blocks is a great idea I think. I should have done that. I suppose I still could pour it down through the top course (six) and see what kind of settling I get. I have laid about half of the solid caps but they are easily flipped up to get access to the block holes at the top. Granted too late to do it right though. What do you think?

Again thanks! I have lots of pictures and progress to post but I have to do my day job too! Stay tuned...
 
   / My first of many Retaining Walls to tame my slope - DIY #36  
I have laid about half of the solid caps but they are easily flipped up to get access to the block holes at the top. ...

Dragon - this brings something else to mind - are you planning on gluing caps/blocks in place as well? I remember when I had to move some of the caps, the contractor had glued them all down ....there is special landscape block glue for this. I also did it on my portion. Adds more rigidity, but I think moreso they can be a falling/tripping hazard if not secured. (caps mostly)


Frank
 
   / My first of many Retaining Walls to tame my slope - DIY #37  
I would do whatever you can to compact the stone in the blocks as possible at this stage. Good that you don't get solid freeze thaw cycles like here in N. England.
Add the water and see if you can get any more stone into what's accessible. Definitely use block caulk to adhere the caps in place- it does add a holding factor and safety too. I'd also call the block manufacturer and ask them what else you could do to make sure the wall stays up- they might have some ideas to help.
I wouldn't sweat the cost of the compactor; consider the amount of time, blood sweat and tears in the process of construction as the cost offset. You deserve the compactor to get it done right!:thumbsup:
 
   / My first of many Retaining Walls to tame my slope - DIY
  • Thread Starter
#38  
Dragon - this brings something else to mind - are you planning on gluing caps/blocks in place as well? I remember when I had to move some of the caps, the contractor had glued them all down ....there is special landscape block glue for this. I also did it on my portion. Adds more rigidity, but I think moreso they can be a falling/tripping hazard if not secured. (caps mostly)


Frank
Yeah I do plan to glue them down. I think I will Coyote's advice and see I can't get anything to settle first. I think I will run a compactor over the top of them. These caps are also heavy. Solid 4in by 18in by 12in with a 'rabbit' on the bottom front to catch the lip on the top of the blocks. Allan Blocks are engineered very nice.
 
   / My first of many Retaining Walls to tame my slope - DIY
  • Thread Starter
#39  
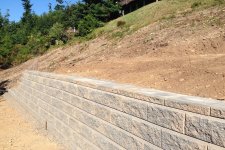
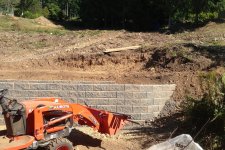
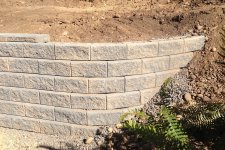
Okay I am not finished but it is always those last few details that take the longest! Here are a few more pics. I curved one end (to the right) into the hill and the other end which will meet up with my path that I cut to get down the hill, will have a couple of terraces (two block high) to create little stepped planters. Caps are still loose and I think I will do a little more compacting/filling before finishing them off. I also realized that when I decided to curve the ends and make the stepped planters, I just created a bunch more work. Now I will have to cut the caps for the curves! :eek:

I guess that means a diamond blade for my circular saw, eh? And a vibratory plate... $$$ I can't justify the daily rental if I do a few more days of wall building and I have weeks or months if I do all I want to do.

IMG_3338.jpg IMG_3340.jpg IMG_3337.jpg

Overall I am pretty happy with my first attempt and the amount of work I was able to do with my BX with BH and Piranha tooth bar added to the bucket. If you look close in the background you can see the cut for my next retaining wall. I have learned a lot from the first one, for sure.
 
   / My first of many Retaining Walls to tame my slope - DIY #40  
It looks like a very nice wall. What I'm not understanding is what is it for? Are you wanting to use the land above it so you can have a level spot? Erosion? Or is it for the land in front of it?

Eddie
 

Tractor & Equipment Auctions

2021 Snake River 14K Dump Trailer (A49461)
2021 Snake River...
2018 Generac MLT6SM-STD3 6kW Towable Light Tower (A49461)
2018 Generac...
2022 Case IH Steiger 470HD AFS Connect Quadtrac 4WD Tractor, (A50657)
2022 Case IH...
3014 (A50657)
3014 (A50657)
2021 John Deere R4038 Self Propelled Sprayer (A50657)
2021 John Deere...
2015 VOLVO ECR88D (A50854)
2015 VOLVO ECR88D...
 
Top