Step 19: Paint.
Okay, so it's been, what, 4 months since I posted an update? Sorry for my procrastination. I really HAVE been working on the barn this whole time, but I have to admit progress has been a little slower since June. The slowdown is mostly attributable to the fact that the horses are now living in the barn. This means that there's a little less pressure to get things done, since it's already functional, but more importantly it also means that I have to do most of my drilling, hammering, sawing, and sundry other loud activities only in the morning when the horses are out in their pastures.
That being said, I figure it's high time for another progress report. I've been working on many, many little things that don't really show much (for example, the tracks for the bottoms of the exterior sliding doors, lights in the wash rack, a wall-mounted AC unit, etc.), but the biggest thing lately has been painting. It's not completely done yet, but it's probably 75% of the way there.
The whole painting endeavor was going to be my wife's contribution to the project, and she insisted that we shouldn't spend the money on a new paint sprayer and that my little 1-quart HVLP sprayer would be too much of a pain to constantly refill. Plus with all the overspray we'd run the risk of getting paint on all the nice varnished wood work inside the barn, and we'd spend a fortune on all the extra paint that we sprayed into the air. To be honest, I think she's just a lot more comfortable with rollers and brushes. At any rate, that's the route she chose to take: rolling and brushing. I didn't care too much either way because I figured it would be her doing all the work. WRONG! I'm still scratching my head as to how it happened, but lately I realize that somehow I've been roped into doing a whole lot of it myself.
Anyway, the rolling part goes pretty quickly, but we have to use an ultra-thick-nap roller (1 1/4" nap!) because the T1-11 surface is so rough, and it sucks up the primer and paint like it's going out of style. I didn't keep count, but we've probably used 20-25 gallons of primer so far for ~2500 square feet of wall. I think that's only around 20-25% of the coverage we should be getting out of each can. That T1-11 has some serious surface area! At least once the primer is on and dry, the surface seems to be much less porous, and the subsequent coats of paint go fairly quickly.
The roller works great for all the flat surfaces, but it won't get into the grooves in the T1-11. That means we have to go through with a brush and manually prime and paint all of the grooves. Again, the paint is no big deal, but the primer is a real pain. With all the rough surface area in the grooves, a 4" brush loaded with primer seems to only cover about twelve inches of groove, and it requires many, many passes to make sure the primer completely covers both sides and the bottom. That's a lot of dipping brushes in paint buckets and moving arms in an up-and-down motion to prime and paint grooves from ground to roof every 8".
Priming and painting everything near the ground is tedious but straightforward. Doing all of the surfaces up high is much more of a pain. Once again, however, my tractor has been enormously helpful in this endeavor, as I can stand in the bucket 11 feet off the ground to paint the gable ends. If I stand on the top edge of the bucket, rather than in it, I can get even higher. With everything maxed out I can reach within about 2 feet of the peak of the gables. That means I only have to get on an extension ladder for that one little triangular section on each end. And since I can paint roughly a 10'-wide swath from within the 6' bucket, I only have to move the tractor a few times on each end of the barn. Everything along the long sides of the barn is within about 10' of the ground, so it's easy enough to paint from a 5' step ladder; no tractor is necessary.
The doors are probably the most tedious objects to paint. With all the tight inside angles and relatively small triangular patches of T1-11, there's not much that can be painted with a roller. That means painting the T1-11 with a brush, and that's an enormous pain! It requires mashing the ends of the bristles into the T1-11 repeatedly to make sure paint gets into all the little nooks and crannies. And the grooves are even more of a pain because it's really difficult to get paint into the groove where it meets the edge of a crossbuck. The crossbucks themselves (along with facia, trim boards, etc. on the rest of the barn) are pretty straightforward to prime and paint, since they're much smoother than the T1-11.
In addition to priming and painting, I also had a lot of caulking to do around the outside of the barn. Again the doors were the most time consuming part because of all the places where the edge of a board meets the face of a sheet of T1-11. Plus, the doors were especially in need of caulk because I built all the crossbucks out of 5/4x6" pressure treated deck boards. They worked great at the time, but I greatly underestimated just how green they were when I assembled the doors last winter. By the end of the summer, they had dried out and shrunk so much that there were cracks as wide as 1/4" between many of the boards. It was pretty discouraging to see that after all the work I put into building them so nice and tight. Luckily after caulking and painting, the cracks are remarkably invisible.
We're still deciding ("we" meaning my wife) on the accent color for the crossbucks and (possibly) the corner trim and facia boards. It'll probably be a similar color to the existing paint, but a shade or two darker. We have a candidate to try tomorrow, so we'll see how it looks.
Here are some pictures of the progress:
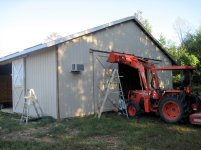
The priming done up high on one of the gable ends.
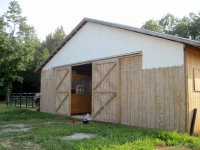
The priming all done and most of the first coat of paint on one of the gable ends.
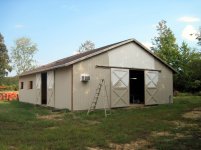
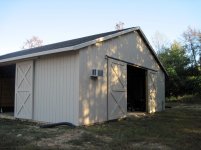
The opposite wall with the AC unit sticking out on the left.
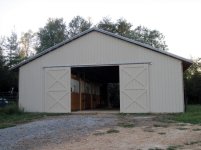
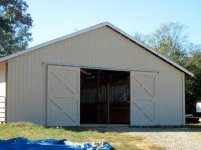
The front of the barn with a full coat of paint.
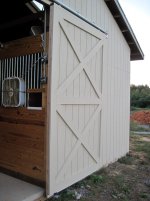
One of the front doors with its first coat of paint. Eventually the crossbucks and perimeter will be a different color.
The wife painting one of the rear doors.
The front of the barn with the facia primed and the post and T1-11 edges covered up with trim on the right corner (I have to temporarily disassemble the paddock fence to do the opposite corner).
The back side of the barn with corner trim installed and the facia boards painted.
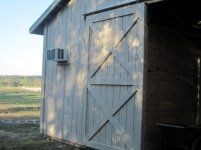
One of the back doors with the AC unit sticking out of the tack room wall and the riding arena in the background.